Tag Archives: breakfast

Recipe: Kouign-Amann Pastries

27 Jan

Like many others, I first learned about Kouign-Amann from watching the Great British Bake Off (Great British Baking Show), marveling at the complexity and apparent deliciousness of this pastry from Brittany. Then I tasted some in San Francisco and Berkeley while visiting my son, daughter-in-law, and daughter — and became a convert. Kouign-Amann is a crispy, buttery, salty/sweet confection that is worth every moment of a weekend day (or two) to make — especially when, as is currently the case for me, there are no such pastries to be had nearby. I start thinking about them in winter when it is harder to be out and about and when the weather lends itself to baking. These pastries are perfect with a cup of coffee or tea as you settle into a cozy inside spot while reading one of the Brittany-based Commissaire Dupin mysteries.

This excellent recipe is from Brown Eyed Baker, though I reduced the sugar slightly and included cinnamon and chocolate chips as optional ingredients. Neither of those are traditional, but each lends something to the pastries. The original version is absolutely delicious, too. Finally, these kouign-amann are individual sized, whereas in Brittany the pastry is more traditionally made in the shape of a caramelized, crispy cake that is meant to be sliced.

Kouign-Amann
Makes 12

For the Dough:
1 c. (240 ml.) water, at room temperature
2 tsp. (3.2 gr.) instant yeast
2.5 c. (355 gr.) all-purpose flour
1 tsp. sea salt

For the Butter Block:
8 oz. (227 gr.) salted butter, chilled and cubed

For the Pastries:
1 1/3 cup (267 gr.) granulated white sugar, divided
1 tsp. (2.6 gr.) cinnamon (optional)
dark chocolate chips (optional)

Directions

Make the Dough:
Combine the water and yeast in the bowl of a stand mixer (or a mixing bowl, if kneading by hand). Add the flour and the salt. Stir with a wooden spoon until a shaggy dough is formed.

Fit the mixer with a dough hook attachment and knead the dough at low speed until the dough is slightly tacky but smooth, 3 to 5 minutes. If the dough sticks to the sides of the bowl, add 1 tablespoon of flour at a time and knead until the dough is smooth. If the dough feels very stiff and dry, add 1 tablespoon of water at a time and knead until the dough is smooth.

Transfer the dough to a clean bowl that has been lightly greased with butter, turning the dough to coat it with butter. Cover the mixing bowl with plastic wrap and let the dough rise until doubled in size, about 1 hour. Once the dough has doubled in size, place it in the refrigerator for at least 30 minutes.

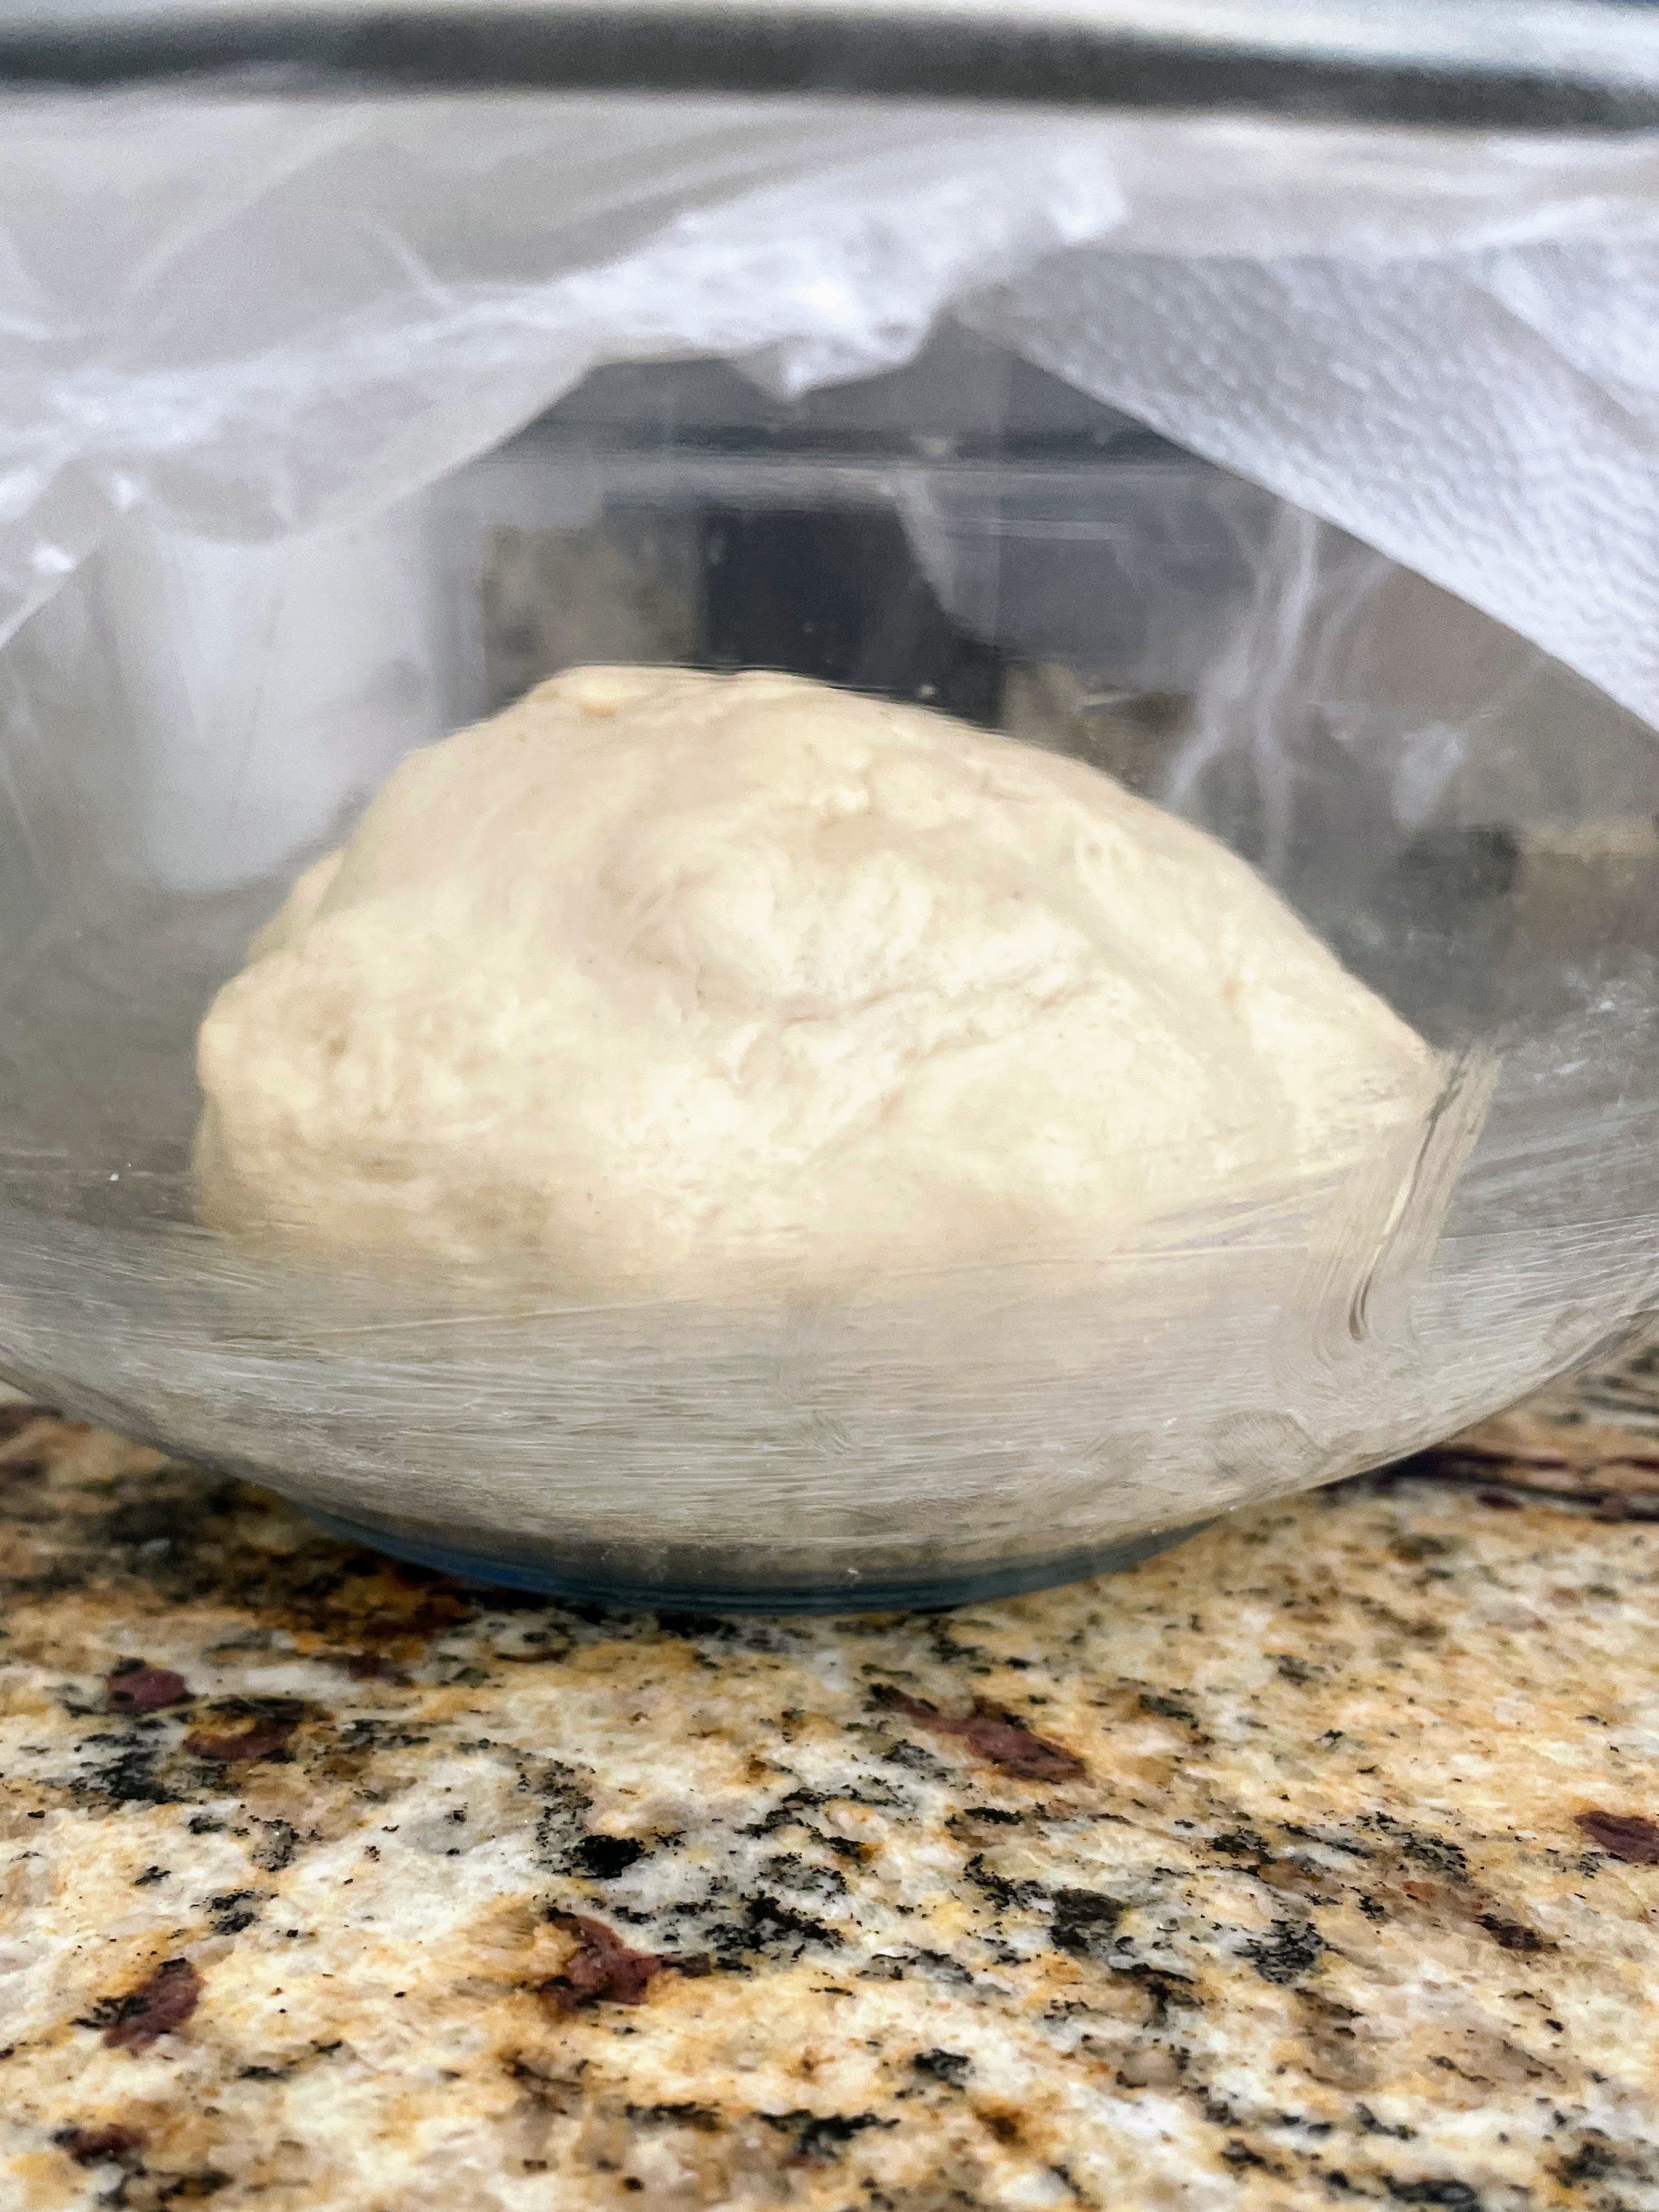
MAKE-AHEAD NOTE 1: At this point, you can refrigerate the dough overnight, then proceed with the recipe.

Make the Butter Block:
Beat the butter on low speed until it’s smooth, about 3 minutes, scraping the beater and bowl as needed to break up the cubes. Turn the butter out onto a piece of parchment paper and shape into a rectangle about 6 x 10 in. (15 x 25 cm.). Wrap the butter in the parchment paper, pressing out any air. Gently roll a rolling pin over the butter packet, pushing the butter into the corners to create a perfect rectangle with even thickness. Refrigerate until firm yet still pliable, about 25 to 30 minutes.

Roll out the Dough:
Place the chilled dough onto a floured work surface and roll into a rectangle 12 in. wide x 20 in. long (30 x 50 cm.). Remove the butter from the refrigerator and place it in the middle of the dough. Fold one half of the dough over the butter, then fold the other half on top, like folding a letter. Roll it out slightly to press the layers together, then fold it again into thirds like a letter.

–Turn #1: Rotate the dough so that the open, narrower edge is facing you. Roll the dough out to a rectangle 12 in. wide x 20 in. long (30 x 50 cm.). Fold the top third down and bottom third up, again like folding a letter. Place the packet of dough on a baking sheet, cover with plastic wrap, and refrigerate for 30 minutes (but not longer as the butter will get too hard).

–Turn #2: Place the unwrapped packet of dough on a floured surface with the open, narrower edge facing you. Roll the dough out to a rectangle 12 in. wide x 20 in. long (30 x 50 cm.). Fold the top third down and bottom third up, again like folding a letter. Place the packet of dough on a baking sheet, cover with plastic wrap, and refrigerate for 30 minutes.

MAKE-AHEAD NOTE 2: At this point, you can wrap the dough in plastic wrap, place in a freezer-safe bag and freeze for up to 2 months. Thaw in the refrigerator overnight, then proceed with the recipe. **If you would only like to make a half batch now (ie, 6 pastries), cut the dough in half, wrap and freeze one half, and proceed with the recipe using the other half. This is my preferred option, as we no longer have a full house of eaters who could polish off 12 pastries in a weekend!

–Turn #3: Place the unwrapped packet of dough on a floured surface with the open, narrower edge facing you. Roll the dough out to a rectangle 12 in. wide x 20 in. long (30 x 50 cm.) [If making half a batch, roll the dough out to 6 x 10 in. (15 x 25 cm.); pinch cut edge closed before rolling]. Sprinkle the entire surface of the dough with 2/3 c. sugar [1/3 c. sugar for half batch], then press lightly to help it stick to the dough. Sprinkle with 1 tsp. cinnamon [1/2 tsp. for half batch], if using. Fold the top third down and bottom third up, again like folding a letter. If any sugar falls out, press it back into the folds. Place the packet of dough on a baking sheet, cover with plastic wrap, and refrigerate for 30 minutes.

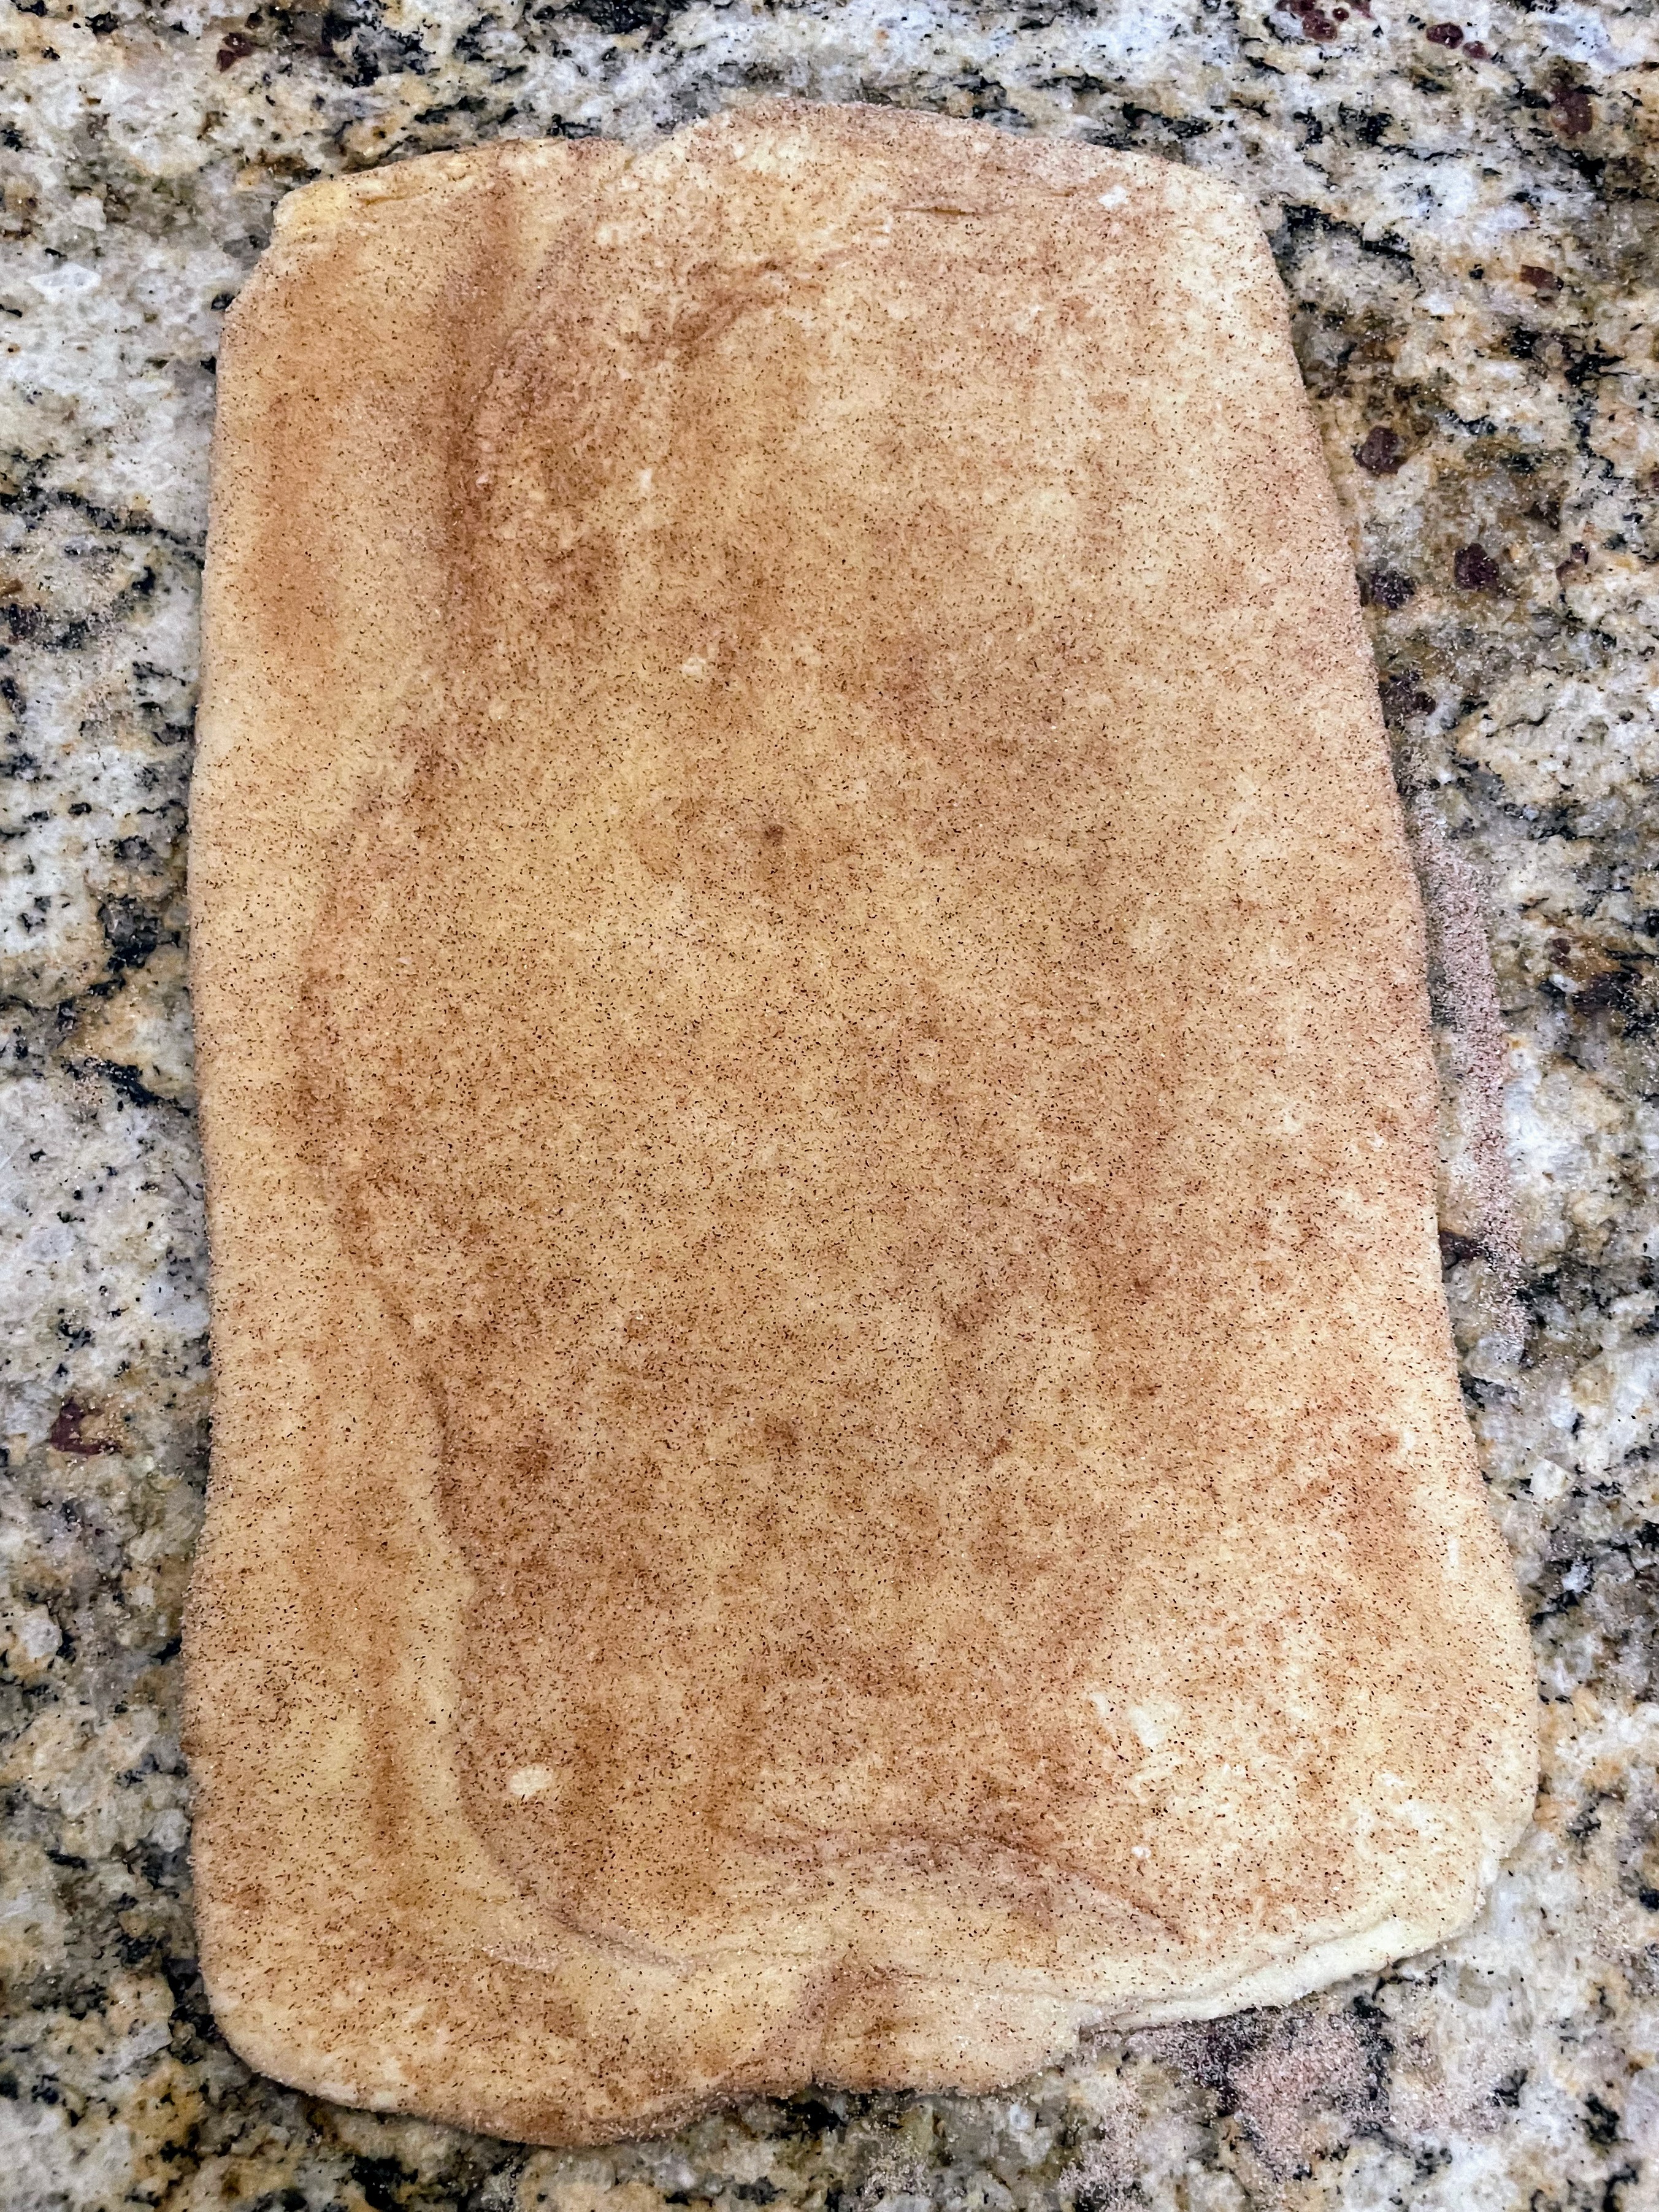
–Turn #4: Place the unwrapped packet of dough on a floured surface with the open, narrower edge facing you. Roll the dough out to a rectangle 12 in. wide x 20 in. long (30 x 50 cm.) [If making half a batch, roll the dough out to 6 x 10 in. (15 x 25 cm.)]. Sprinkle the entire surface of the dough with 2/3 c. sugar [1/3 c. sugar for half batch], then press lightly to help it stick to the dough. Sprinkle with 1 tsp. cinnamon [1/2 tsp. for half batch], if using. Fold the top third down and bottom third up, again like folding a letter. If any sugar falls out, press it back into the folds. Place the packet of dough on a baking sheet, cover with plastic wrap, and refrigerate for 30 minutes.

Prepare the Muffin Tin:
Generously grease the insides of a standard 12-cup muffin pan (or 6-cup muffin pan if making a half batch) with butter. Set aside.

Shape the Kouign-Amann:
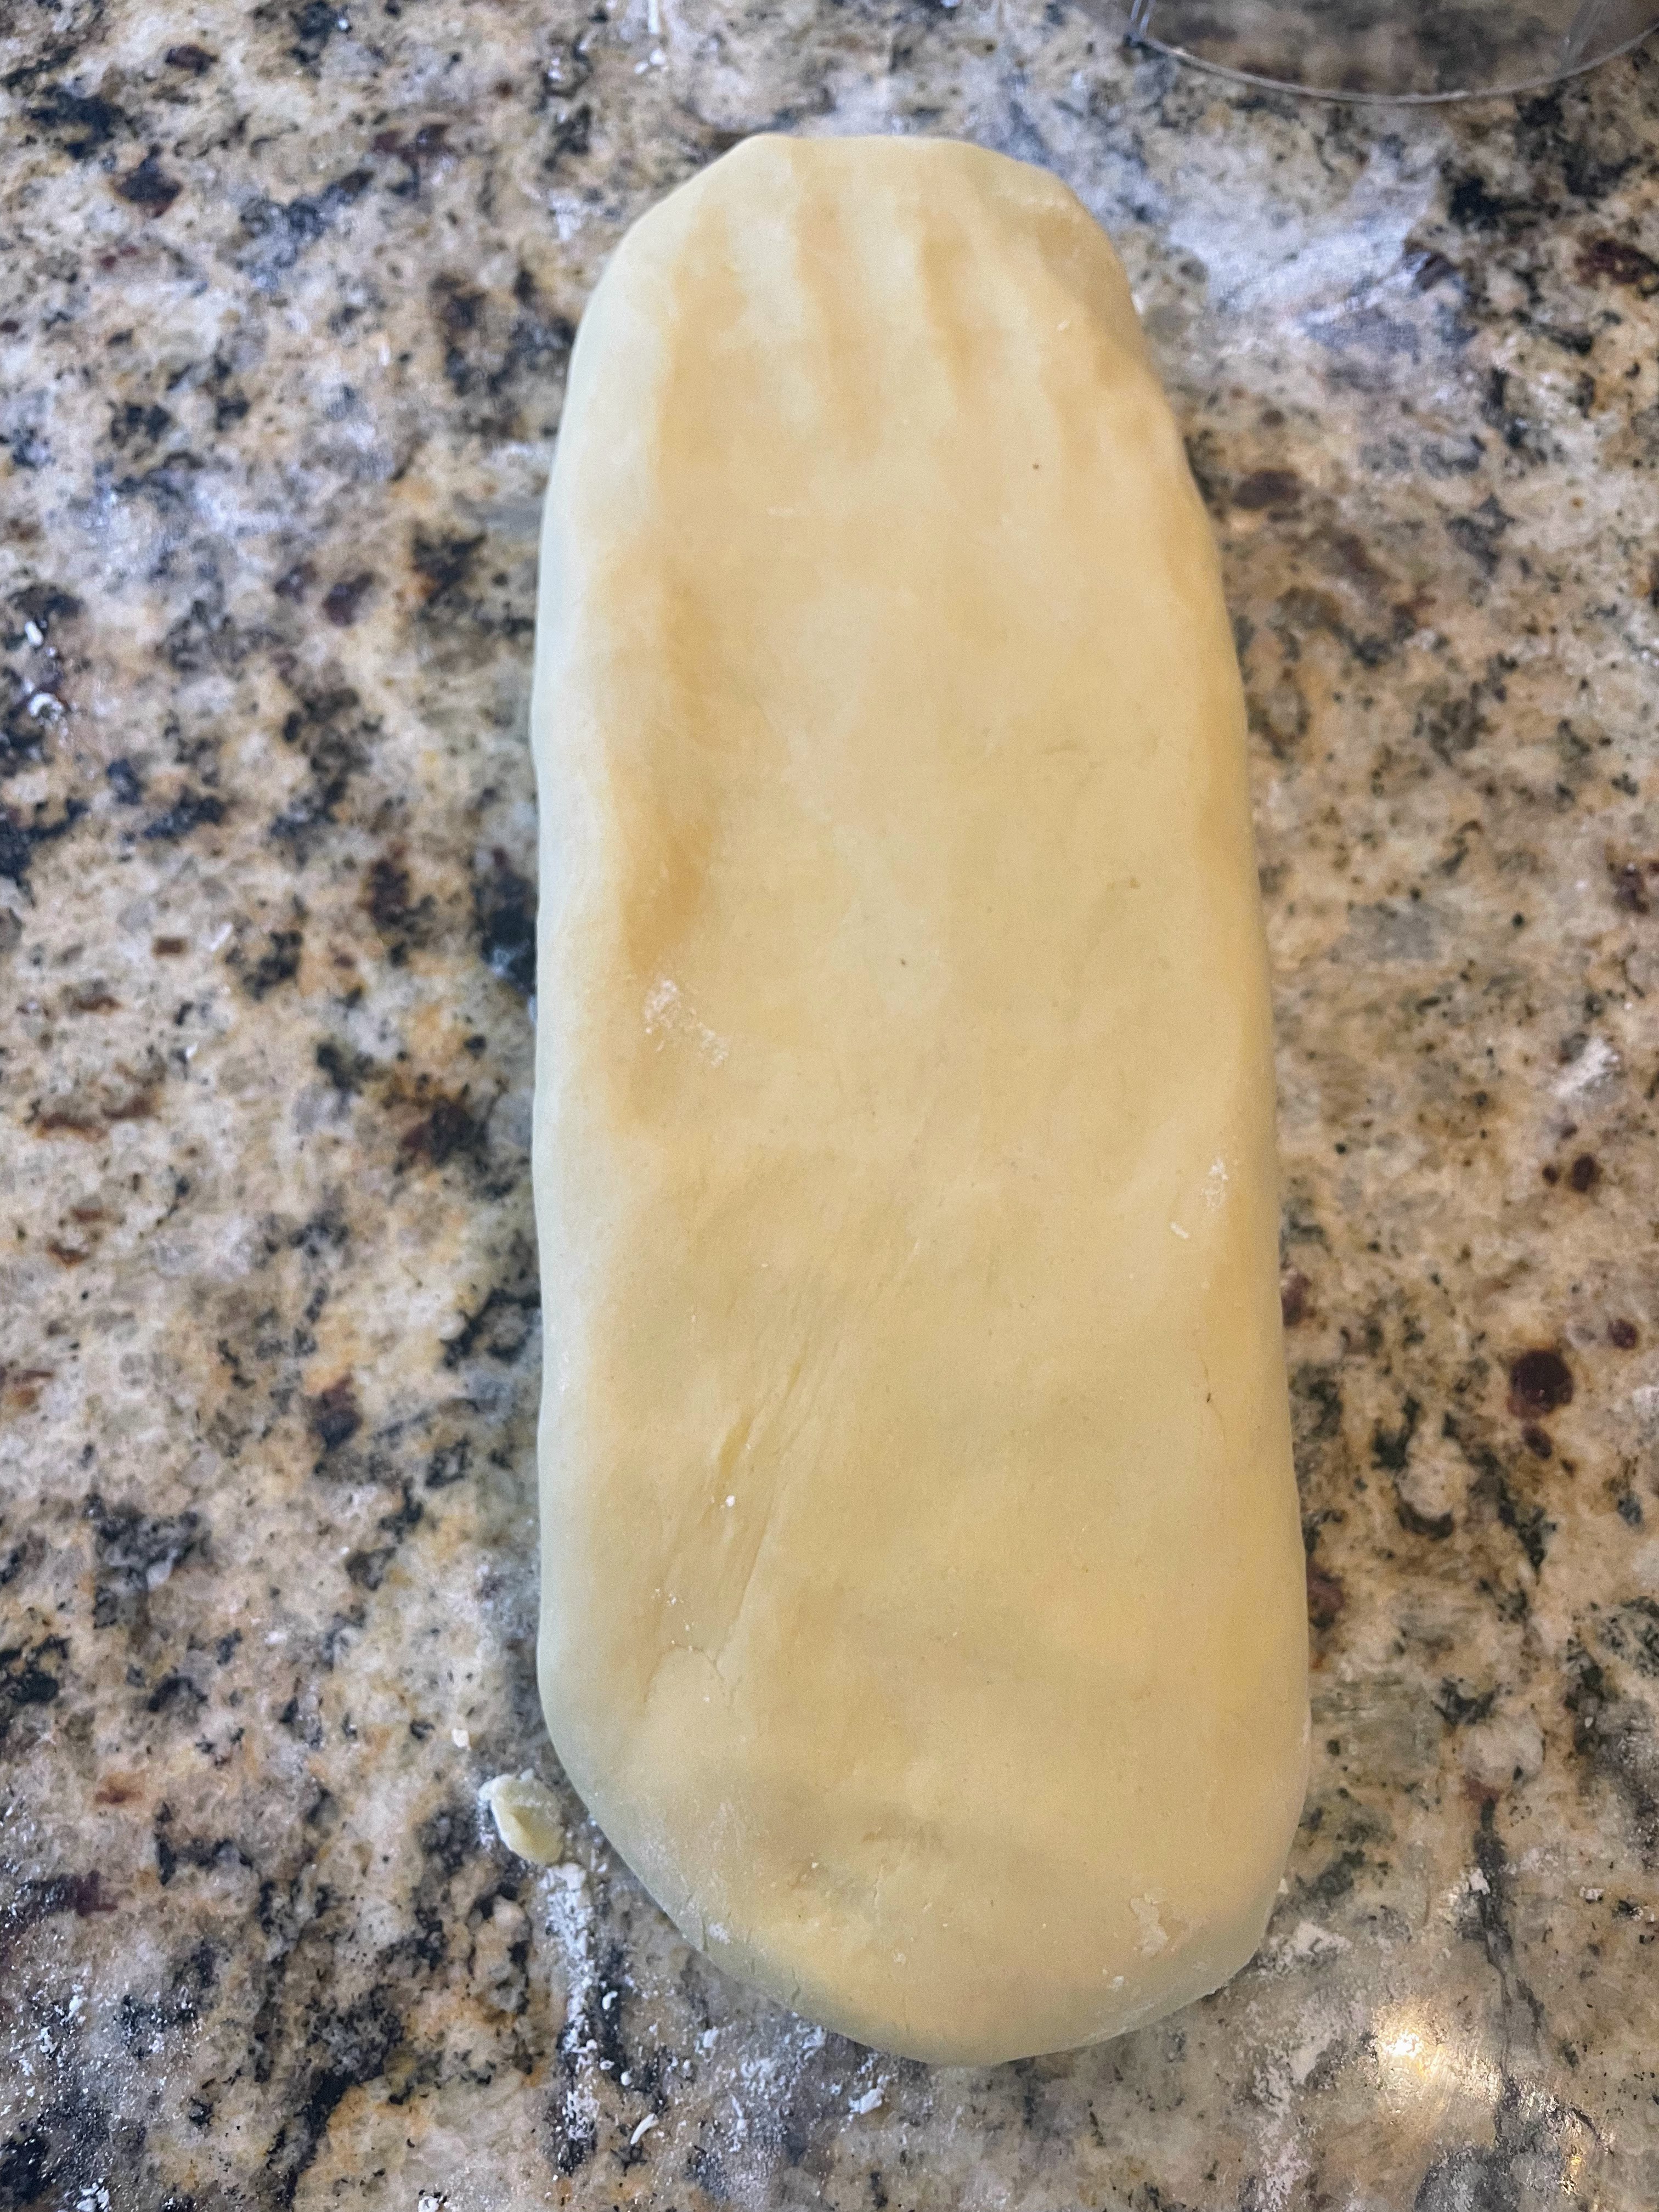
Remove the dough from the refrigerator and transfer it to the counter. Sprinkle a little extra sugar (and cinnamon, if desired) over the top of the dough; pat to press it in. Roll the dough out to a rectangle 8 in. wide by 24 in. long (20 x 60 cm.) [If making half a batch, roll the dough out to 8 x 12 in. (20 x 30 cm.).] Slice the dough down the long side to form two strips that are 4 in. wide. Cut each strip into 4 x 4-in. squares (10 x 10 cm.) to create 12 squares (or 6 squares if making a half batch).

If you are adding chocolate chips, arrange chocolate chips on each square. Note: You want to taste the buttery, salty, sweet pastry, so err on the side of fewer chocolate chips vs more. Fold the corners of each square toward the center. Pick up each pastry and tuck it firmly into the buttered muffin pan.

MAKE-AHEAD NOTE 3: At this point, you can cover the muffin pan with plastic wrap and refrigerate overnight. The next day, allow the pastries to come to room temperature and rise for 1 hour before baking.

Otherwise, cover the pan loosely with plastic wrap and let the pastries rise until slightly puffy, 30 to 40 minutes. Meanwhile, preheat the oven to 400 degrees F (200 C).

Bake the Kouign-Amann:
Set the muffin pan on a rimmed baking sheet, place in the oven and immediately reduce the heat to 350 degrees F (180 C). Bake until the pastries are deep golden brown and tips are very dark brown, 40 to 45 minutes, rotating the pan halfway through baking.

Transfer the pan to a cooling rack and let the pastries stand until they are just cool enough to handle, about 5 minutes. Gently remove them from the muffin pan and set them on the cooling rack to finish cooling completely. The kouign-amann can be served warm or at room temperature.

Final note: The pastries are best served the same day they are made, but you can store them at room temperature in an air-tight container and they will be good for one more day; after that they will get soft. You can also freeze the baked pastries by letting them cool completely, wrapping them individually in plastic wrap, and placing them in a freezer-safe bag; freeze for up to 3 months. Thaw at room temperature or place in a 325-degree F (163 C) oven for 10 minutes.

Recipe: Crostata Ricotta e Visciole (Sweet Ricotta Tart with Cherry Preserves)

17 Dec

Recently, my husband pointed out that we had TWO jars of cherry preserves, TWO jars of fig jam, and an unruly assortment of other jams, jellies, and preserves in the fridge. I was accused of jam overpopulation. I admitted to accidently opening a new jar of cherry preserves (my favorite) without realizing we already had one in the fridge, but I still maintain the other jars were not my fault…. However, in the spirit of providing a solution to this problem, I offered to make a ricotta crostata with what was left in one of the jars of cherry preserves. One less jar in the fridge, and attention diverted to dessert. A win-win.

Actually, a ricotta crostata is always a win-win; the sweet ricotta is beautifully creamy and you can use any preserves or jam of your liking, though the most traditional way of preparing this Italian sweet is with cherry preserves. Second, the dough for this crostata comes together in a food processor, adding speed and ease to the recipe’s many virtues. And finally, a crostata not only makes a great dessert, but a tasty breakfast as well — and a good accompaniment to afternoon tea or coffee.

You can also let your creative side loose on the top crust; I made a very simple (unwoven) lattice with scalloped strips this time around.

Crostata Ricotta e Visciole
Recipe inspired by (and translated from) Antonio Romano Runchef
Note: This recipe is best made using a kitchen scale to weigh the ingredients.

Tart Dough:
225 gr. sugar (about 1 1/8 c.)
grated zest of one lemon
250 gr. butter (2 sticks + 1 tbsp)
120 gr. eggs (I used 3 yolks + 2 whole eggs, carefully adding the white of the last egg until I got to 120 gr.)
1 tsp. vanilla
pinch of salt
500 gr. flour (I used all-purpose; you can also use 00)

Filling:
450-500 gr. ricotta (16-oz. container); I try to find ricotta that is not super wet. Here in the U.S., I like Bel Gioioso Ricotta con Latte. I pour out any little liquid that may have collected in the container and dab the top with a paper towel to remove any extra moisture.
100 gr. sugar

250 gr. cherry preserves (about 3/4 c.)

Directions:
1. Place the sugar and lemon zest in a food processor and pulse until combined.
2. Cut the butter into cubes. (Note: An easy way to cut butter into cubes is to use a bench scraper; cut the sticks lengthwise into quarters, then chop into cubes. ) Add the butter cubes to the sugar in the food processor and continue to pulse until incorporated; the butter will look grainy. Add the eggs and vanilla and process until well combined.
3. Add the flour and sprinkle the pinch of salt over. Process just until a smooth dough forms.

4. Turn the dough onto a floured countertop and roll into a thick log. Pat into a rectangle, wrap in plastic film (or put in a sealable bag) and refrigerate for 2 hours.
5. Meanwhile, butter a tart pan. Make the ricotta filling by mixing the ricotta and sugar together; let it sit, stirring occasionally, until the sugar is fully incorporated.

6. Cut the dough into a 2/3 piece and a 1/3 piece. Return the 1/3 piece to the refrigerator. Roll the 2/3 piece into a circle about 3 inches wider than your tart pan. Carefully drape the dough over the pan, lifting it gently to tuck it into the inner diameter of the pan. If any dough overlaps the edge, press on it to crimp it off. Save the extra dough.
7. Spoon 2/3 of the preserves ( 1/2 c.) over the base of the tart. Carefully add the ricotta mixture, smoothing the top as best as possible. Dollop the remaining preserves across the top of the ricotta mixture and gently swirl.

8. Roll the remaining 1/3 piece of dough into a rectangle at least as long as the diameter of your tart pan. Cut into 10 strips, and lay the strips in a diamond pattern across the top of the tart. (You can also re-use any extra dough you have leftover from lining the tart pan, to make the 10 strips.)

9. Bake the crostata at 170C/340F for about 35 minutes, or until the lattice is golden. Let cool and then serve.

Recipe: Power Smoothie

14 Oct

Sometimes, probably not as often as I should, I feel the need to eat (or drink) something super, extra virtuous. Even better if it’s delicious and quick, too. One signifier of virtuous for me = green, which is why I love this smoothie. It has such a beautiful color. It also has bananas, dates, oatmeal, flax seed, and cinnamon. Mmmmm! Perfect for breakfast, and even as part of lunch. Another bonus; it can be adapted countless ways:

  • I like less-thick smoothies, so I don’t use frozen bananas, but you easily could. I do add crushed ice, though, to offset any lingering warmness from the softened oats and dates.
  • Also, if my banana is very ripe (and thus, very sweet), I put in blueberries instead of the dates, to temper the sweetness. But… blueberries muddy the lovely green color somewhat, so be prepared for less vibrancy.
  • If I need an extra boost, I add almond butter or kefir.
  • Sometimes, I put everything in!

Power Smoothie (one serving)

2 tbsp rolled oats
2 pitted Medjool dates (opened up and flattened out)
boiling water (about 1/3 cup)
1 banana, in chunks
1 tbsp ground flaxseed
sprinkle cinnamon
1-2 handfuls baby spinach
handful ice
milk/plant milk of choice (about 3/4 cup)

Optional add-ins:
blueberries
1 tbsp almond butter
kefir

Preparation

1. Boil a small amount of water.

2. Put the oats in a small glass ramekin, and the dates in another. Pour boiling water over each, just to cover. Let the oatmeal and dates soften (and cool) while prepping the rest of the smoothie ingredients.

3. In a smoothie blender container (or in a blender), add the banana, flaxseed, cinnamon, oats, and dates. Stuff as much spinach as will fit, with a little space leftover for the ice. Pour in milk of choice.

4. Blend, and enjoy!

Recipe: Cinnamon Cardamom Coffee Cake with Extra Streusel

28 Mar

If you like cardamom in baked goods, this recipe is for you. If you don’t, just omit it and you will still have a delicious cinnamon-scented coffee cake with a generous amount of streusel. Cardamom, which is native to India and Indonesia, is in the same family as ginger and turmeric and is very fragrant. Ancient Egyptians, Greeks, and Romans all used it, and the Vikings took it back to Scandinavia. Today, it is widely used in Indian, Middle Eastern, and Swedish dishes as well as some Southeast Asian ones.

In its native India, whole green cardamom frequently appears in savory dishes, and green and/or black cardamom seeds are also part of many garam masala spice mixes. Black cardamom is also very popular in Vietnam; I discovered it was a key ingredient in the long-simmered broth of my favorite Vietnamese pho in Maryland, when the owner came from the kitchen to show me a handful of the aromatic black pods.

On the sweeter side of things (a very nice side indeed), cardamom is a key ingredient in chai teas and mulled wines like Swedish glögg and German glühwein. It is also a key flavor component in Nordic baking and in Indian sweets, which often feature one of cardamom’s most delicious partners: rose water.

This recipe pays homage to my love of cardamom, my love of coffee cake, and my love of lots of streusel.

Extra Streusel Coffee Cake with Cinnamon and Cardamom

Ingredients:

STREUSEL:
2/3-3/4 cup (135-150 gr.) brown sugar (adjust depending on how sweet you like your coffee cake)
4 tablespoons (34 gr.) all-purpose flour
2 1/2 teaspoons cinnamon
1/16 teaspoon ground cardamom
heaping 1/2 cup (80 gr.) chopped pecans or walnuts
3 tablespoons (45 ml.) canola/vegetable oil

CAKE:
1 1/2 cups (about 200 gr.) cake flour or regular flour
1 1/2 teaspoons baking powder
1/2 teaspoon salt
2/3 cup (134 gr.) sugar
1 teaspoon cinnamon
1/8 teaspoon ground cardamom

1/4 cup (60 ml.) canola/vegetable oil
1 egg
3/4 cup (180 ml.) milk (oat milk also lends a nice flavor)
1 teaspoon vanilla

Preparation:

1. Preheat oven to 350 degrees F/180 degrees C.
2. Grease the bottom of an 8×8-inch (20 cm.) square baking pan (or spray with cooking/baking spray), line with parchment paper, and grease or spray the paper.
3. In a medium bowl, mix the streusel ingredients until well combined. Press down on the mixture with the back of a spoon to compact (to create a few future streusel lumps), and set aside.
4. In a large bowl, combine the flour, baking powder, salt, sugar, and spices.
5. In another medium bowl, combine the oil, egg, milk, and vanilla. Add the wet mixture to the flour mixture, stirring just enough to mix. The batter will be a bit thin.
6. Pour 1/2 of the cake batter into the prepared pan (it will seem like a very thin layer; just make sure to fully cover the bottom of the pan).


7. With a knife or spoon, score a line across the top of the streusel in the bowl, dividing the streusel in half. Using a spoon, scoop and scatter 1/2 of the streusel on top of the batter, trying to retain some streusel lumps. Evenly pour the remaining cake batter over, and then scatter the other 1/2 streusel on top.
8. Bake the coffee cake for 25-30 minutes or until a toothpick, knife, or fork inserted in the center comes out clean.

Adapted from a recipe on food.com.

Breakfast in Old Delhi

9 Nov

It has been said that  one of the best ways of getting to a culture’s heart  is through its stomach. Sweet words for travelers who go from meal to meal with at least as much joy as they have in going from sight to sight. What a treat to learn things about other cultures (and about ourselves), bite after bite. And so it was that during a recent work trip to New Delhi, India, I had the delightful opportunity to savor Old Delhi’s breakfast culture for a few hours, weaving through narrow streets, dodging people, cars, carts, bicycles, auto-rickshaws, motorcycles, dogs, and the occasional cattle, to find culinary gems–both Hindu and Muslim (the walled city being home to Jama Masjid, the best-known mosque in India)–as the neighborhood awoke. An Indian friend, who knows me so well, arranged this gastronomic tour via Delhi Food Walks. We placed our stomachs in the capable hands of our guide, and dug in.

First, some scenes to set the stage (l-r, top-bottom): a food vendor carrying his wares to a special spot (#1), a renowned Old Delhi chef stirring one of his pots (#2), spices and tea for sale (#3), a dented pitcher atop one of the ubiquitous water containers found throughout the neighborhood (#4), and the very first things we tried for breakfast (#5)–a classic savory-sweet combination: Aloo sabzi (potato curry) in the foreground, eaten with  Bedmi poori (hot and fresh in photo #6 below), and Nagori halwa in the background (small crispy semolina poori served with sweet porridge).


After a stop at Karim’s for Nahari Mutton (morning mutton), we then went in search of a famous chickpea dish redolent of coriander, ginger, and tamarind: Lotan ke Chole Kulche (#7). The vendor of this rich specialty had set up shop in a protected nook down a narrow street, where he doled out the dish to throngs of hopefuls waiting with packets of butter in hand. The salty Amul brand butter–available for purchase just up the street from another vendor–added a perfect salty silkiness to the chickpeas, all the better to dip the accompanying bread into. After a brief pit stop to sample some biryani (#8), and then some parathas (#9) at Pundit Gaya Prasad Shiv Charan, it was all about the sweets, starting with sev pak, or sev burfi at Chaina Ram (#10)-a golden treat made with vermicelli, milk cheese, and lots of sugar. I was so inspired by this particular sweet, that I am experimenting with recreating it at home (update on that to follow).


At this stage, it was definitely time to start expanding our stomachs to make room for the other sugary confections on the menu, a task I was more than willing to undertake since I have the world’s worst (or best?) sweet tooth. And judging by their sweets, so do most Indians–except, amazingly, for my Indian friend and breakfast partner, which meant I had to step up for both of us. Below is a vendor dishing up some pudding-like rabri (#11) at Hazari Lal Jain, which also sells delicious khurchan (#12), creamy layers of  “leftover” boiled sweet milk, scraped together and decorated with pistachios and silver foil (varakh). It was very hard to walk away from that khurchan, but even more delights awaited, including warm jalebi (#13 -15), which after going from a hot frying pan into a sugar-syrup bath, are about as sweet as it is possible to imagine. After that, we swore we could not ingest even the smallest morsel more, but we were wrong. One last taste awaited us: Daulat ki Chaat, or sweet milk foam from a cart (#16). Our guide assured it was like a light and airy meringue that would not take up any stomach space at all, and he was right. But after that, even I was done. But, oh, what a morning, and what a glorious taste of India.


Recipe: Chocolate Waffles

11 May

Because I’m leaving on a work trip tomorrow, I was treated to an early Mother’s Day breakfast of my choosing. But really, I didn’t have to think about it at all — I asked for the same thing I  always ask for: Chocolate Waffles. My 16-year-old daughter made them this year, and they looked absolutely gorgeous:


They tasted fantastic, too, with some whipped cream, maple syrup, and a sprinkle of cinnamon. A heavenly combination. And long after breakfast or brunch, you can grab a plain waffle and break off pieces to eat along with a nice cup of coffee or tea.

Chocolate Waffles
Makes 8-12 waffles
2 oz. unsweetened chocolate
1 1/2 c. flour
2 tsp. baking powder
1/4 tsp. salt
1/2 tsp. cinnamon
1/2 c. canola oil
1 c. sugar
2 eggs
1 tsp. vanilla
1/2 c. milk

Preparation

1. Melt chocolate, let cool.
2. Preheat waffle iron.
3. Sift dry ingredients together over medium bowl.
4. Mix oil and sugar together, then beat in eggs until well blended. Add vanilla and melted chocolate.
5. Add sifted ingredients to wet ingredients in three batches, alternating with milk.
6. Spray waffle iron with cooking spray. Pour batter onto iron and cook according to manufacturer’s directions. (Our waffle iron makes 4 waffles–we pour about 1 c. batter into the center of the iron, close, and wait for the waffle iron to beep.)
7. For these waffles, it’s important to spray the waffle iron each time you make a set of waffles.
8. Serve with whipped cream and maple syrup.

Adapted from Joy of Cooking.

Recipe: Scrambled Eggs with Spinach and Feta

22 Jan

Eggs are a miracle food in many ways, but what I most appreciate about them is that they make for a quick, nutritious meal any time of the day. These scrambled eggs are great for breakfast, brunch,  lunch, and even as an after-school snack for ravenous teenagers. And if I am ever on my own for dinner, these scrambled eggs often make an appearance.

Scrambled Eggs with Spinach and Feta
Serves 2

4 eggs
pinch salt, freshly ground pepper
1 tbsp. olive oil
1/4 onion, diced
1/2 c. chopped fresh spinach
1/4 c. crumbled feta

Preparation
1. In a small bowl, whisk the eggs with a fork. Add a pinch of salt, and freshly ground pepper.
2. In a small skillet, heat the olive oil, add the onions, and cook over high heat until soft and beginning to turn golden at the edges.
3. Reduce heat to medium and layer the spinach on top of the onions. Pour in the eggs, top with the crumbled feta, and gently scramble until set.
4. Serve immediately.