I realized a bit late that today is Pi Day, 3/14 (March 14). Our daughter is a huge fan of Pi Day baking, so I wanted to see if I could come up with a savory pie without having to go to the grocery store. Luckily, beets can keep in the fridge for a long, long time, and I recalled that two of them had been living in our crisper drawer for at least a month. Were they still good? Yes, they were. That meant the main ingredient for my pie was set. What goes beautifully with beets? Feta and walnuts. Both were miraculously on hand. As was a red onion that needed to be used, too, lending itself nicely to the red theme. So far, so good. Then I checked the freezer. Excellent: the puff pastry I thought I had in there was there, so I took it out to thaw. Pie ingredients all available!
Like most things involving pre-made puff pastry, this is a pretty easy recipe. The most complicated step (which is not hard, just messy) is peeling and dicing the raw beets. Prepare them on a plastic cutting board or a surface that will not stain. And beware of your hands. I washed my hands with soap and water after peeling each beet, then after dicing each beet, and then a final time for good measure–and my hands escaped unblemished. You could also use gloves. Or you could not worry about it, and then have time (on your hands) to admire a potent natural dye….
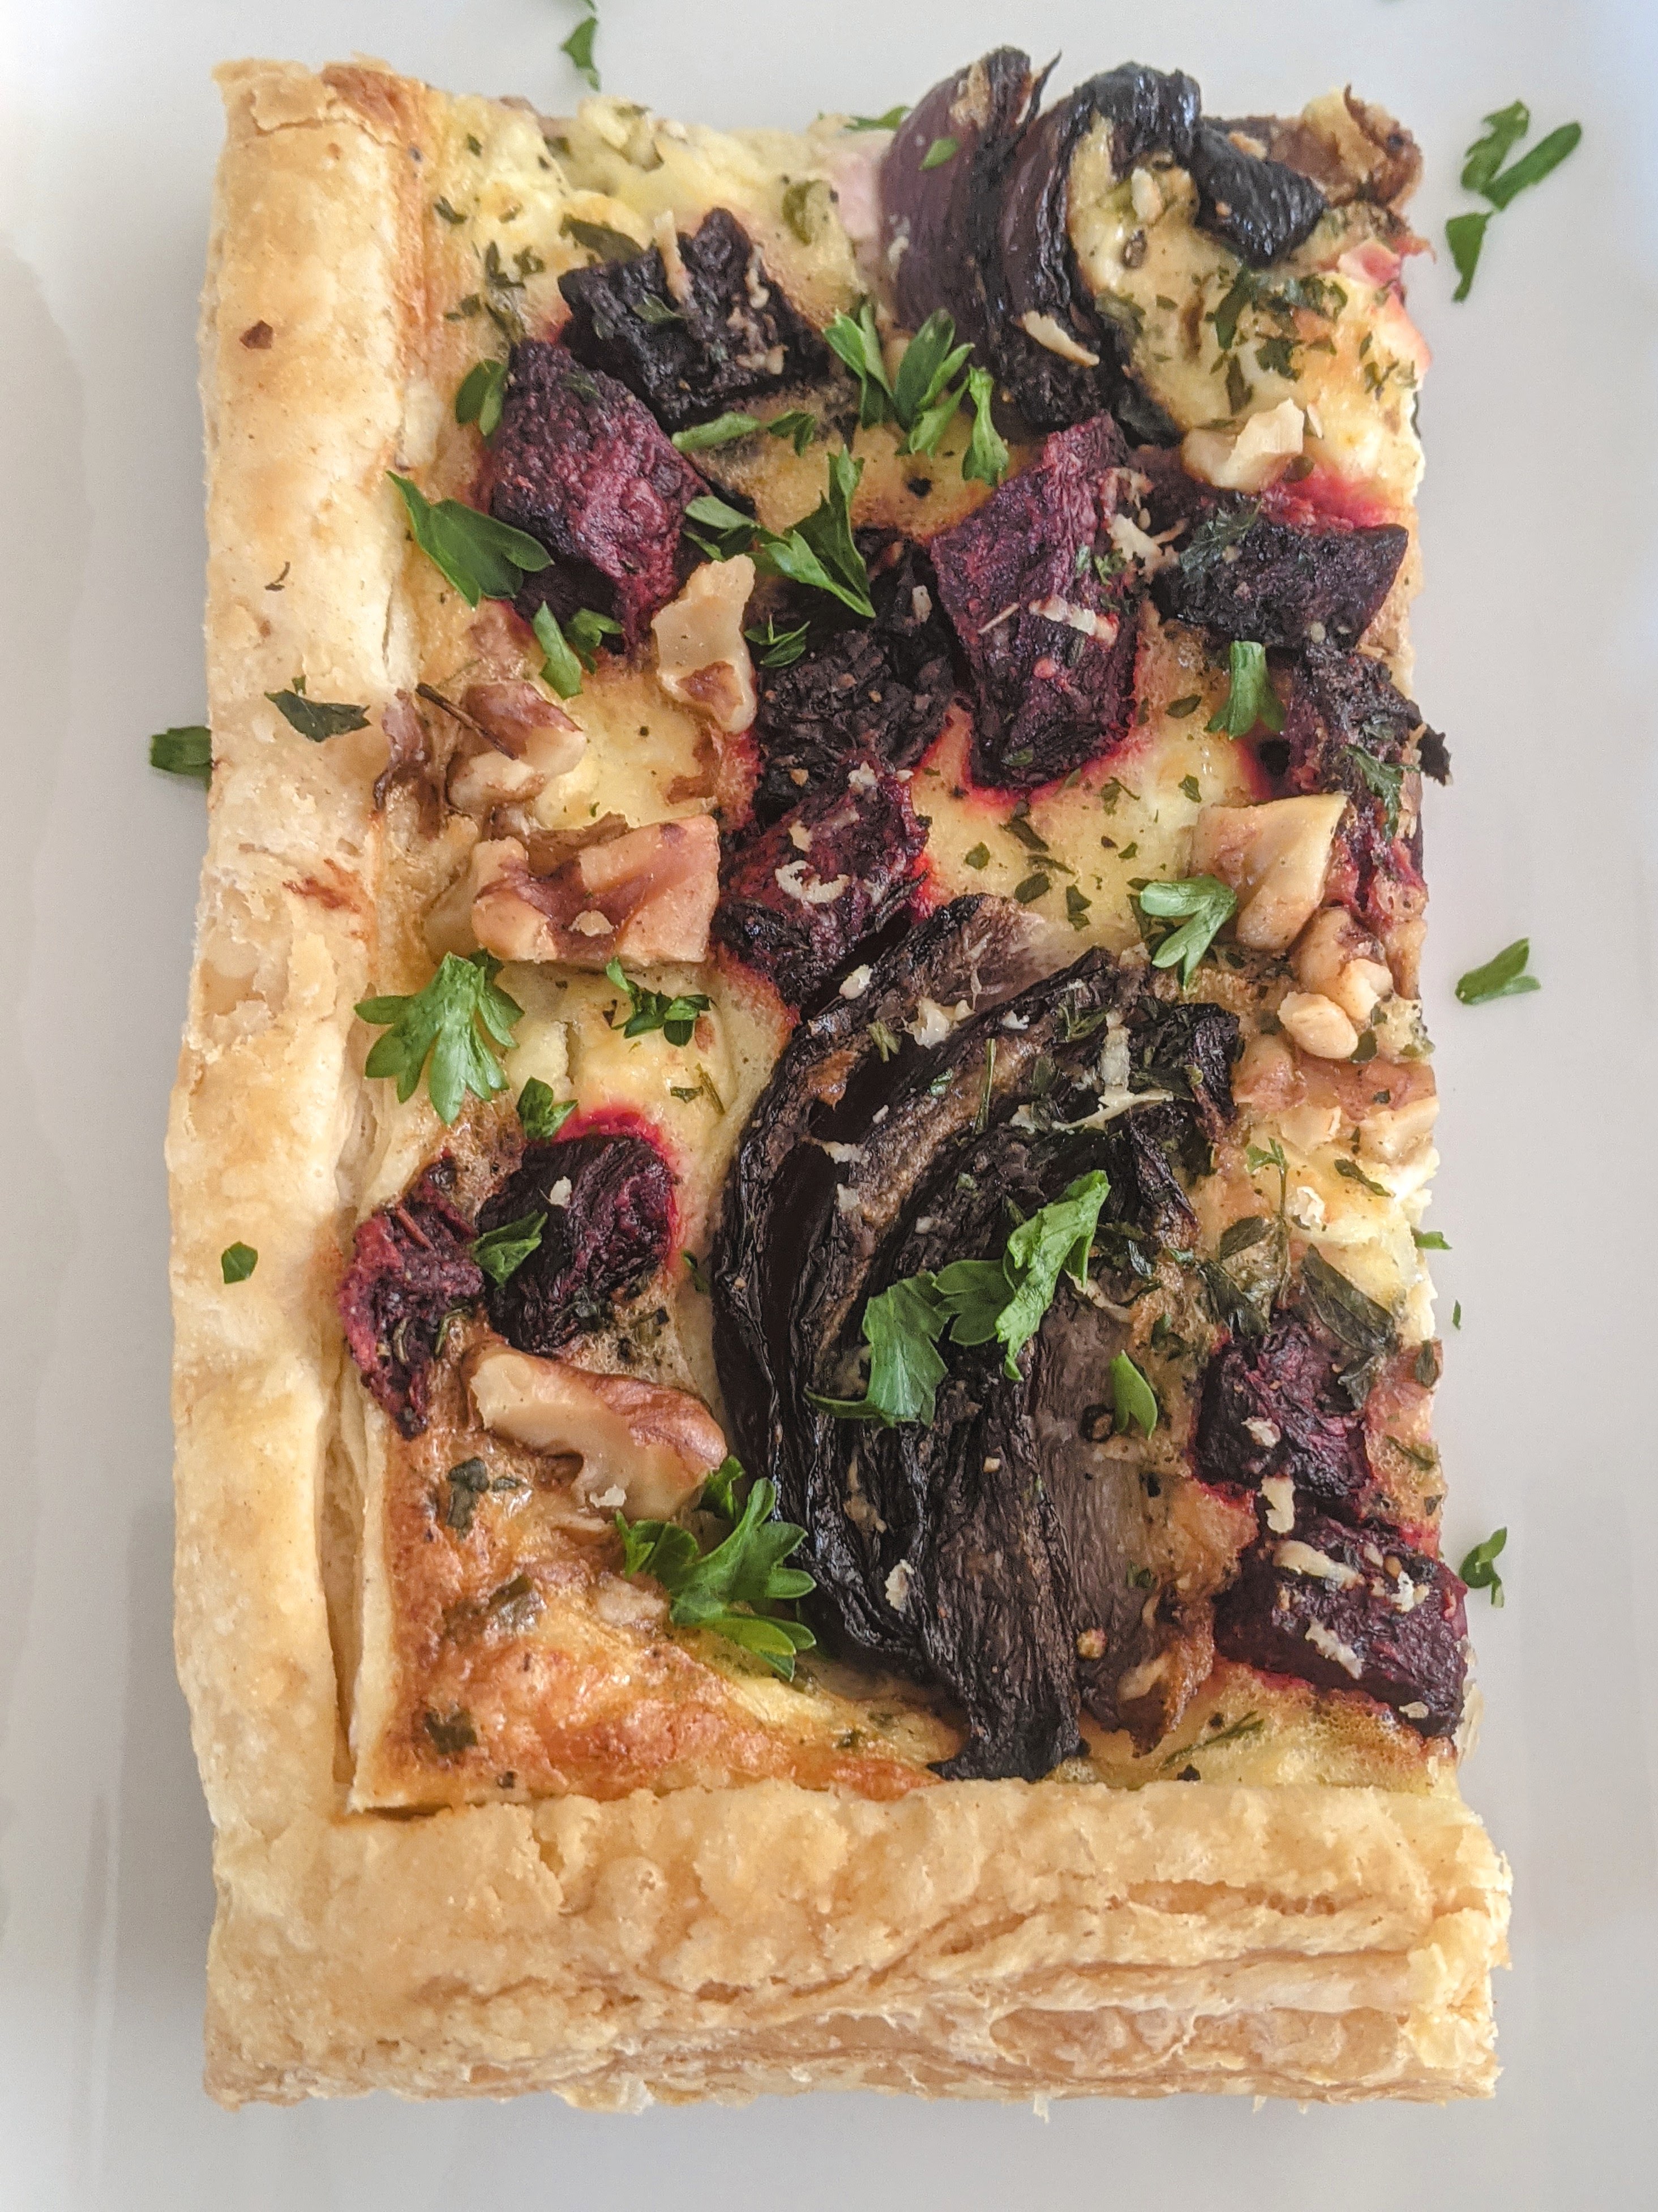
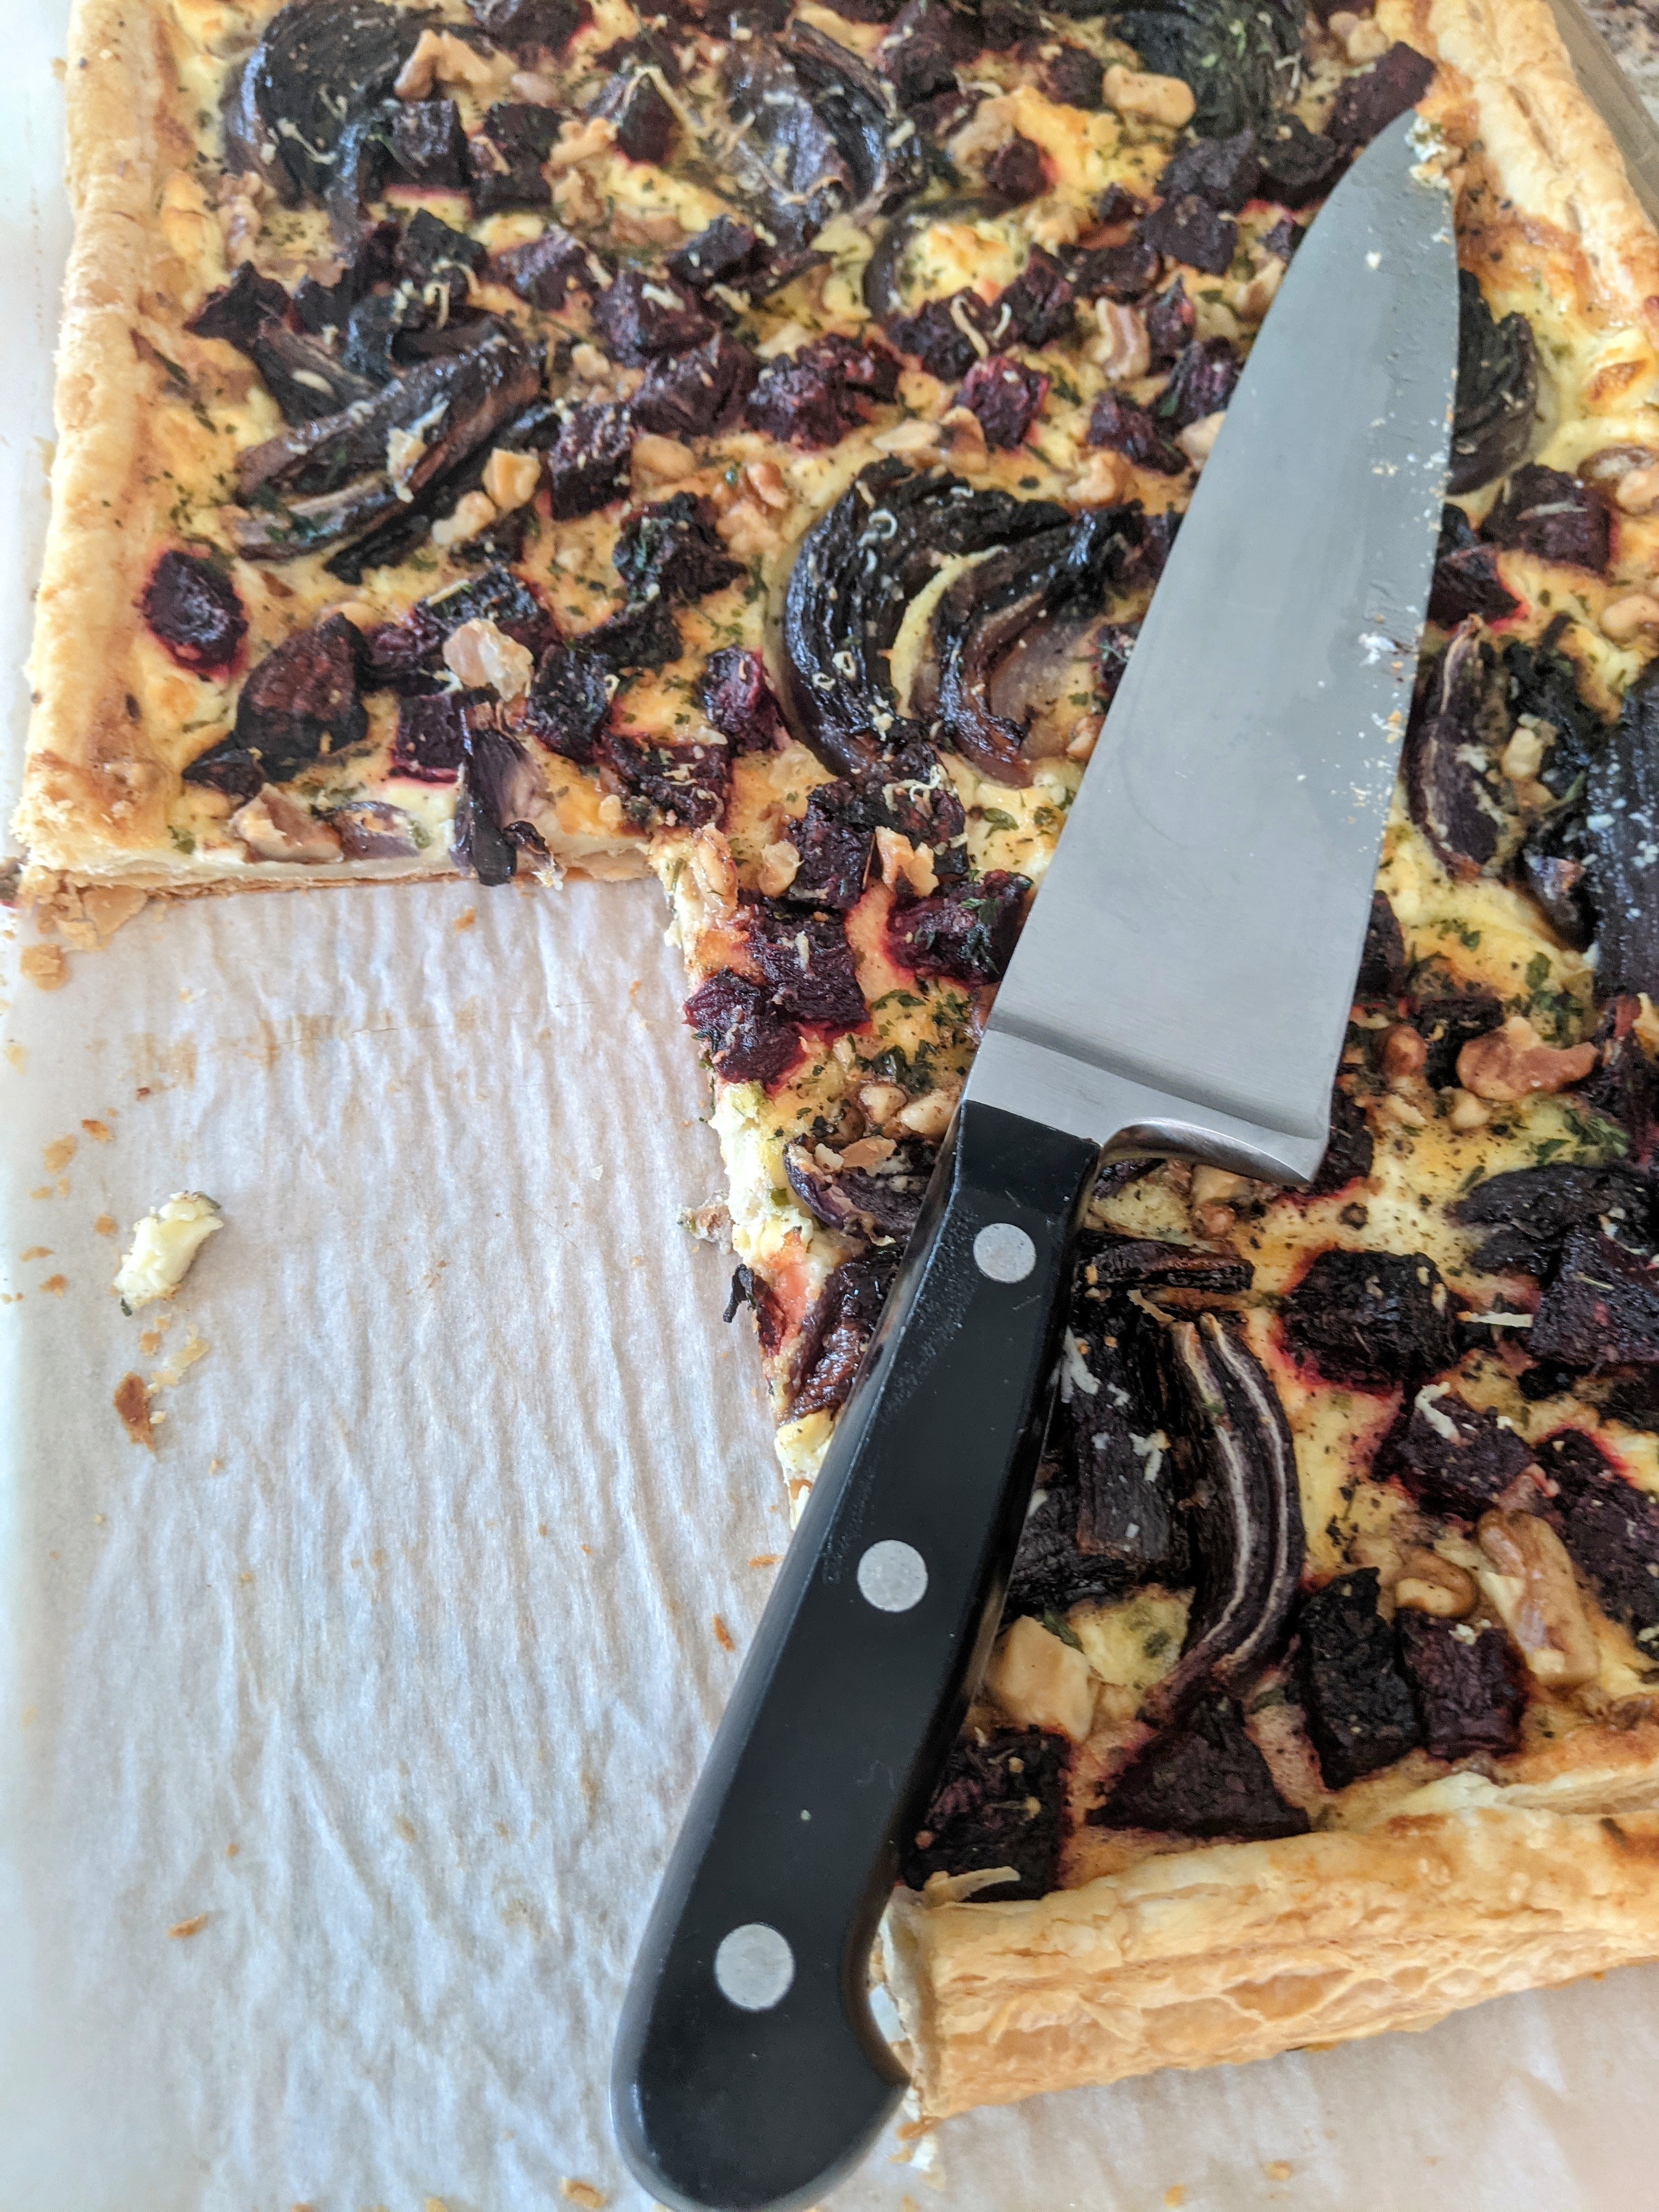
Roasted Beet and Red Onion Tart with Feta and Walnuts 6-8 servings
Ingredients
1 pkg. (17.3 oz./490 gr., usually comes with two sheets) puff pastry (pasta sfoglia, pâte feuilletée)–thawed
Two large raw beets (about 1.1 lb./ 500 gr. total), peeled and diced into medium-sized pieces
1 large red onion, cut in half, then each half cut into about 5-6 wedges
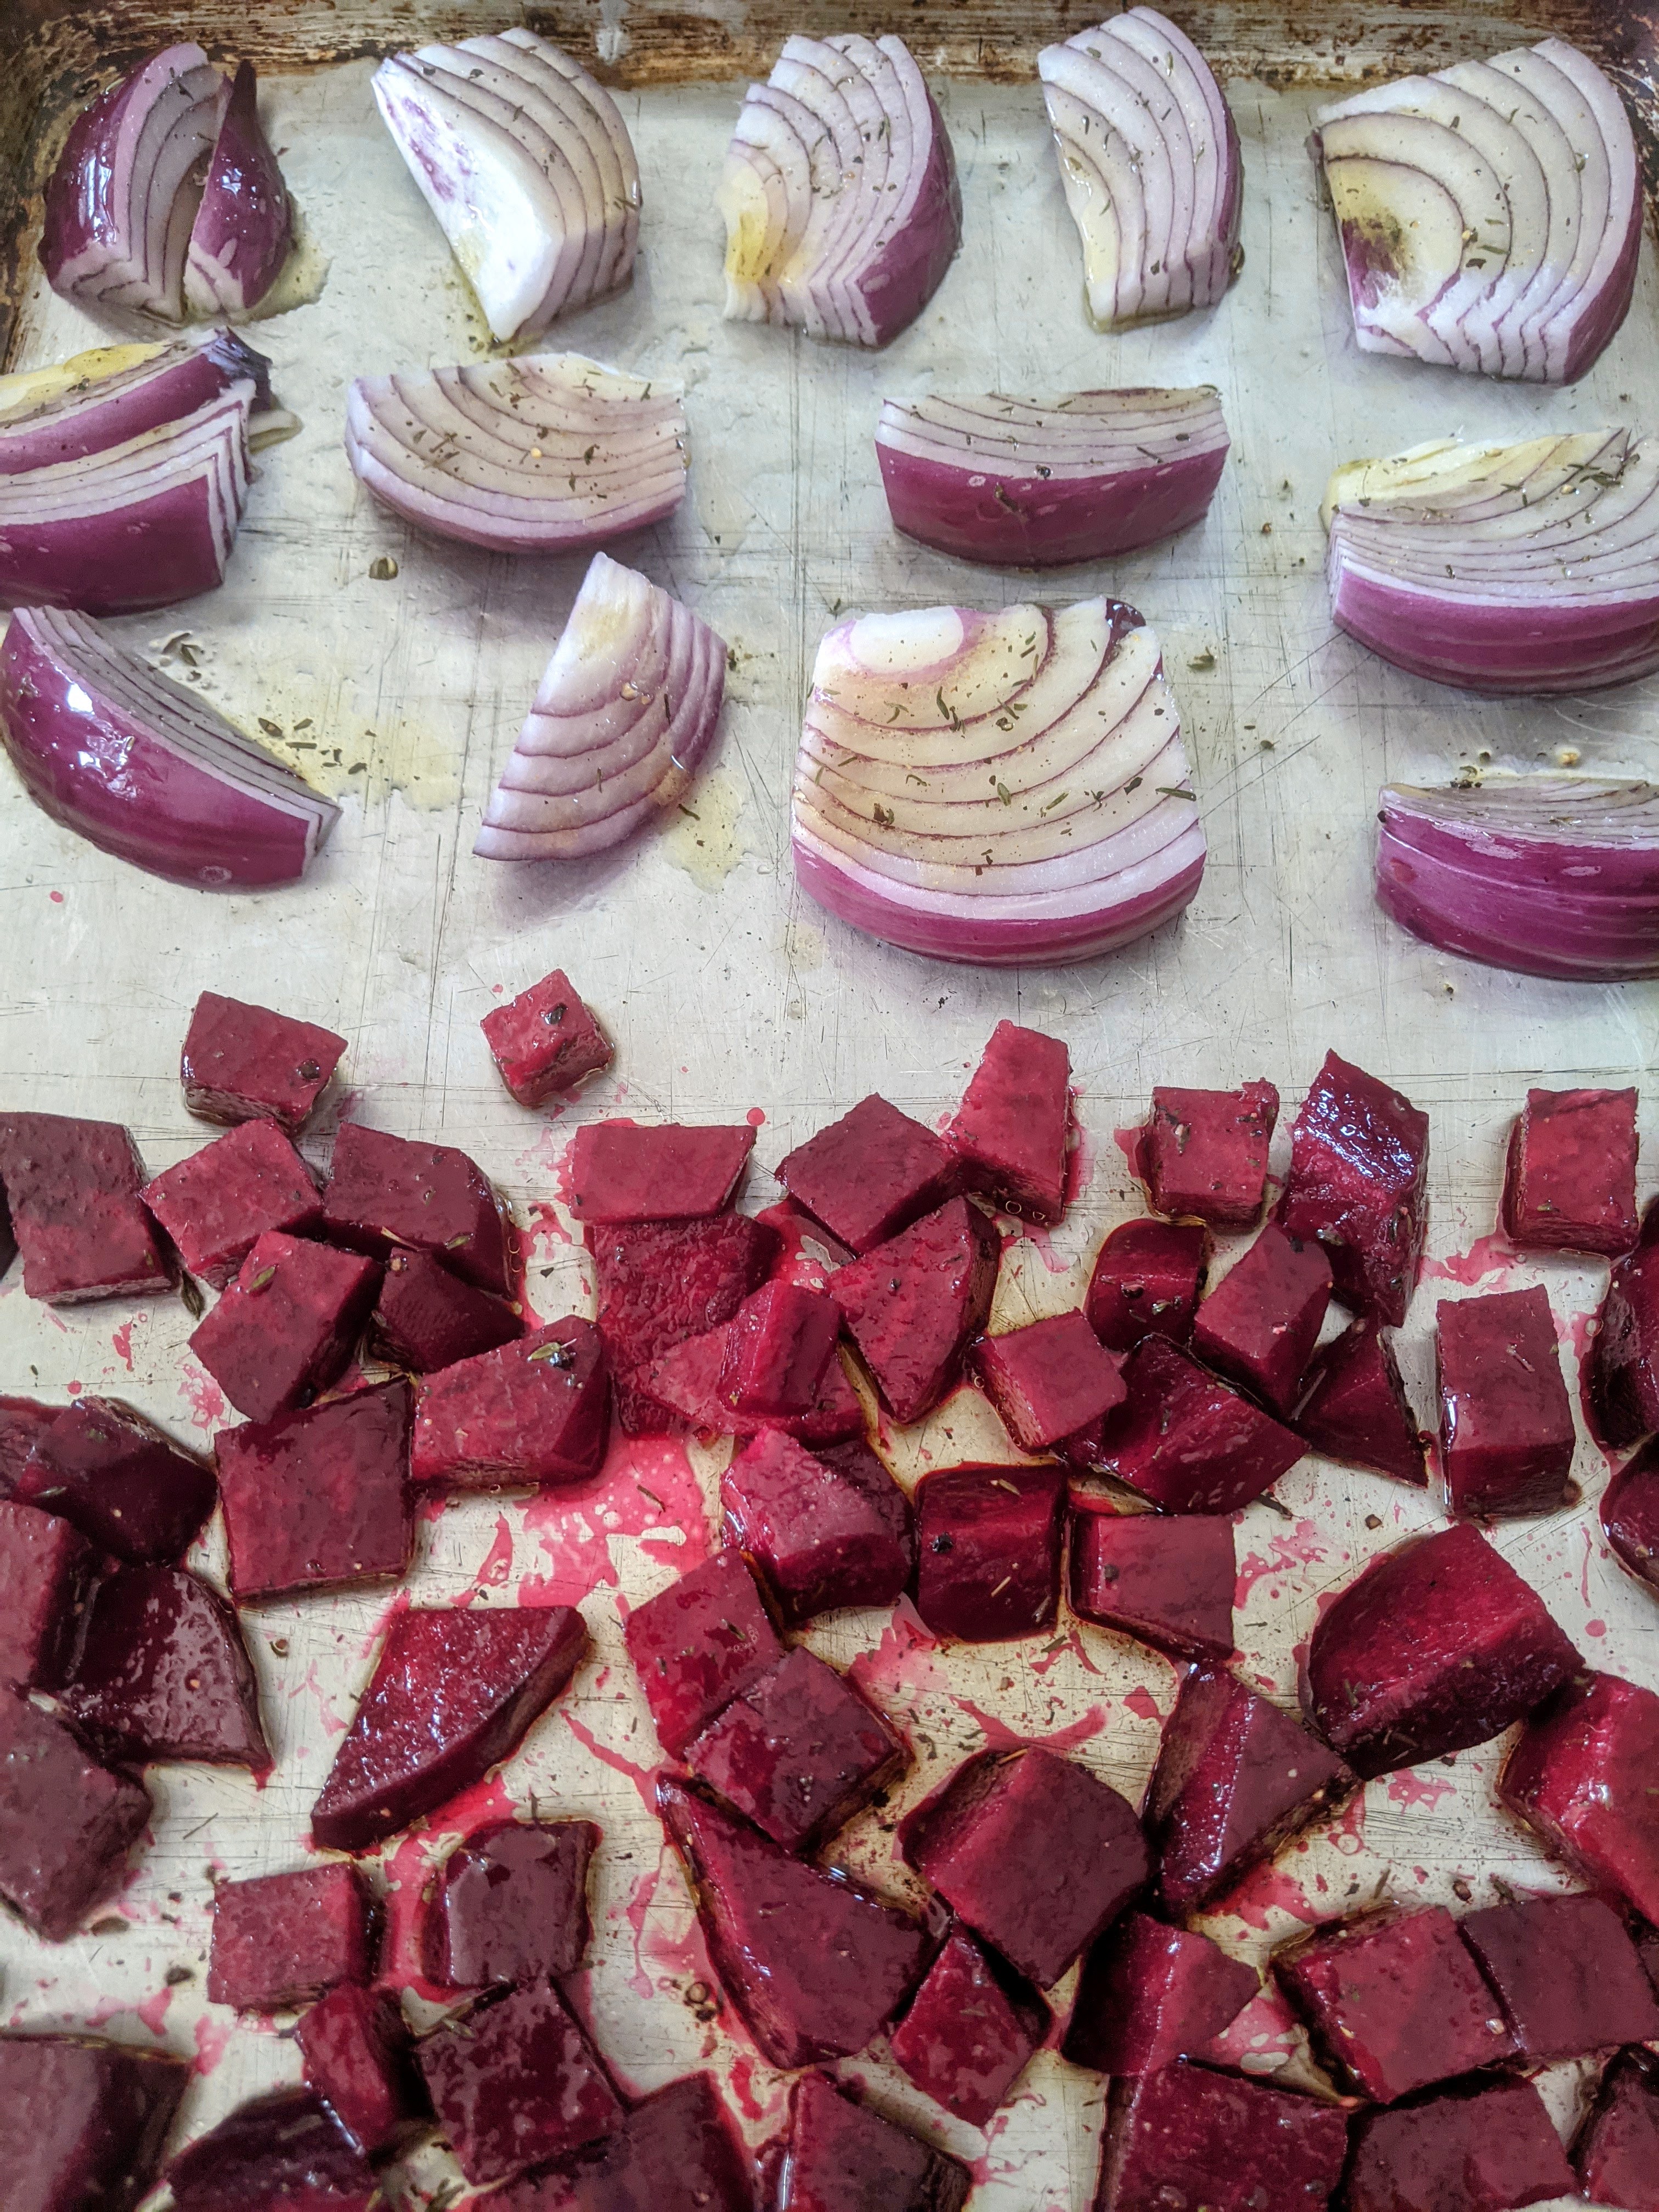
1. Preheat oven to 400 degrees F / 200 degrees C. 2. In a medium bowl, toss the diced beets with 1 tbsp. olive oil, a pinch of salt and pepper, and 1/4 tsp. thyme. 3. Lightly oil a large baking sheet (I used a half sheet) and spread the beets onto 2/3 of the sheet. 4. Place the red onion wedges on the other 1/3 of the baking sheet. Brush the onion wedges with olive oil, then sprinkle with salt, pepper, and more thyme.
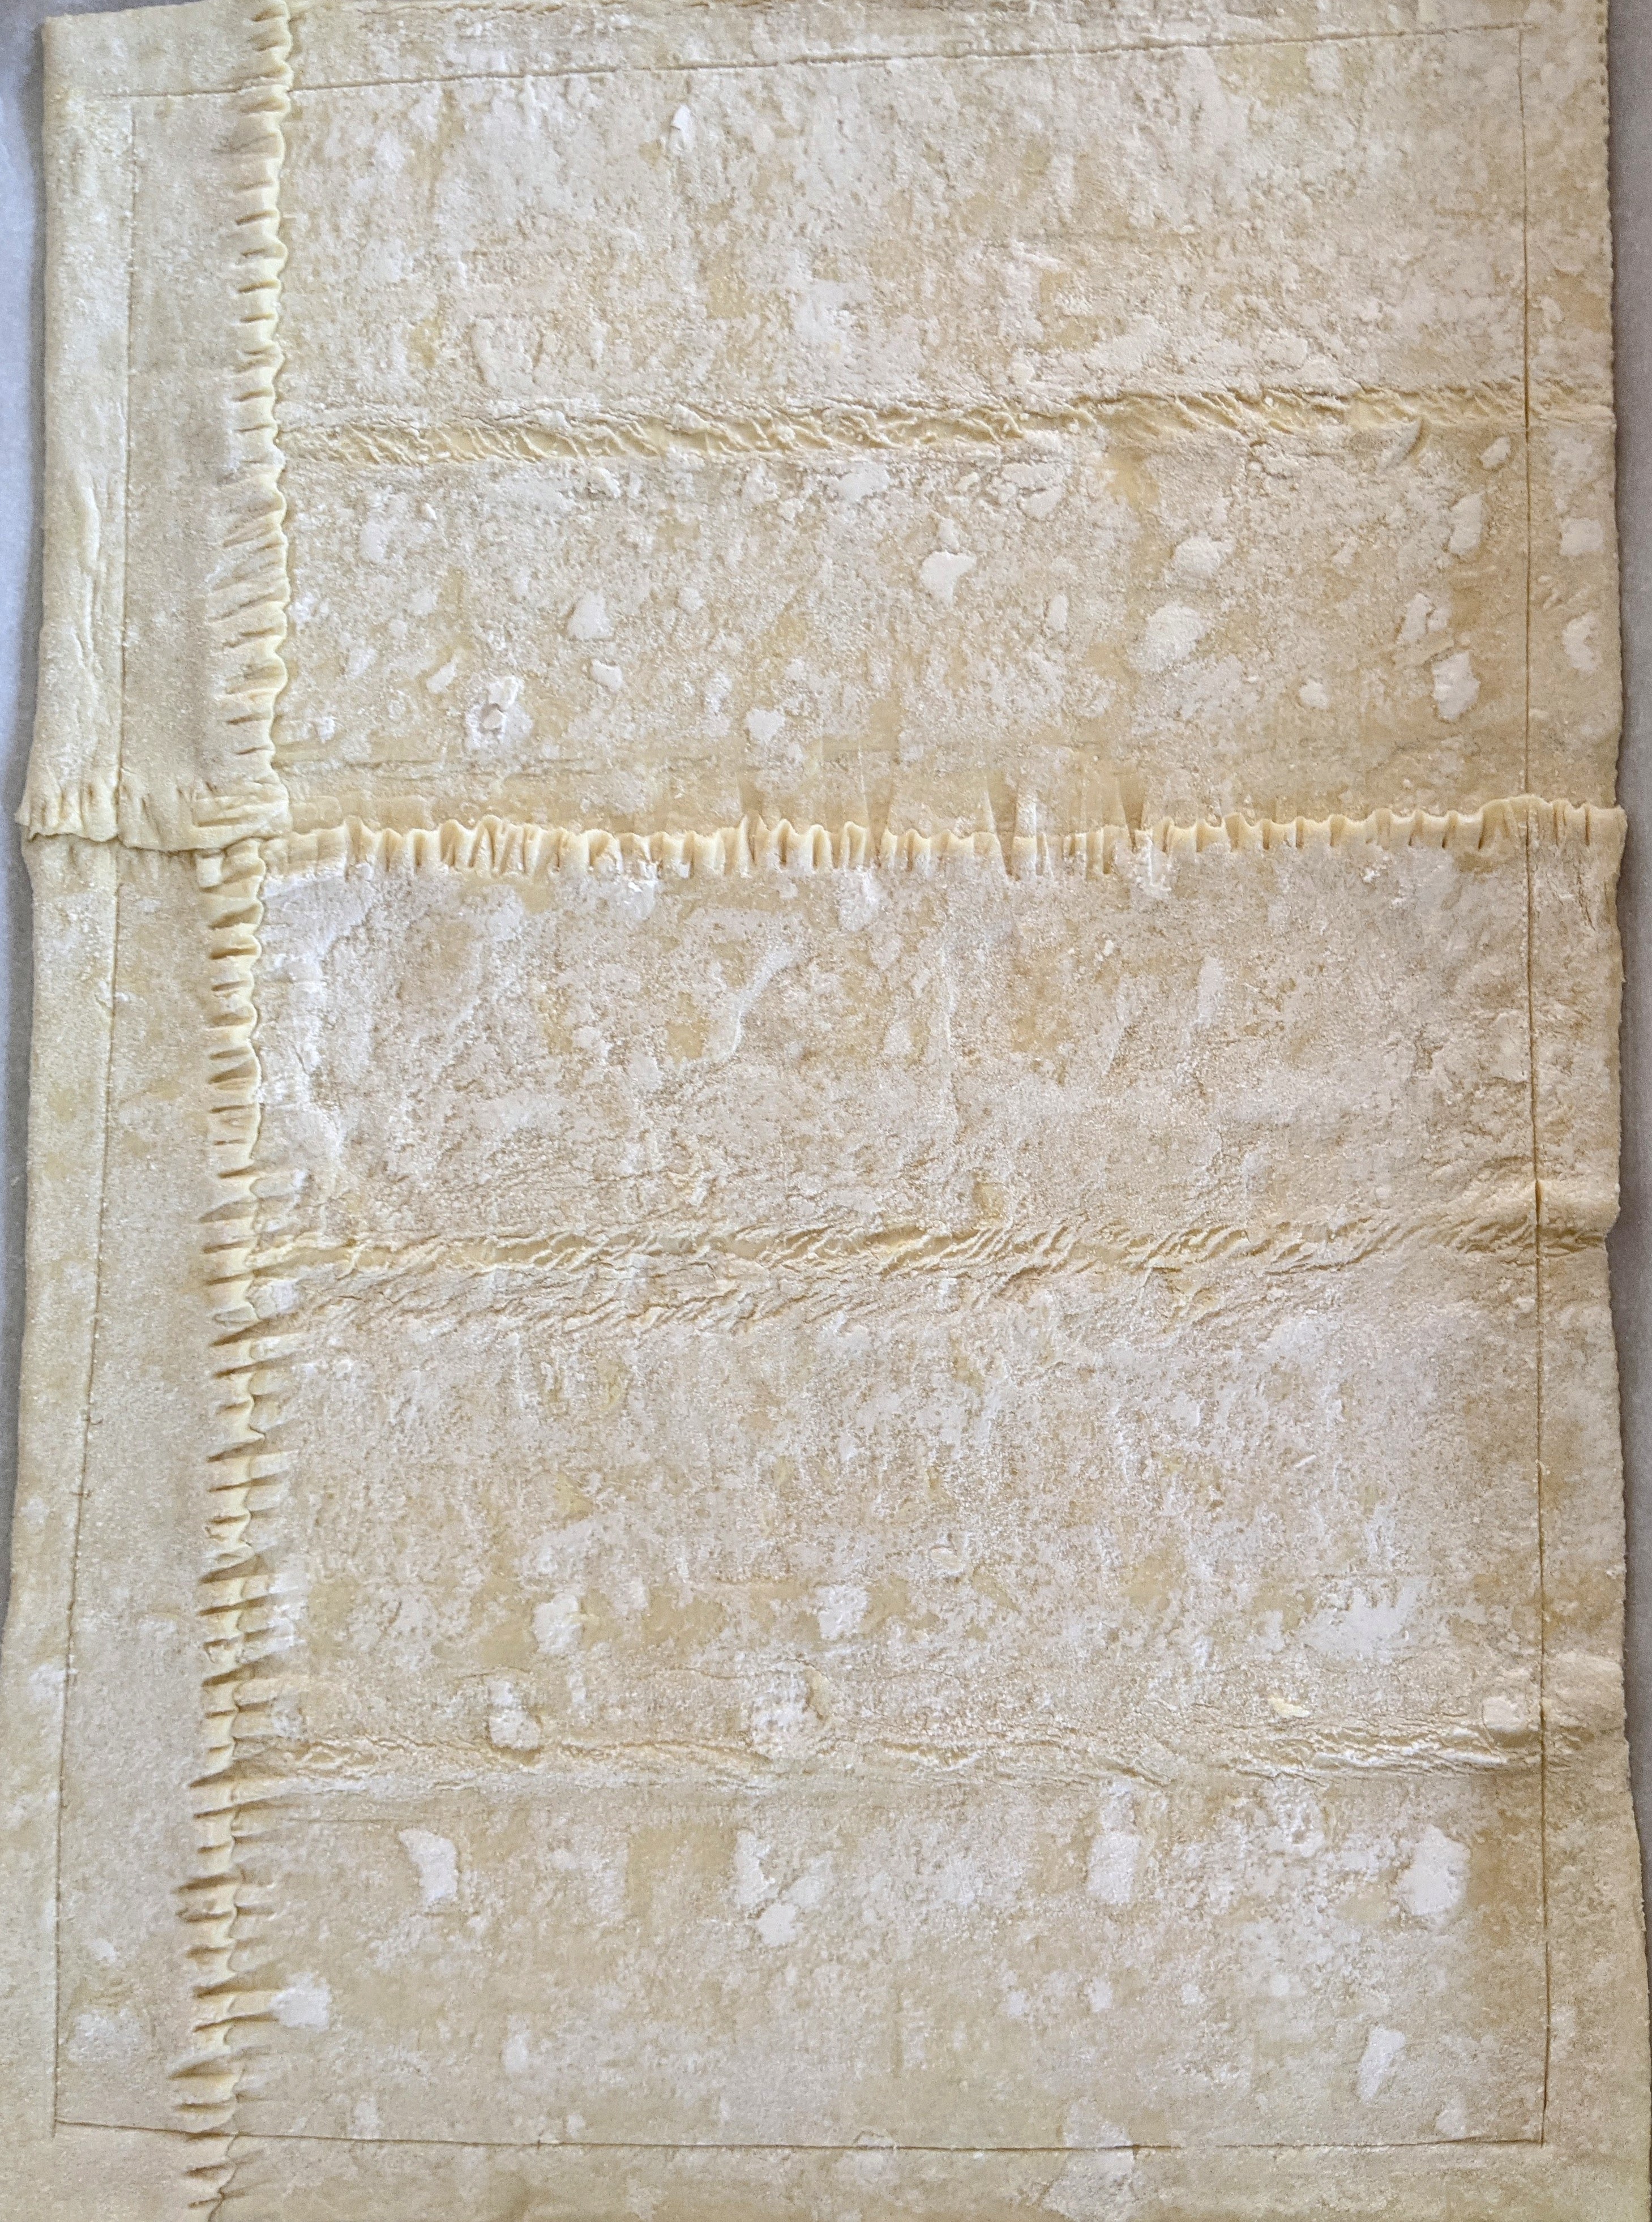
5. Bake the vegetables for about 25-30 minutes or until the onions are soft and look slightly grilled. Carefully remove the onions and place them on a plate to cool. Roast the beets for 10 more minutes until they are soft and golden looking (ie, about 40 minutes total), then place them on a plate to cool slightly, too. 6. Lower the oven temperature to 375 degrees F / 190 C. 7. Line another baking sheet with parchment paper (I used another half sheet pan, but if you do not have one, you can use two smaller baking pans) . Unfold the thawed puff pastry sheets and arrange them on the parchment paper to fill up the pan as best as possible. Note: Depending on the size of your baking pan, this will require some cutting and pressing to fill the pan properly. With a sharp knife, score the edge of the pastry all the way around, creating a 1/2-inch border, but don’t cut the pastry all the way through. Here’s what my pastry looked like when I was done (if you aren’t in the mood for jigsaw puzzles, you could also place a puff pastry sheet on each of two smaller pans):
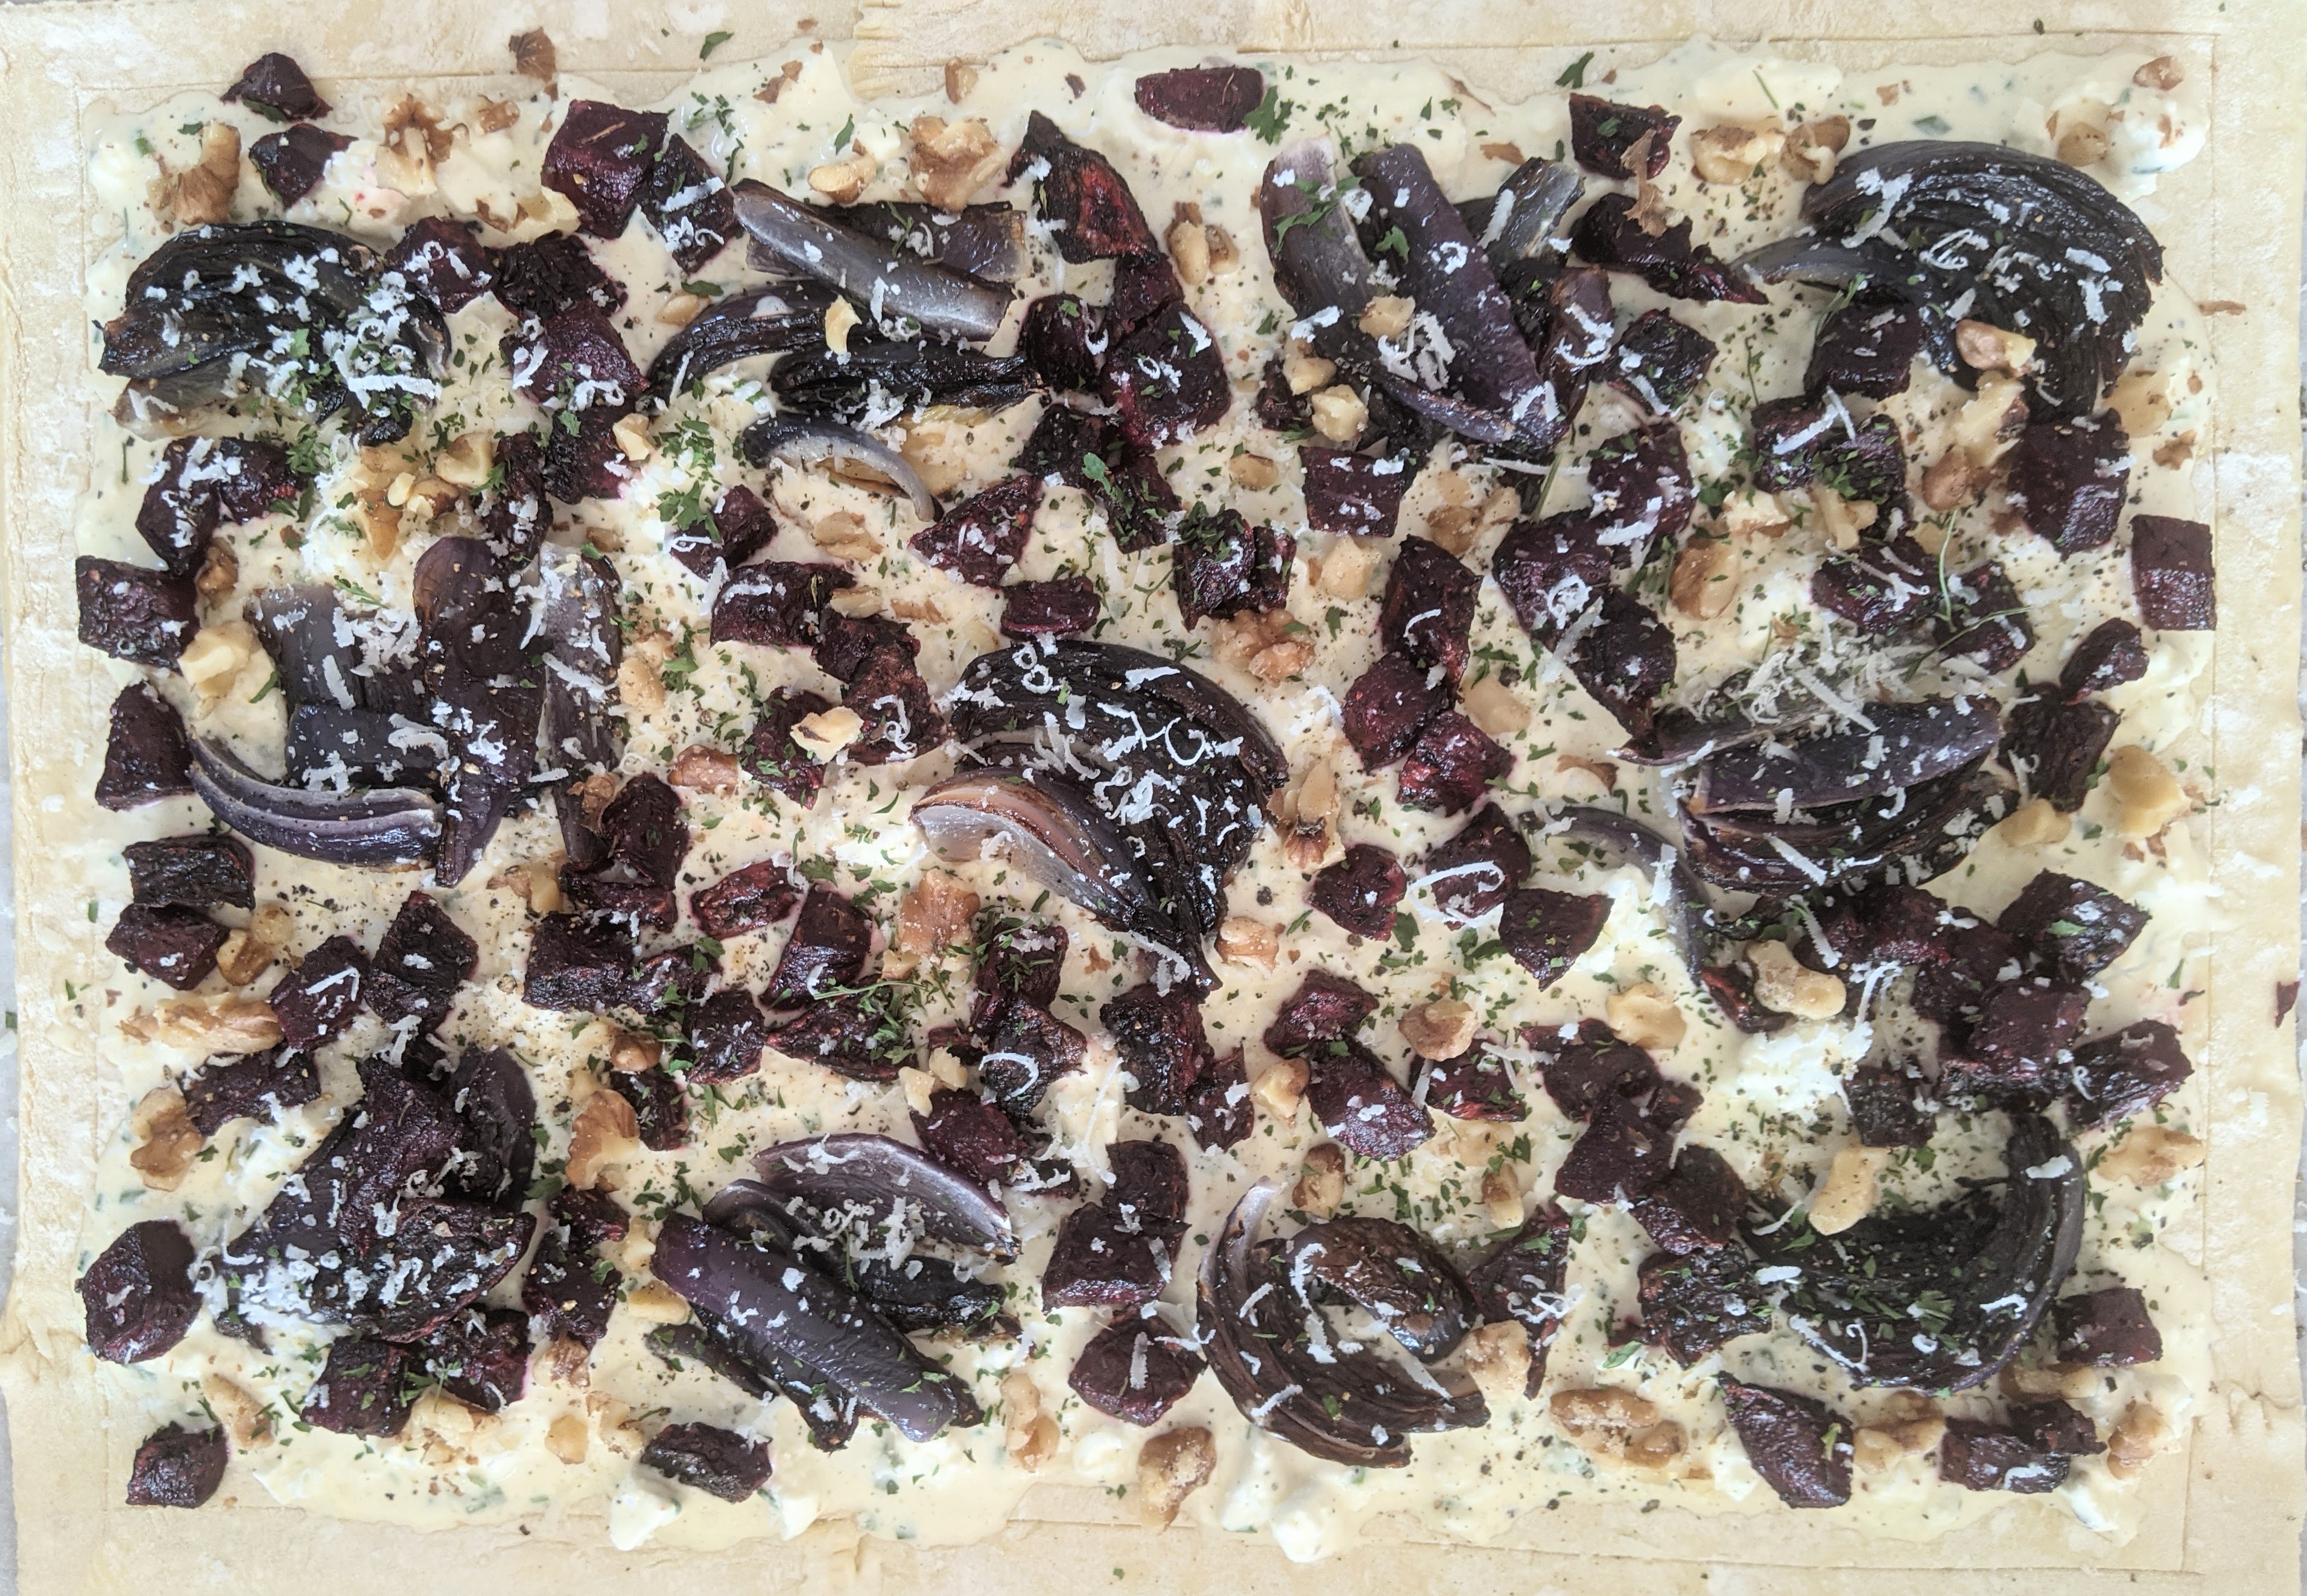
8. Make the feta base. Combine the feta, cream, egg, garlic, chives, and black pepper, and mash together. Prick the pastry, then spread the feta mixture over it, being carefully not to go past the border.
9. Arrange the beets and onion wedges on top of the feta mixture, sprinkle with Pecorino Romano cheese (or Parmesan), then scatter the walnuts around. Sprinkle dried parsley and more ground pepper over the top. If you really love cheese, you could spoon some extra crumbled feta over the top, too.
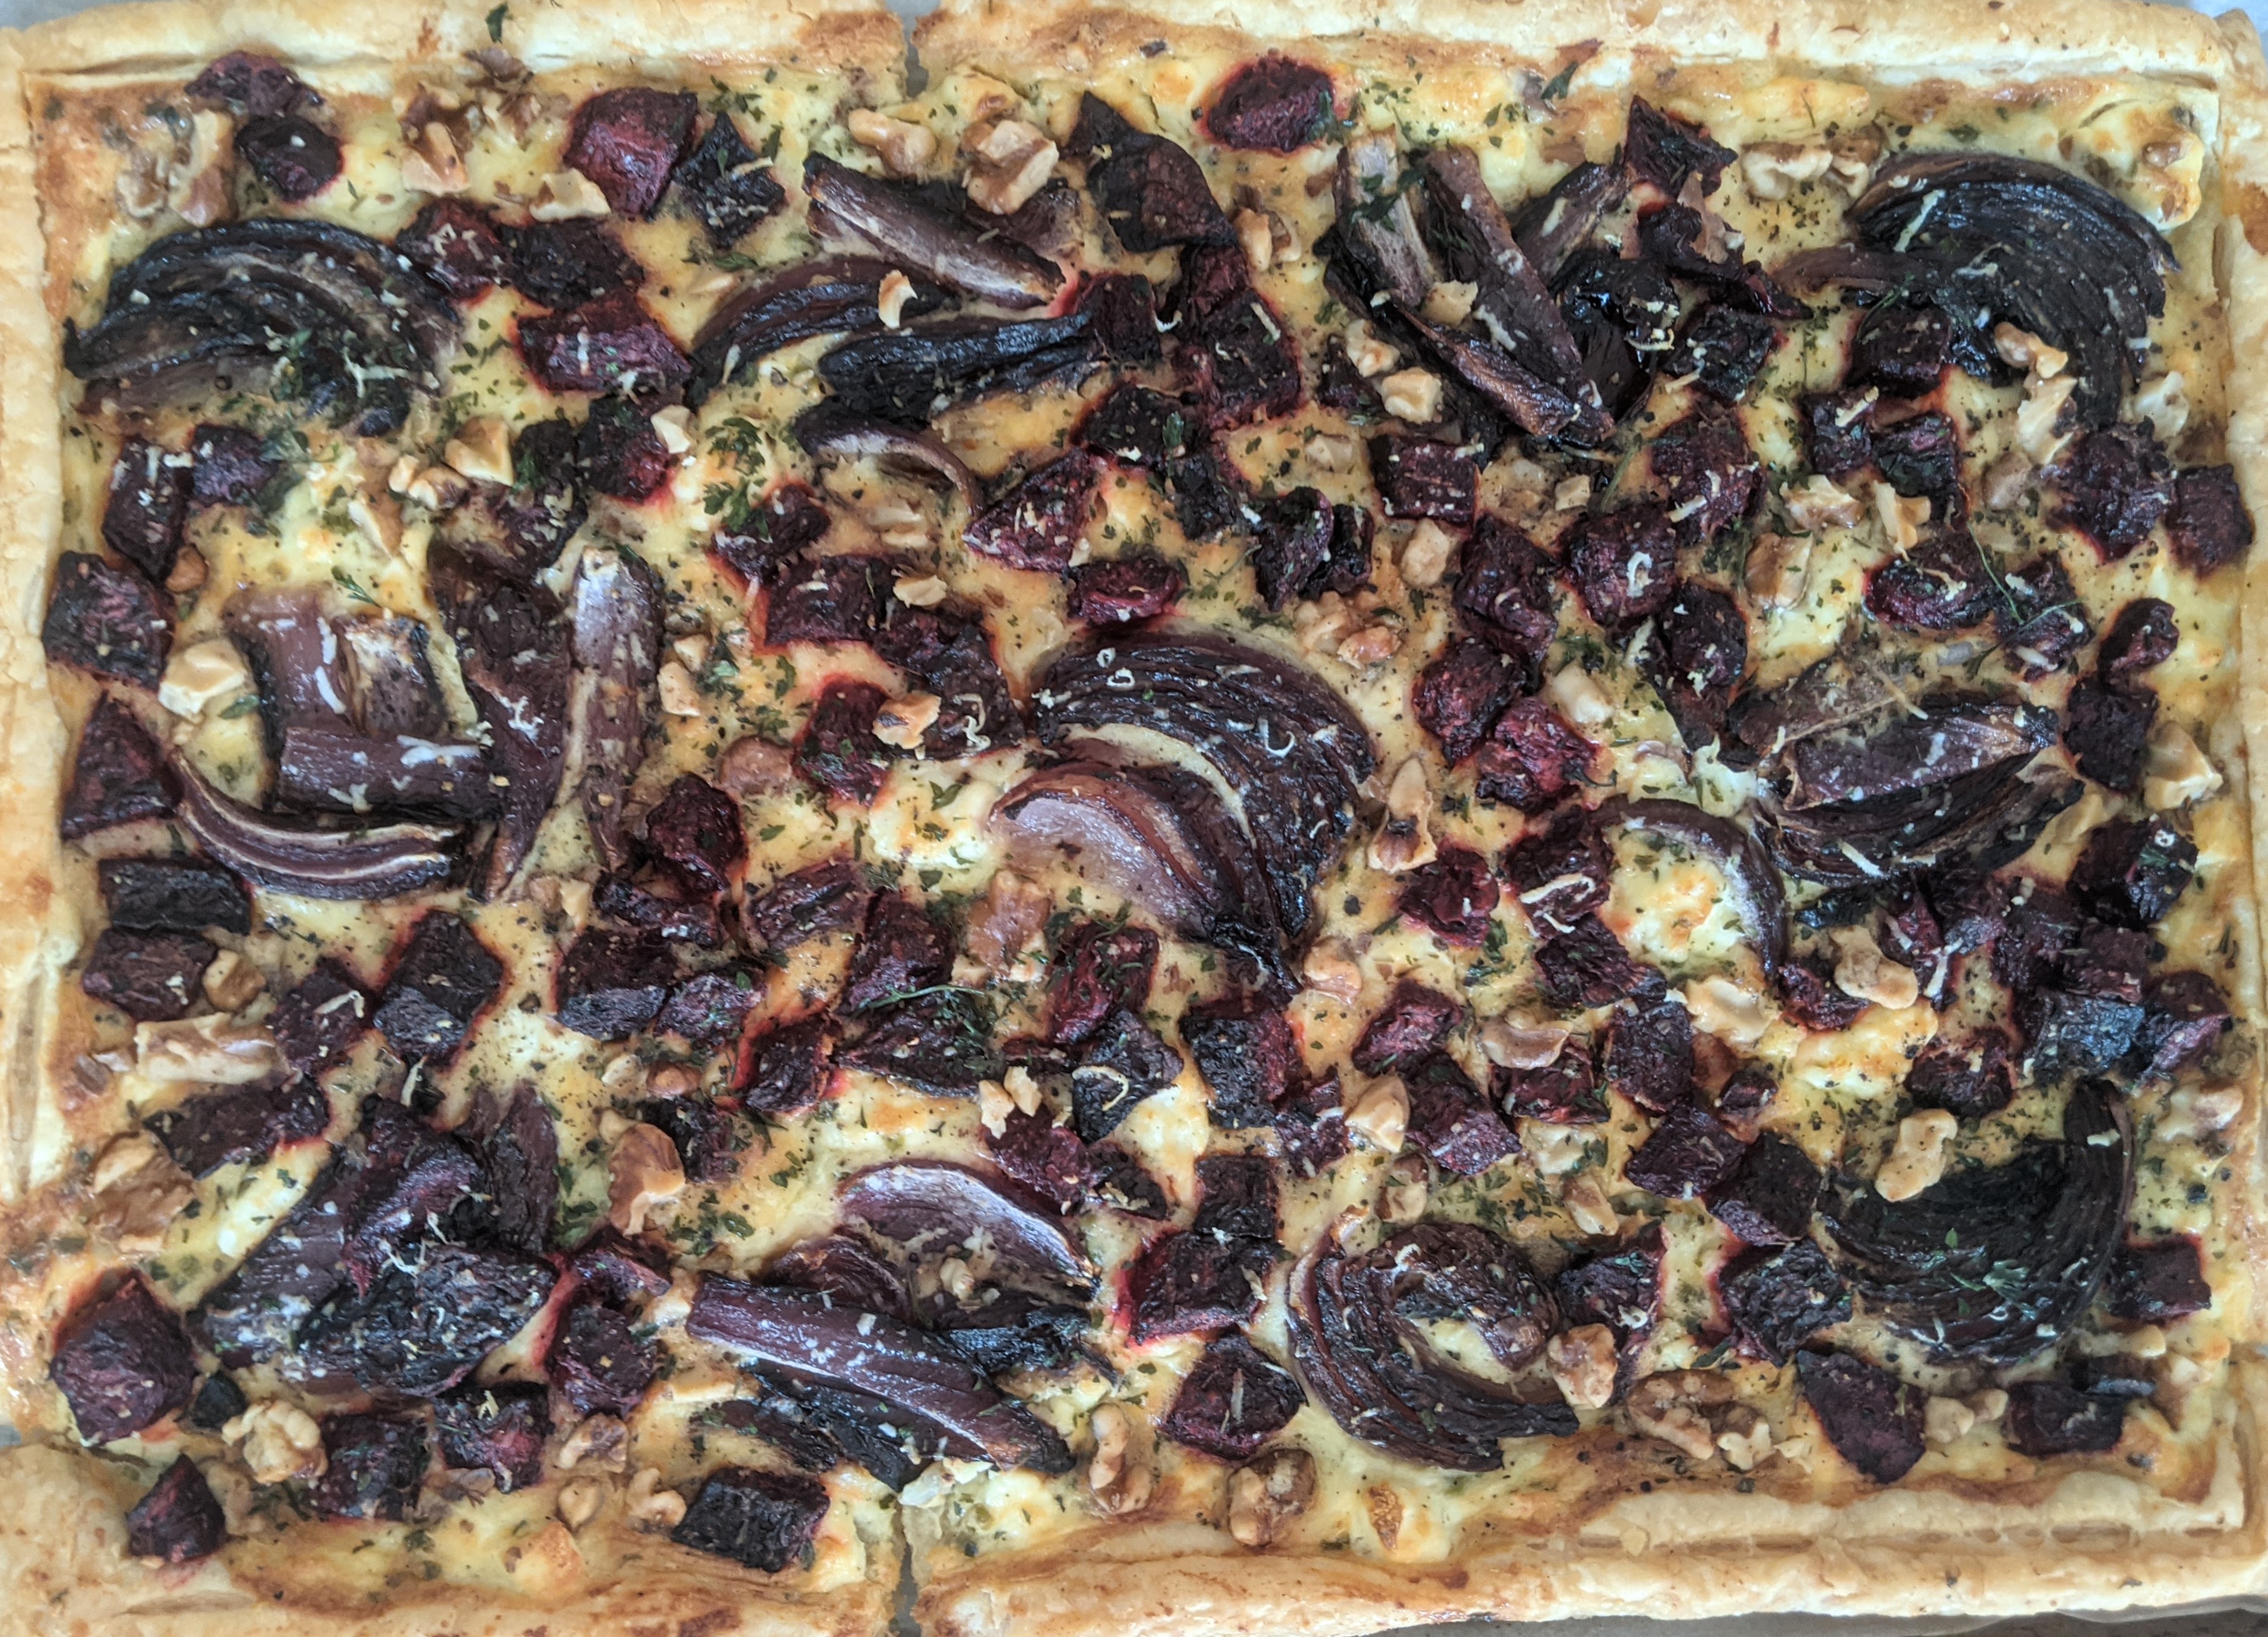
10. Bake the tart for 30 minutes or until the edges and bottom are golden. Let cool for a few minutes, then sprinkle with fresh chopped parsley and serve with peppery greens (like arugula, though a spring mix would do, too) drizzled with a balsamic vinaigrette.
In Rome, there are four classic pasta dishes: Amatriciana, Carbonara, Cacio e Pepe, and Gricia. The two base ingredients that are constant across all four sauces are Pecorino cheese and black pepper. Cacio e Pepe, which means cheese and pepper, is a perfect example of the magic that occurs when the two base ingredients are combined with pasta cooking water. Gricia omits the water and adds guanciale (pork cheek/jowl). The purest version of Amatriciana (from the town of Amatrice itself) also omits water, but adds tomatoes to the guanciale. (Note: the black pepper can be a very controversial ingredient in an Amatriciana sauce, depending on who you ask. I include it, as I was taught.) Carbonara is Gricia with eggs; it never, ever includes cream. Essentially, a small handful of ingredients trade places across the four classic Roman pasta sauces.
This Carbonara recipe came about when we were living in Rome as true empty nesters. It took me a few years to adjust from cooking for 6 to cooking for 2 (even though our children left home in phases), but I finally did it. This is a recipe my husband and I enjoyed often, one that can be easily doubled (or tripled) when guests arrive. The photos below show guanciale (pork cheek/jowl), which typically has a peppery outer coating. If you cannot find guanciale, look for pancetta (pork belly). If you cannot find pancetta, use bacon. Pancetta and bacon may not be authentic, but you should use what is available and make something that tastes good to you. The beauty of recipes such as this one is their ability to be translated in a way that still preserves their essence. I will never speak Italian like an Italian, but what I do speak is still recognizably Italian and I hope it demonstrates my love for (if not my complete mastery of) the language.
Note: This recipe uses raw egg yolks. They are cooked by being tossed with the hot pasta, but if this may be a problem for you, try Pasta in Cream Sauce as an alternative.
Pasta Carbonara for Two
Ingredients
100 gr. (about 1/4 lb.) guanciale, cubed or diced
1 tbsp. olive oil
3 large egg yolks
225 gr. rigatoni (1/2 lb)
freshly ground black pepper
30 gr. (about 1/4 heaping cup) finely grated Pecorino Romano cheese, plus more for garnish
Preparation
Cook guanciale in olive oil in a heavy skillet over medium-high heat, stirring frequently until crispy. Remove the guanciale to a plate. Put 1-2 tbsp. of the guanciale drippings in a large bowl; let cool. Add egg yolks, grind a healthy amount of pepper over the yolks, then mix with a fork to emulsify.
Meanwhile, cook the pasta in a large pot of boiling, salted water, stirring occasionally until al dente (according to package directions). Before draining, reserve ½ cup of the pasta cooking liquid— and place a tbsp. measuring spoon into the reserved pasta water.
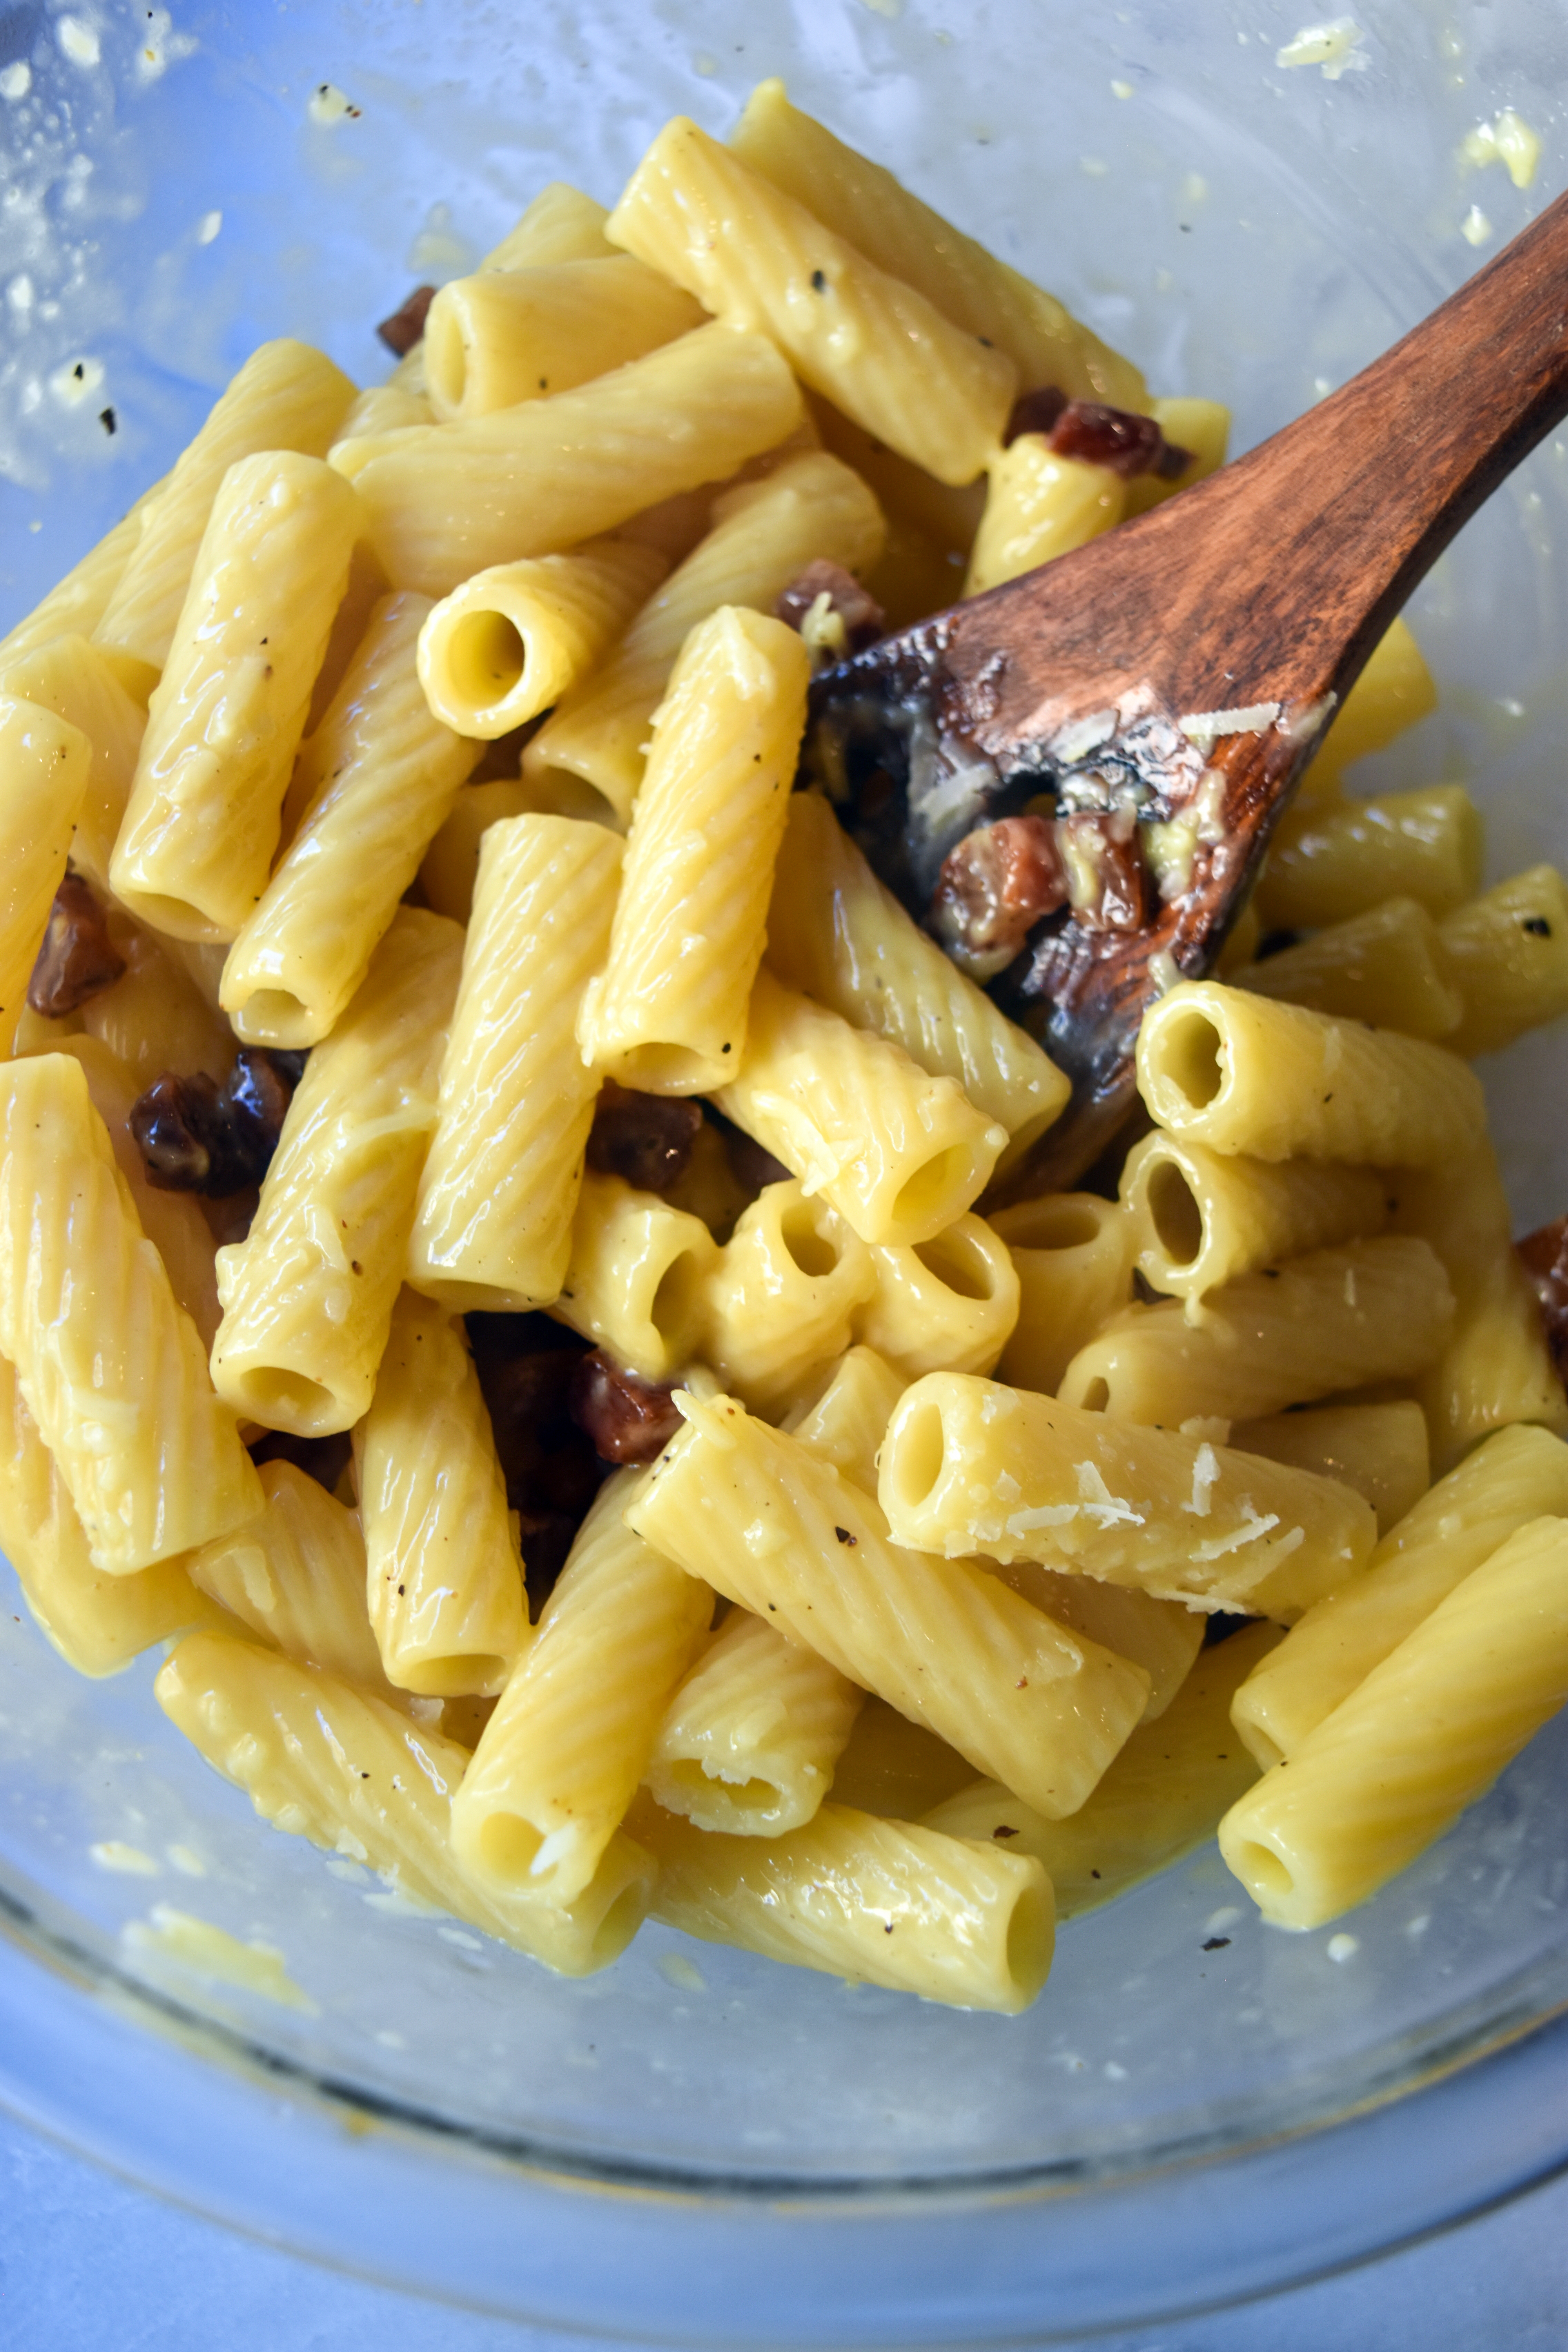
When the pasta is ready, drain it and immediately add it and 1 tbsp. of the reserved pasta water to the egg mixture; tossing vigorously to coat and to make sure the egg yolks don’t scramble. Add the Pecorino in batches, stirring and tossing until the cheese is mostly melted and the sauce thickens. (Add more pasta water or pepper if desired.) Just before serving, mix in the crispy guanciale.
Divide among bowls. Serve with more grated Pecorino Romano.
We moved into a new house this past summer, and repainted every single wall in the house (because we are crazy that way). We spent a lot of time making sure the living areas felt just right. As usual, we left our bedroom for last. One thing it needed was some kind of art work on the wall above the bed, and after coming across a fabric weaving photo online, I knew that was what I wanted to do. Two problems: 1) My previous weaving experience was limited to making potholders as a child and 2) I don’t know how to use a sewing machine, which is useful for actually turning the weaves into a final product of some kind. (I can sew by hand, but that was definitely not something I wanted to attempt here.)
I tackled the first problem by finding out everything I could about weaving with fabric strips, and by practicing a lot. I avoided the second problem by deciding on a non-sewing solution for the bedroom project, though I know it’s only a matter of time before I’m going to have to learn how to use a sewing machine. This post is not about the weaving I finally did for the bedroom wall, but about the practice runs leading up to it and what a novice like me learned along the way–in case anyone can benefit from my mistakes.
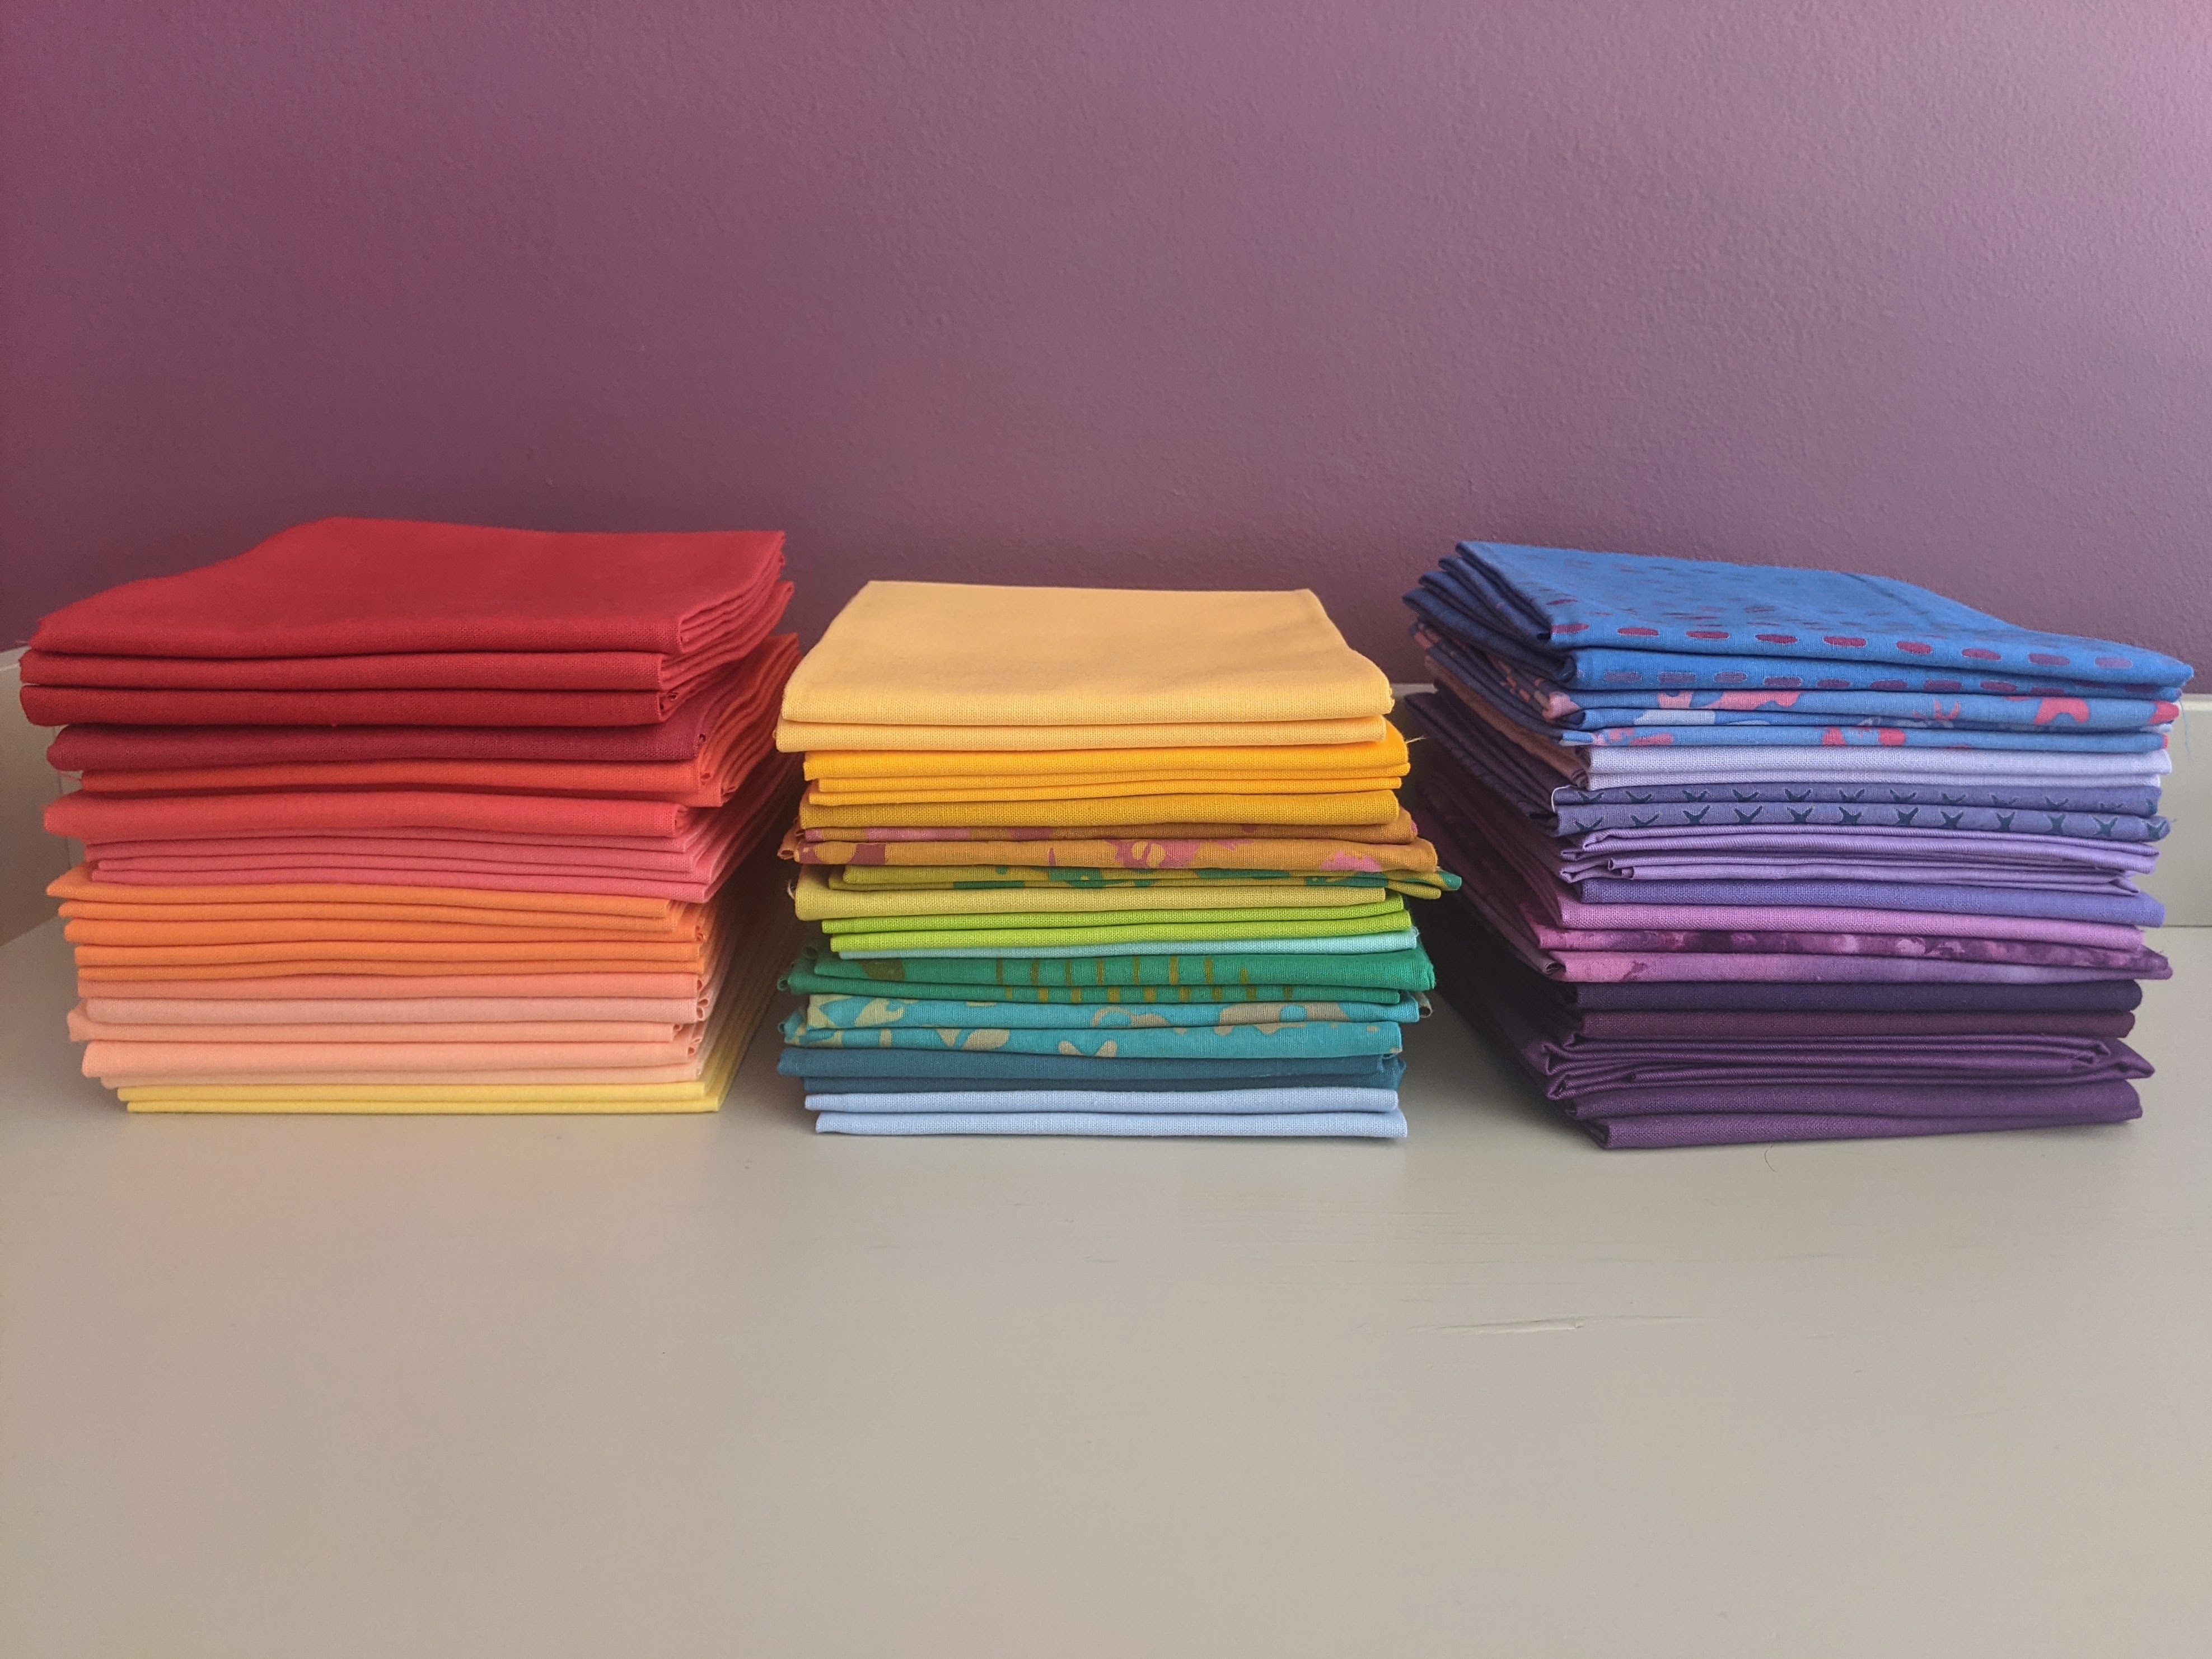
Fabric basics: I knew fabric came in yards, but that was it. (As I mentioned, I had a lot to learn….) Now I know that a bolt of fabric is usually 44″ wide, though width can sometimes vary a tiny bit. So a yard of fabric is usually 36″ x 44″. A half yard is 18″ x 44″ and a fat quarter is 18″ x 22″. I started out by buying inexpensive fat-quarter bundles online, to use for practice:
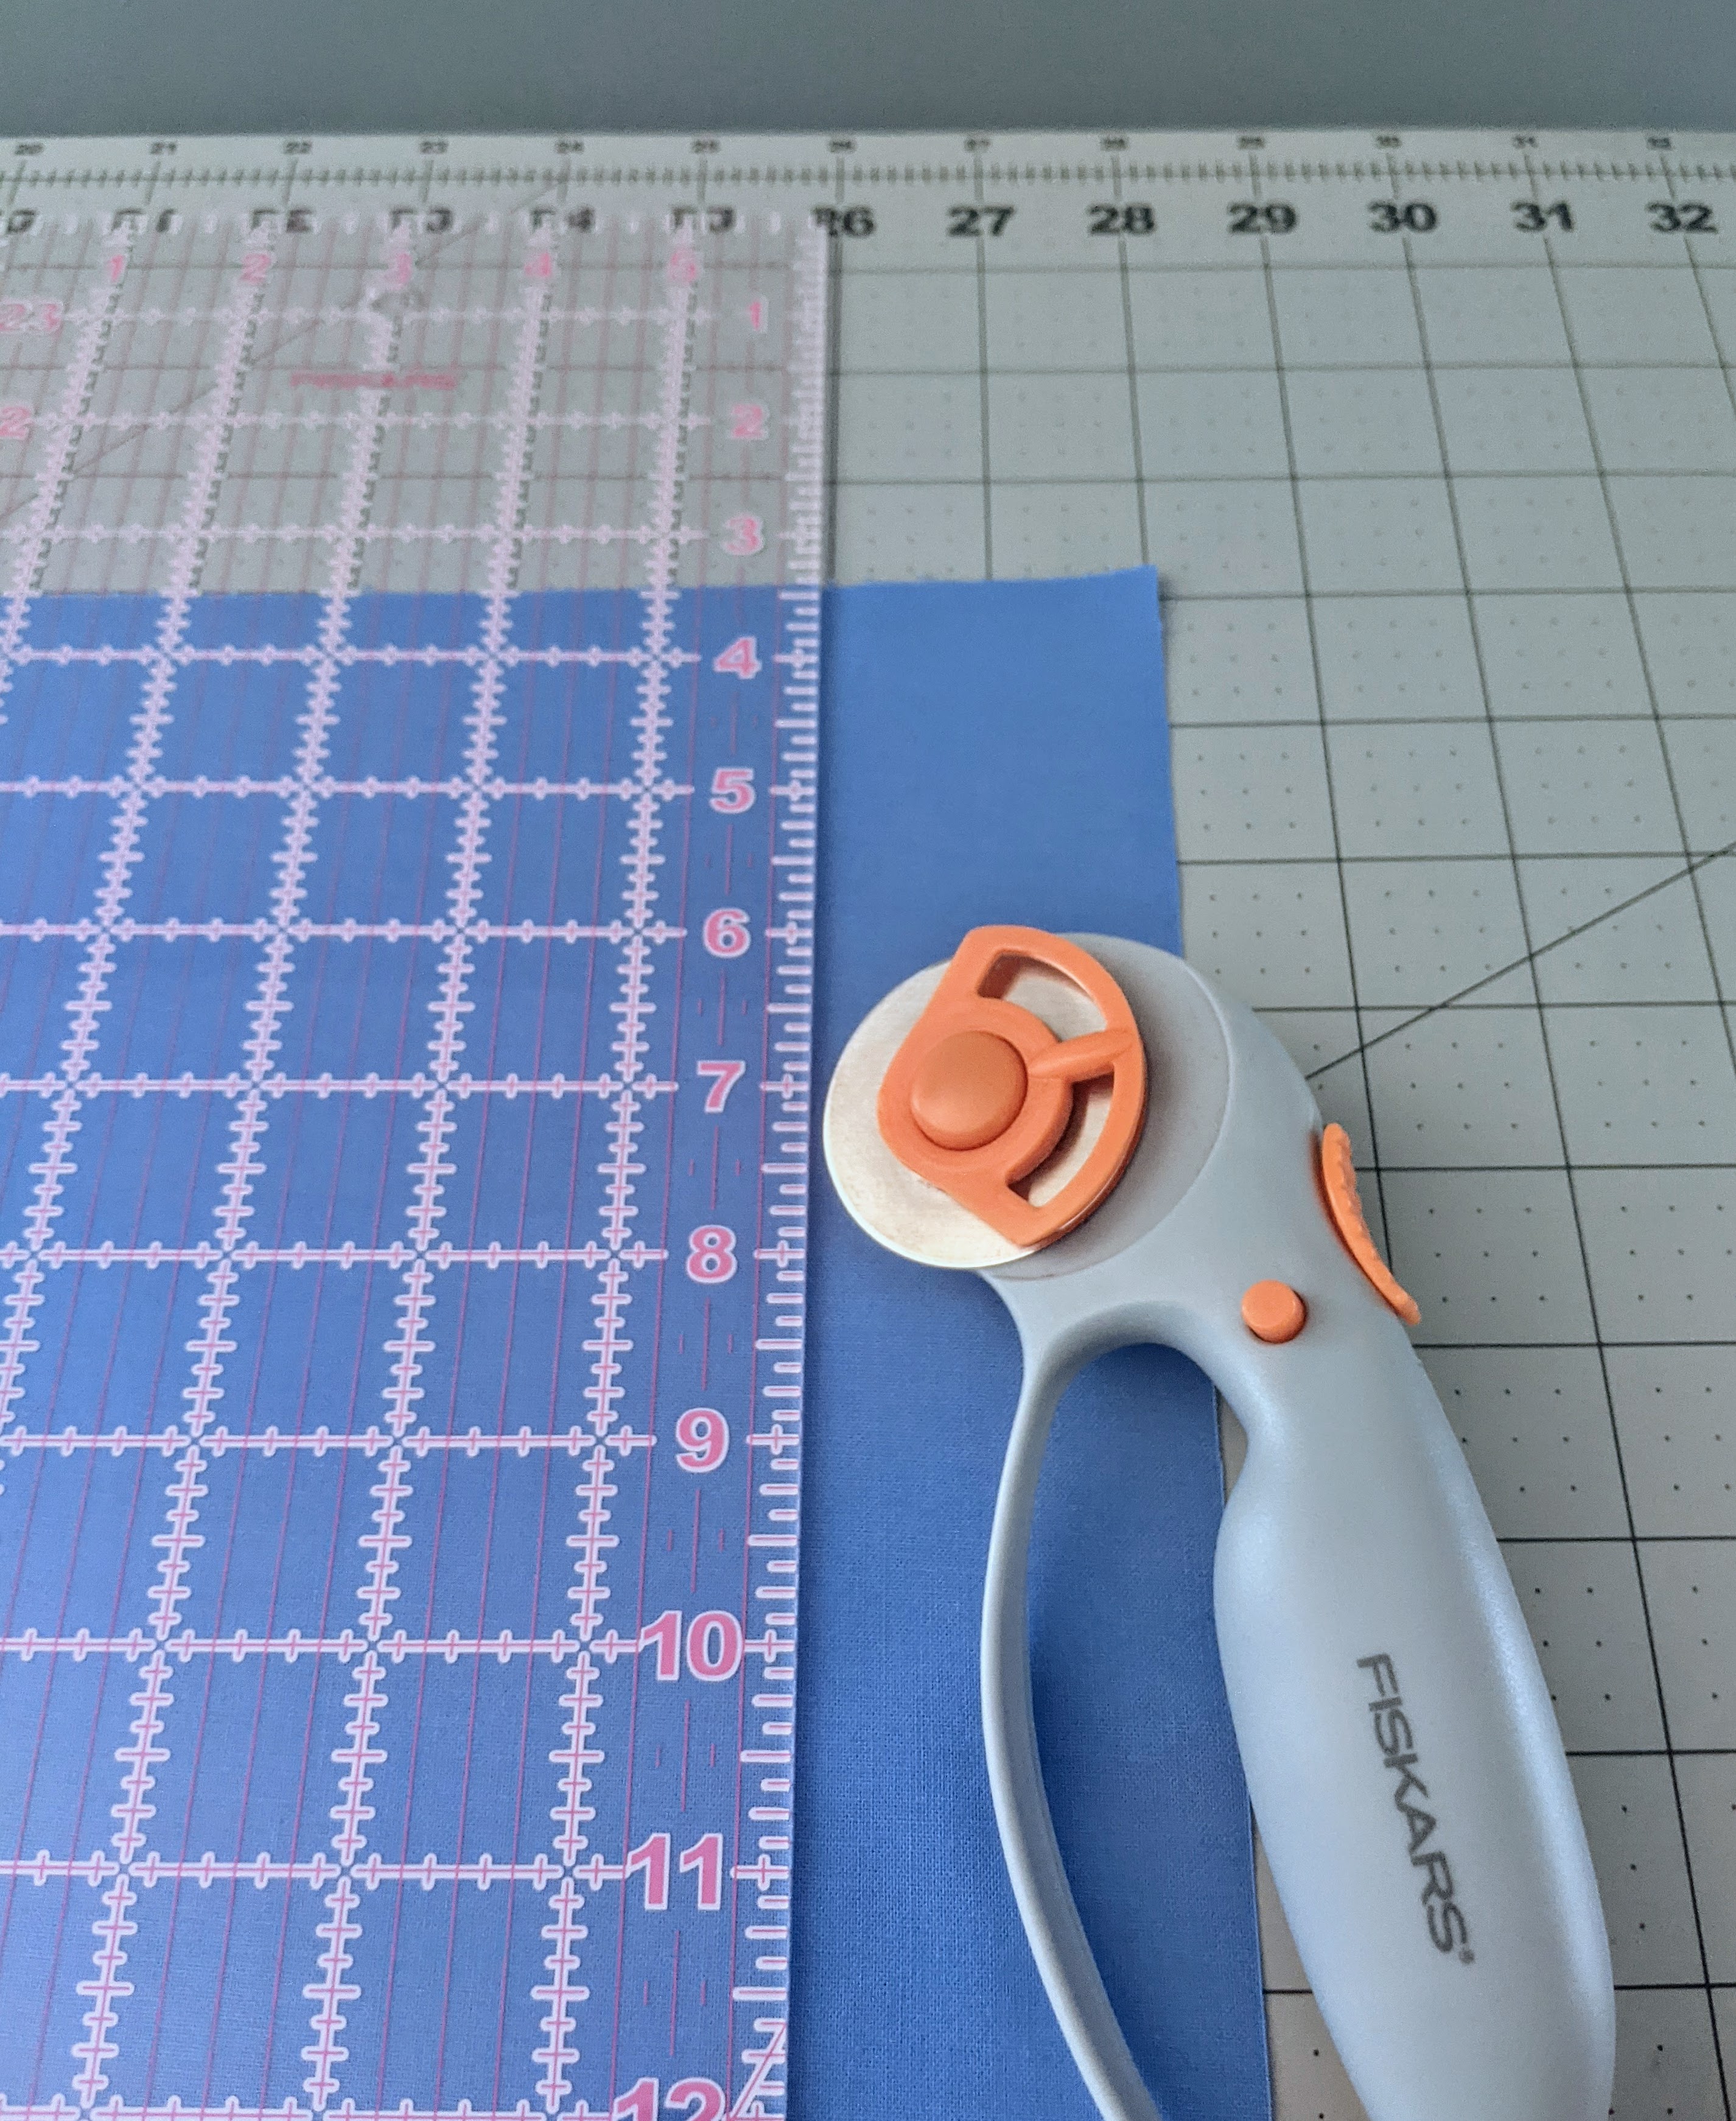
Cutting the fabric: This may sound self evident, but to weave with fabric strips you need to make the fabric strips–and cutting the fabric is only the first step. I decided to weave with 1″ strips, meaning I needed to cut fabric pieces double that width. A fat quarter will yield 11 (2″wide x 18″ long) pieces. I cut the fabric on a drafting table (though any good-sized work space will do) topped with a self-healing rotary cutting mat, using a rotary cutter. I lined up the fabric on the mat and used a 6″ x 24″ inch clear ruler as a guide/edger for the rotary cutter, moving leftward across the fabric since I’m right-handed:
Fabric strips: The second step is to actually make the strips (aka tape). For 1″ strips, you need to fold a 2″ piece of fabric in half by bringing the two long halves together, and run it through a sasher tool/tape maker while ironing the strips to keep them neat and flat. The first photo below shows (l-r) a final 1″ ironed strip, the fabric in the sasher tool, and some original 2″ pieces of fabric. The second photo shows the ironing process, though note–as this was one of the first times I made a strip, I ran the cloth through the sasher tool with the tool upside down. It’s much easier to maneuver when the curved part of the tool faces upward, so don’t repeat my mistake!
Preparing your work surface: Normally, you will be working on a foam board (though I didn’t use one when doing the project for my bedroom wall; more on that later). Select a foam board larger than you expect your final project to be, and place a layer of fusible interfacing on the board, tackier/stickier side up. (You will bond your weave to the interfacing with an iron after you are done with your project, to help keep it all in place, then you will tape the edges for extra reinforcement.)
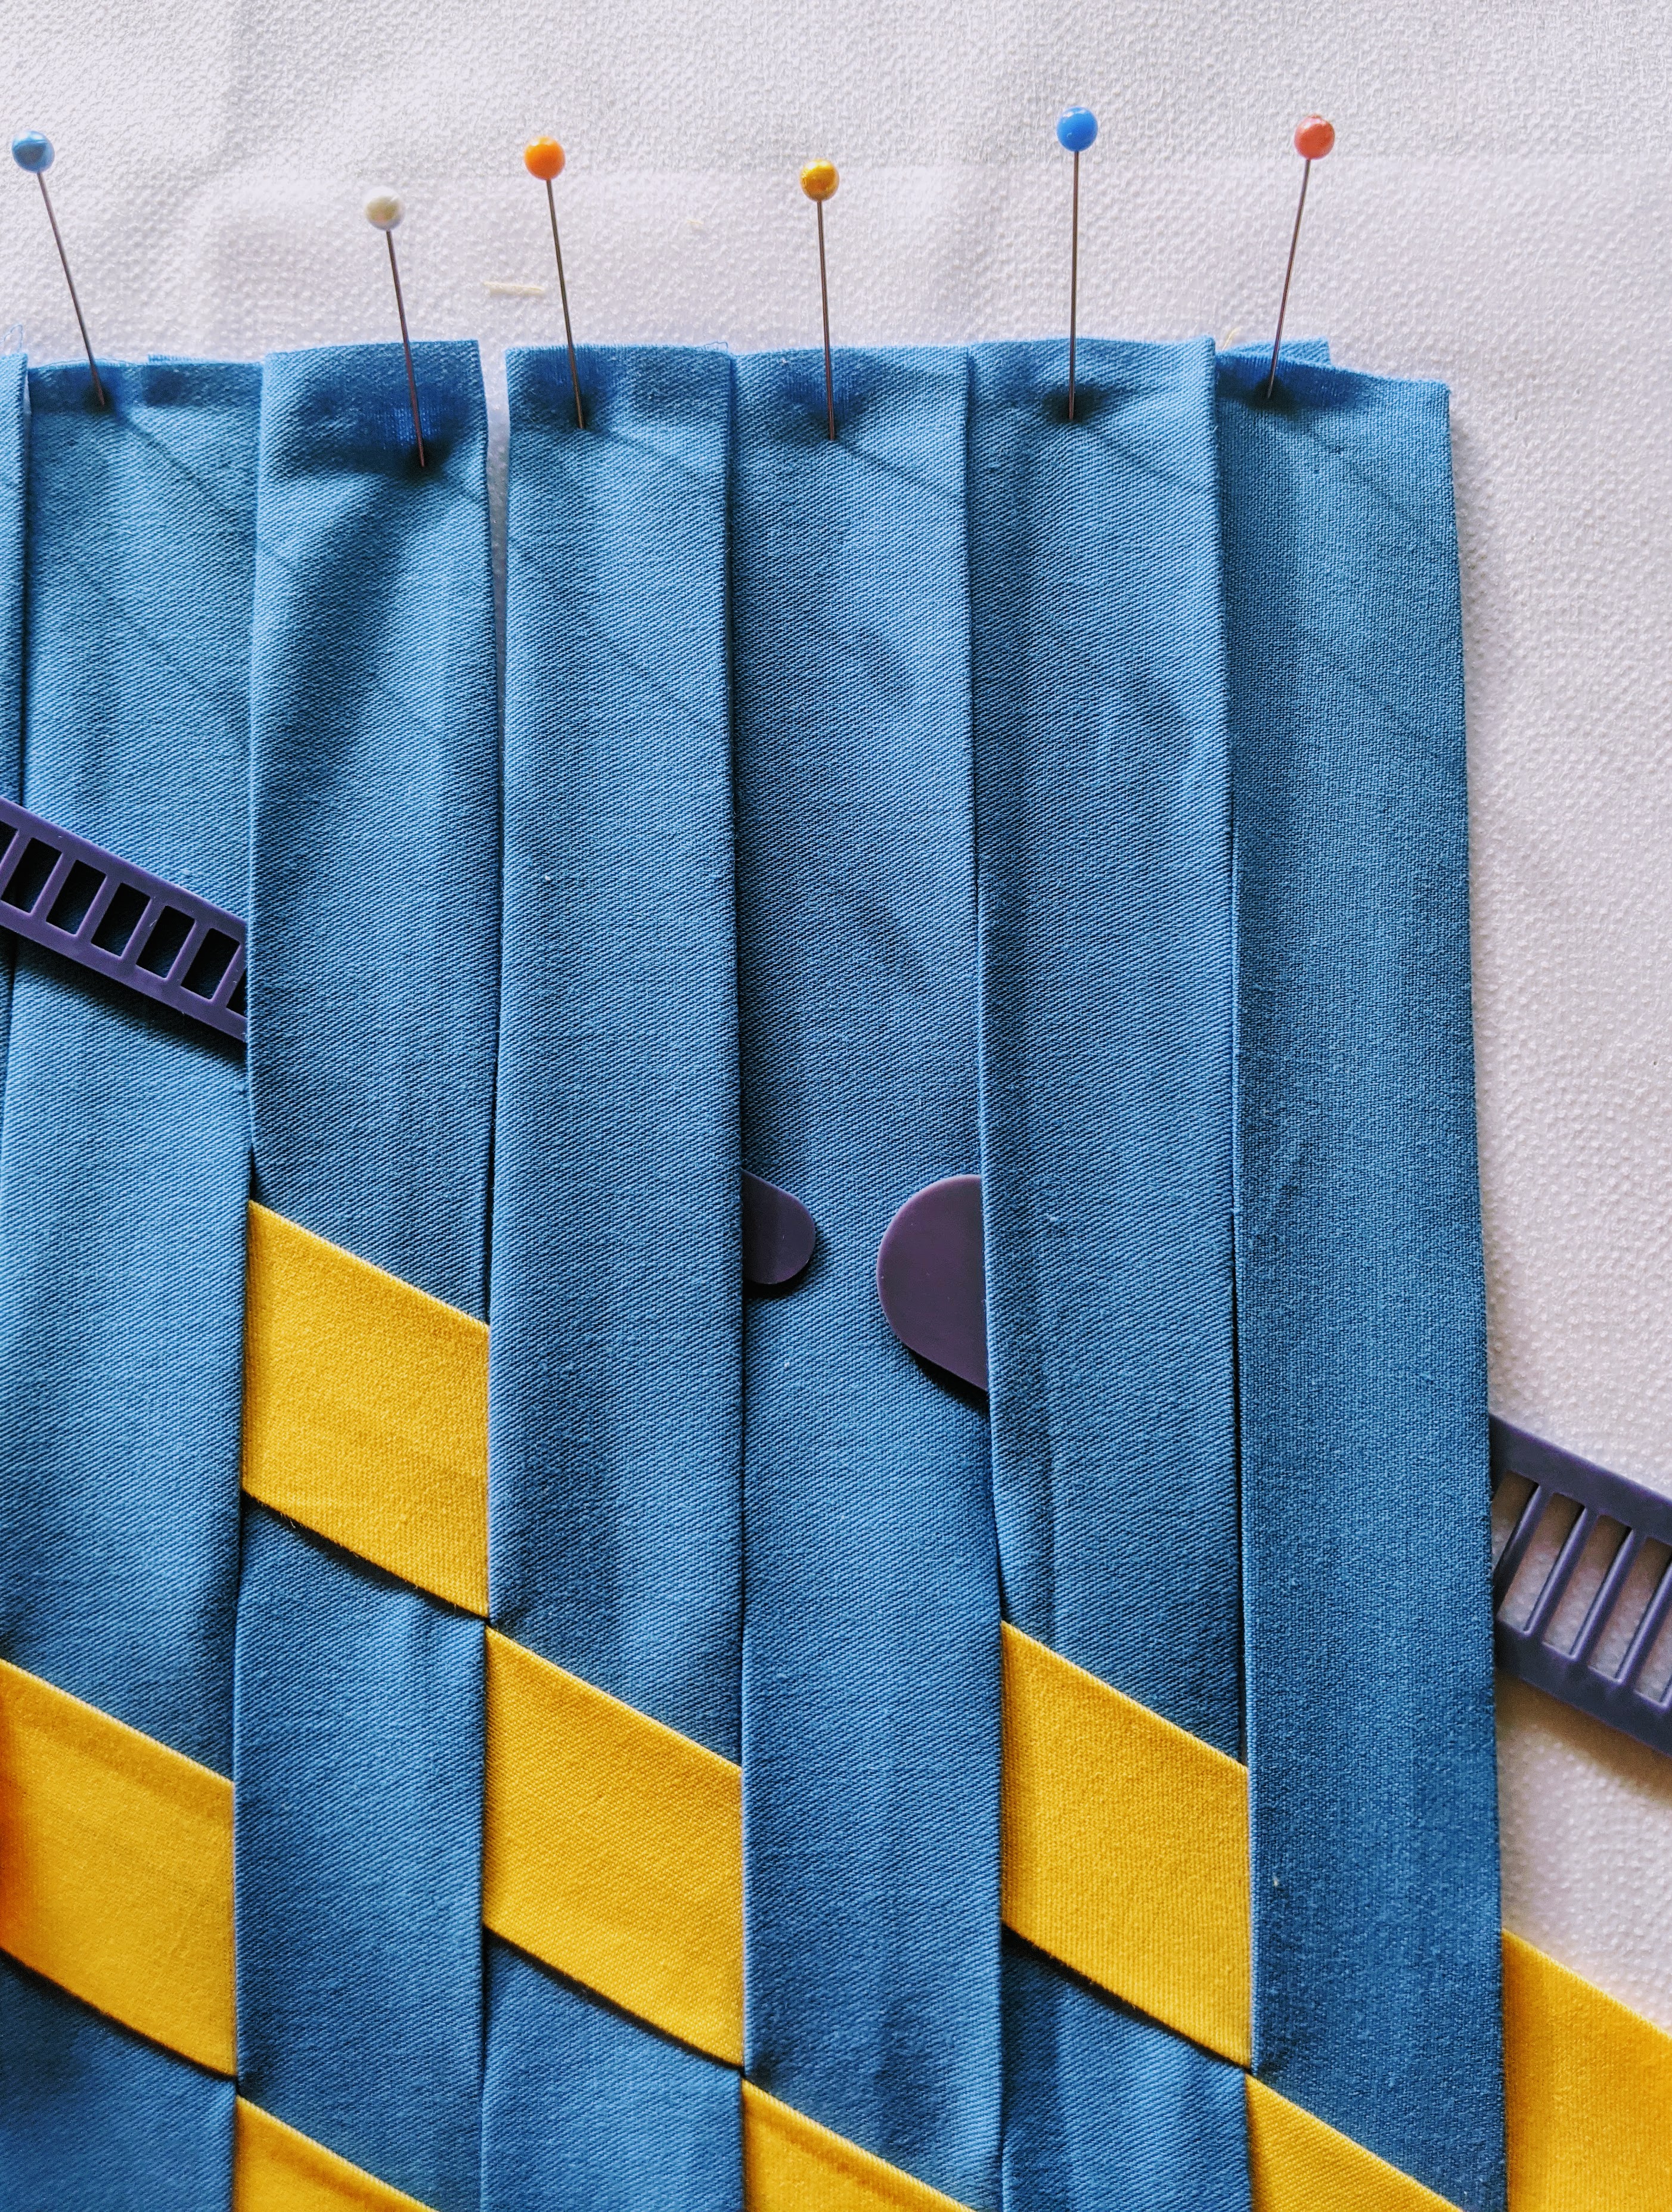
Patterns: There are MANY different ways to weave. I chose three colors (orange, blue, yellow) of inexpensive fat-quarter fabric and decided to try all sorts of patterns with those. But instead of trying the easiest pattern first, I went straight for a triaxial/tumbling block weave, because why not? (There are reasons why not, but I ignored them. I should have remembered that this pattern is also fittingly called a “madweave.”) A triaxial weave has three layers: A first set of strips that are pinned vertically onto the foam board/interfacing (see the blue strips below), a second layer of strips going diagonally upward to the left at a 30-degree angle (see yellow strips below), and a third layer of strips going diagonally upward to the right at a 30-degree angle, moving over and under the previous two layers. For this type of weave especially, a WEFTY tool is essential (I use it for all my weaves; it makes everything much easier). I used a 1″ WEFTY (the larger of the two purple ones below) for the actual weaving, and a smaller one to help lift the strips. [Note: You can see the fusible interfacing below the blue strips; everything rests atop a foam board, too.]
Issues to Consider When Doing a Triaxial Weave:
Dimensions of final project: Because I did not think it through properly (or at all), I started out assuming that if I used strips that were 18″ long, I’d end up with a final project that was 18″ x 18″. Incorrect when it comes to a triaxial design. I forgot basic geometry: the hypotenuse is always longer than the sides. Meaning if my longest diagonal strip was 18″ (which is the length I had cut all my strips), then the width of my finished project could not also be 18″ or my diagonal strips would not be long enough to reach the sides. In fact, the ideal width was closer to 14″, as I learned when I started over with 14 vertical strips in the first layer, instead of 18. To avoid this problem again, I turned to math: Multiply the length of your strips by .78 to see how wide you can go for your first layer (for example, 18″ long x .78 = 14.04″ wide = 14 strips that are 1″ each). If you are using 22″ strips, your project can be about 17″ wide (22″ x .78 = 17.16).
Measuring a 30-degree angle: When starting the second layer of a triaxial weave, make sure you know how to measure a 30-degree angle. I thought I did, but I didn’t. The first time I tried, I placed the clear acrylic ruler vertically on my foam board (ie, perpendicular to the bottom edge), found the 30-degree angle and began weaving. The resulting pattern looked pretty cool, but not like any other triaxial weaves I’d seen. Turns out, by placing my ruler vertically, I’d ended up with a 60-degree angle. So I learned the hard way to measure the angle with my ruler placed HORIZONTALLY along the bottom edge of my board (ie, parallel to the bottom edge).
Where to start the second layer: For the second layer, start in the middle of one side (I like to start this layer on the right side, going upward toward the left at a 30-degree angle; see yellow strips below). Follow this pattern:
Strip 1: Over one, under two, over one, under two….
Strip 2: Under one, over one, then under two, over one, under two, over one….
Strip 3: Under two, over one, under two, over one….
Repeat.
Note: As a reminder to myself, when I finish weaving each “Strip 1”, I pin it to the right side of the board with a BLACK pin, to make for easy identification/counting. You could also use white or any color that stands out. I go up the board from the first strip I pinned in the middle in a 1, 2, 3, 1, 2, 3 pattern, and down the board from that middle strip in a 1, 3, 2, 1, 3, 2, 1 pattern. The red arrow below shows my first Strip 1; I wove above and below it afterward.
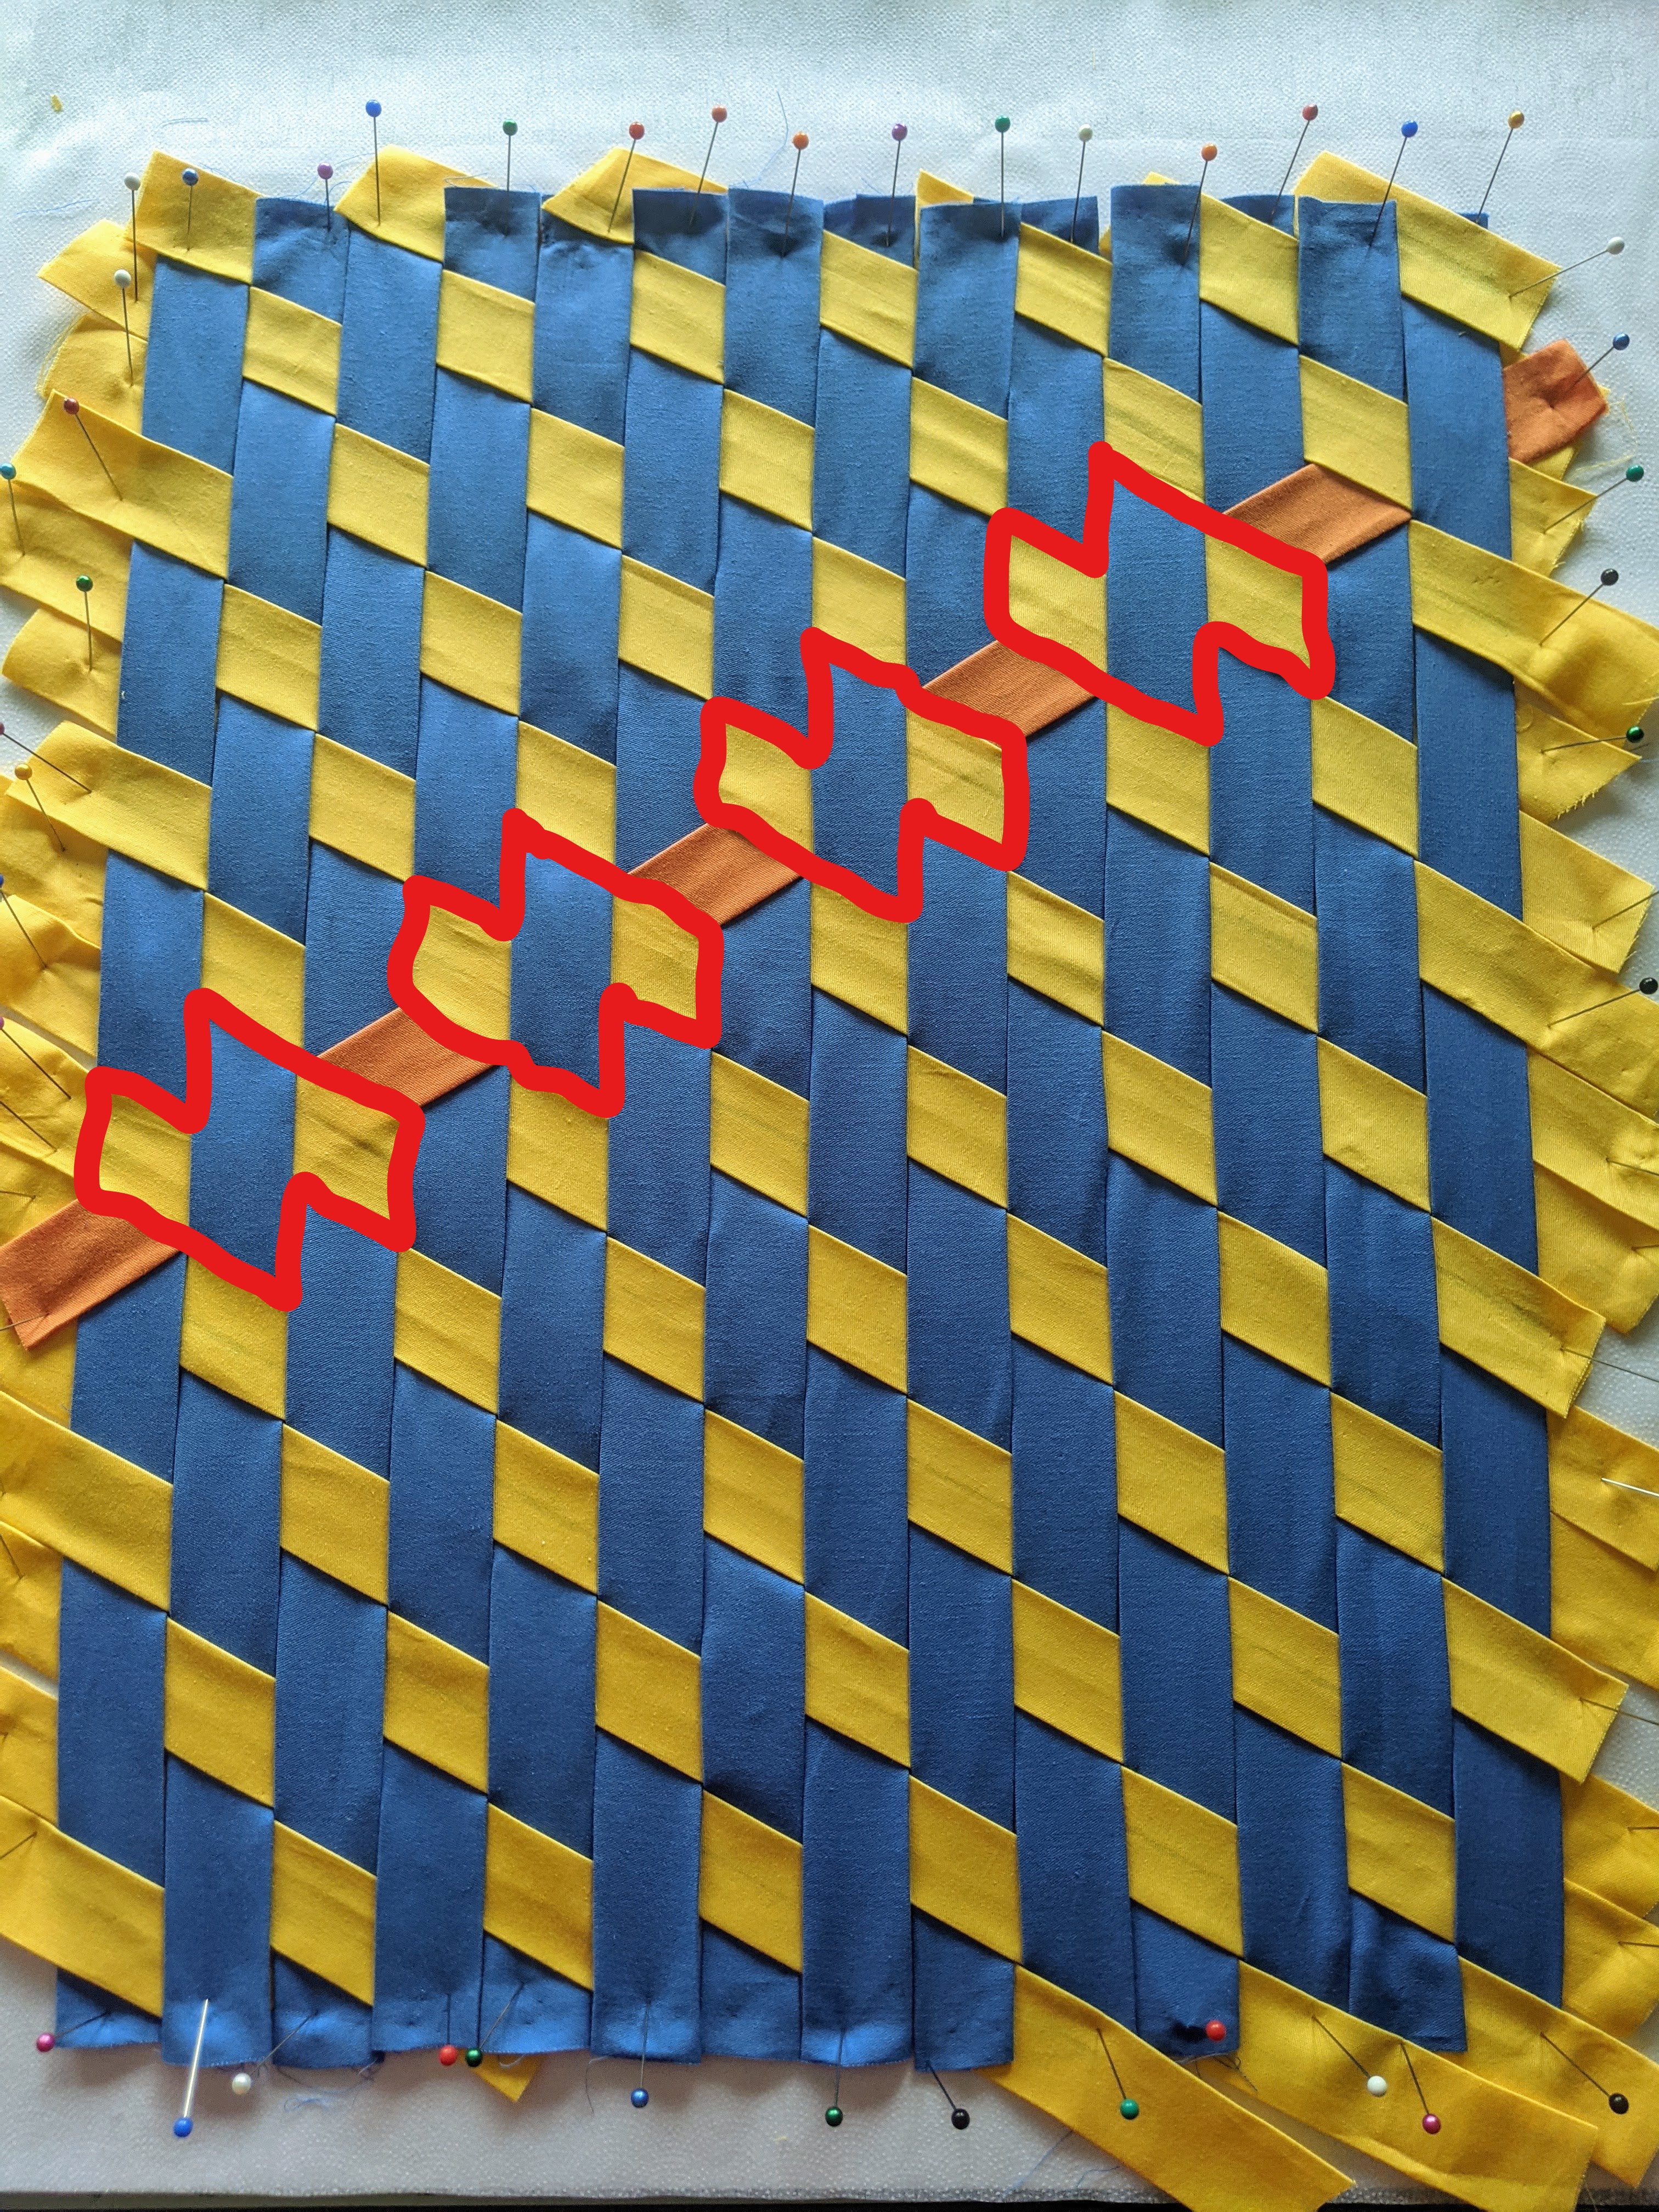
Where to start the third layer: For the third layer, start in middle of the other side (I start this layer on the left side, going up toward the right at a 30-degree angle; see orange strip below). You need to find a guide to know what parts of the first two layers to weave under. Some people look for a bird, others for a backwards “Z,” weaving under the wings and body of each “bird” or the horizontal parts of the “Z” (see red outlines in the photo below; those “birds” or backwards “Zs” are what you will need to weave under in the third layer). Going under the first wing and the body of the “bird” is easy; maneuvering the Wefty tool under the second wing but over another underlying strip of fabric below that wing is more tricky and requires some lifting and checking to make sure you’re getting it through the right way. This is when the second, smaller WEFTY tool helps; you can use it to lift the fabric and guide the main WEFT tool through (you can also use a tool called That Purple Thang for the same purpose). Once you get a sense of how to do it, this layer is actually very straightforward; you weave each strip exactly the same way, no Strip 1, Strip 2, etc. It’s also a fun layer to weave because you’ll start seeing the tumbling block pattern emerge after you’ve woven a few strips.
For my practice projects, I would finish one pattern, then undo it or switch it up a bit, and start another. Here are a few of the practice patterns I tried before moving on to more colors and more complex fabrics:
Here is my first actual triaxial weave, one that was not a practice one. It is fused to the interfacing below, with edges taped off, ready to be turned into something ( as soon as I learn to use the sewing machine and sew the edges properly). Note: There are 14 vertical rows in the first layer (the black strips), which allowed me to weave diagonally with 18″ strips at the longest points across the middle. By the time you get close to the corners of the weave, you can cut off the overhanging parts of strips from previous rows and reuse those cut-offs for the shortest sections. (This will make sense after you’ve tried the triaxial weave for the first time.)
I hope some of this info helps. I learned a lot from the resources listed below, but some things I only picked up by trial and error. I’m sure I have many more errors to discover, but perhaps these preliminary observations will make it easier for you as you get started.
Overview of supplies you will need:
Fabric (I used 100% cotton quilting fabric)
Clear ruler (a 6″ x 24″ is a good one to start with)
Rotary cutter and extra blades
Self-healing cutting mat
Iron
Sasher tool
WEFTY tool(s), That Purple Thang tool
Foam boards
Fusible interfacing
Pins
Fabric tape (you can even use something like painter’s tape, which is what I used above; anything that you can peel off of the fabric easily)
Great resources I used when learning how to weave:
If you are ever ambitious (or, in my case, clueless) enough to take the stairs from Minori up to Ravello on Italy’s Amalfi Coast, you will not regret it. You may leave one or even both lungs along the way, but a piece of your heart will remain, too. You will marvel at the views, the lemons groves, the mountainside terraces, and the churches–and at the people who live along the path, many of whom go up and down with a spryness that comes with long practice. It is a bit disconcerting to be passed up by septuagenarians carrying multiple bags of groceries, but if you persevere, there are two tremendous rewards to be had in Ravello: Villa Rufalo and Villa Cimbrone.
Minori, at sea level
We started out one morning in February, finding the path on Google Maps (though any shopkeeper can also point the way). Luckily, I didn’t have a good idea of what I was in for; the distance on the map didn’t look too bad at all. But up and up we went, roughly 1,500 steps by some counts–though not by ours; we didn’t have sufficient oxygen flow to keep up an accurate count. Ok, I’m exaggerating slightly–the climb is tough but doable, especial in cooler months and at cooler times of the day. It’s not all stairs, there are stretches of pathway and places to stop, too. But I wouldn’t recommend it at high noon in the middle of the summer, or for anyone who generally has trouble with lots of stairs. If you are game, however, it will be unlike almost anything else you do in Italy. And you can always do it in reverse–go down instead of up. We did both.
Signpost
Stairs going up; man trimming Mimosa tree
Altar along pathway; sea view
Mountain view
Last stretch of pathway between Minori and Ravello
When you finally make it to the top, you are in for a few more spectacular views. But first, a cappuccino or cold drink in the main piazza may be in order. After that, head to Villa Rufalo, home to the Rufalo family in the 13th century, restored by the Scottish businessman Francis Nevile Reid at the turn of the 20th century, and–since the 1950s–the venue for the famous Ravello Festival. Though how those musicians sit on a specially erected platform that appears to be dangling over the cliff, I do not know. The gardens and views are spectacular, but the villa itself is also worth a look.
Giardino
Umbrella pine; Torre Maggiore
Interior doorways; Tiled floors
After seeing Villa Rufalo, grab some lunch, then head to Villa Cimbrone, restored in the 19th century by the Englishman Ernest William Beckett (Lord Grimthorpe) and now a luxe hotel. The gardens, which can be seen separately from the hotel, were influenced by Edwin Lutyens and Gertrude Jekyll and benefited from the advice of Vita Sackville West, who chose many of the trees and plants. If you are afraid of heights, beware the Terrace of Infinity, a stunning spot from which to experience a vertiginous view of the sea 1200 ft (365 m) below. Yes, it’s a slab of concrete dangling on the cliff, but it has lasted this long and appears very sturdy. Just don’t lean too far over the dainty, waist-high, wrought-iron fencing….
Entryway to Villa Cimbrone; Cloister
Rose Terrace
Avenue of Immensity; Statue of Ceres
Terrace of Infinity
Sea view from Terrace of Infinity
So, after a good day in which we climbed a mountain and saw two spectacular gardens, we decided to treat ourselves to a cab back down to Minori. Except there wasn’t one; the lone cab driver working in February had gone on an extended lunch break. So, back down the 1,500 steps we went. My knees and calves were sore for a few days afterward, but I’d do it again in a heartbeat. Plus, there was a sweet reward at the bottom….
Pathway down; Lemon trees behind protective fencing
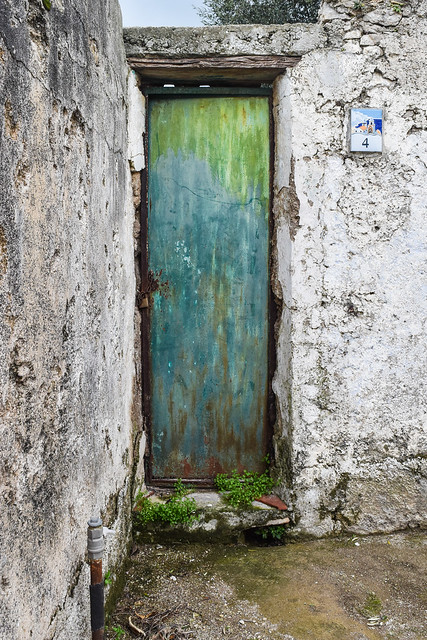
Rusted doorway; Donkey and cart decor along pathway
View of Ravello atop the cliff
Reward at the bottom; cake at Pasticceria Sal De Riso in Minori
Anyone interested in passion and heartbreak need look no further than a flower garden. And there is no better place to look than Keukenhof (in Lisse, the Netherlands), which opens tomorrow for its 2017 season. It is the largest flower garden in the world and it specializes in tulips–which, like orchids, have driven people to distraction, debt, and death.
Keukenhof means ‘kitchen garden, but don’t let the name fool you into thinking it’s unobtrusively tucked round the back of a manor house; it covers 32 hectares (79 acres) and is known as the Garden of Europe. This botanic wonderland features 7 million bulbs in bloom, including 800 varieties of tulips: botanical tulips; Greigii tulips; parrot tulips; single early, double early, single late, and double late tulips…. The list goes on.
Mixed beds; Double Late Tulip ‘Uncle Tom’
Tulip ‘Doll’s Minuet’; ‘Mysterious Parrot’ Tulip
A view of Keukenhof
High on that list are “broken” tulips, which originally were cultivars infected with a tulip breaking virus that “broke” the plant’s single-color code, causing streaks, stripes, and flames of different colors to appear on the petals. Today, the same effects are achieved through breeding; only a few varieties of truly “broken” tulips still exist. But 380 years ago, the virus and those tulips caused people to lose their heads. While tip-toeing through the crowds at Keukenhof may not be for the faint-hearted, neither was the tulip trade in 17th-century Amsterdam.
Tulips are believed to have originated in current-day Iran; in fact, some scholars suggest the name “tulip” comes from the Persian word for “turban.” The flowers were highly prized by the Ottomans, and it is from ambassadors and visitors to the Ottoman courts that the flowers likely made their way to Northern Europe, and to the Netherlands. Carolus Clusius, a Flemish botanist and professor at the University of Leiden, planted the Netherlands’ first tulip bulbs in the university’s botanical garden in 1593.
Clusius’ tulips received a great deal of attention. Tulips were already considered an exotic flower in the Netherlands, and the virus only made them more so. As a result, there were regular raids on Clusius’ gardens and the market for tulips began to heat up, leading to the infamous Tulip Mania of 1634-37. At its height, a single, prized tulip bulb was worth exponentially more than the average person’s annual income, and more than a luxurious canal-side house. The tulip had become the ultimate status symbol. Some people put mirrors in their gardens to suggest there were more tulips than they actually had. Those who could not afford the bulbs bought furniture, art, and tableware decorated with tulips instead. And then the world’s first—but not last–speculative bubble burst, leaving a trail of shattered dreams and destitution in its wake. (This animated Ted Ed video puts it in perspective.)
If you want to see the flowers that inspired these events, Keukenhof’s 2017 season runs from March 23 to May 21. As you wander the grounds, you will see that modern-day tulips still have the power to inspire; it is not unusual to see visitors climbing into the flower beds to pose for photos while lying among the blooms. But spare a moment for the many other flowers you are likely to see, too, because they are also worth the attention:
Spring is in the air and that means the Garden of Ninfa, which has been called the most romantic garden in the world, will soon be open for its limited 2017 season. Ninfa is the Italian word for nymph. It is an apt name for this sylvan place that time forgot, with its flowers, trees, and gurgling streams, and its ruins covered in vines.
Located near Cisterna Latina 75 km (46 miles) southeast of Rome, Ninfa has a long and colorful history. A thousand years ago, it was a small town by a flowing stream, home to a temple dedicated to the water nymphs from whence it got its name. By 1100 it had become an important and wealthy place next to the only north-south road that was passable when the Appia Antica was flooded.
Pope Alexander III was crowned there in 1159, but the town’s honor and glory would not last long; the Pope’s enemy the Emperor Barbarossa sacked the town. It eventually passed into the hands of the Caetani family, though it suffered a long and steady decline starting in the 1300s. During subsequent centuries, nature took its course, engulfing the abandoned medieval town, which faded from sight.
But not from memory. In the early 1920s, Gelasio Caetani decided to reclaim the swampy land via a custom-built drainage and irrigation system, and establish a garden amid the ruined town with the help of his English-born mother and American-born sister-in-law. Gelasio’s’ niece Leilia Caetani and husband Hubert Howard continued the family’s work. They imported plants from all over the world; the 8-hectacre (20-acre) site is home to more than 1,000 plant species, including dozens of roses, clematis, climbing hydrangea, water irises, ornamental cherry trees, cypress, magnolias, oaks, and poplars, among many others.
Today, a foundation maintains the garden, which is only open on certain dates and is accessible only via a guided tour. In 2017, visiting season kicks off on April 1. The majority of open days are in the spring, though the season runs through November 5. Check online for dates and to buy tickets–and if you are going to go, get there early. If you have a few minutes before your tour starts (or after it ends), you can cross the road and visit the Horti Nympharum, a classic citrus garden across the lane complete with fountain, a family of swans, and castle ruins to wander through. There is a separate entry fee for that garden, but it is worth the price.
Finally, if you are making a day of it, head up to the walled hill town of Sermoneta for lunch; the town itself is charming, and the views of the valley from above are gorgeous.
You’ve vowed to eat more leafy greens, and you’re doing a great job adding more collard, kale, mustard greens, spinach, and other leafy greens to your diet. In Italy, where I live, those other greens would also include borage, broccoli rabe, chicory, escarole, watercress, and wild greens. But as you munch your way through one high-fiber, high-mineral, high-vitamin leafy green after another, there comes a day when you realize that, much as you love them all, one sautéed leafy green looks much like another. You have fallen into a green rut. That’s when Swiss Chard comes to the rescue. With Swiss Chard, you can have your leafy greens and ruby-red stems, too (if you get the right kind; chard stems can be white, yellow, or red).
Swiss Chard, or bietina/bietola in Italian, is widely eaten in Italy and around the Mediterranean. Why, you may ask, is it called Swiss Chard? No one knows. It’s not Swiss. But the plant may have first been described by a Swiss botanist, so that could be the answer–though it’s possible a German botanist actually did the describing first. It is one of those common plant-name oddities, like Jerusalem Artichoke.
This recipe uses tender, baby red Swiss Chard. If the chard you have is bigger/older, you may need to cut the leaves off the stalks, and add the chopped stalks to the skillet first, to give them more cooking time.
Recipe: Sautéed Baby Red Swiss Chard 2-3 servings
1 1/2 lb. (3/4 kg.) baby red Swiss Chard
olive oil
2 cloves garlic, chopped
chili flakes/crushed red pepper
salt and pepper
Preparation
1. Trim the stalks by cutting them off the root end of the bunch of chard. Most stalks should be thin and tender. With larger stalks, take a knife and carefully remove the stringy part by peeling down the center of the stalk.
2. Wash the greens in plenty of cold water, swishing and swirling to remove any dirt or grit. Drain in a colander.
3. Drizzle some olive oil around the bottom of a heavy skillet; add the garlic, chili, and salt; grind some pepper over; and cook the garlic and chili over medium-high heat for about a minute. Add the chard, stirring occasionally to make that sure none of the leaves get stuck to the bottom of the skillet, and that all leaves get cooked. As with all greens, what looks like a huge amount will soon cook down to a fraction of its former volume. If the pan seems too dry, add a bit more olive oil.
4. Check the seasonings, and serve either warm or at room temperature.
Sometimes, you need comfort food. While home today with a very sore throat and not much food in the fridge, I wondered what to make for lunch. It needed to be soft. It needed to make me feel better. It needed to be made from the few items I could scrounge up, and it needed to be prepared quickly. There was only one possibility: Spaghetti with Ricotta and Pecorino Romano, a double dose of sheep-milk heaven — and ready in less than 15 minutes. Perfect.
Spaghetti with Ricotta and Pecorino Romano
This is a free-form recipe; you can adjust any of the ingredients to suit your tastes. The quantities below are for one hungry pasta lover, but this dish could serve two people if part of a multi-course meal.
¼ lb. (113 grams) spaghetti, fettucine, tonnarelli, or other pasta
1 tbsp. (14 grams) butter, cut into small pieces
¼-1/3 cup (28-38 grams) grated Pecorino Romano cheese
fresh, coarsely ground black pepper, to taste
2 ¼ oz. (64 grams) sheep’s-milk ricotta, crumbled or cut into small pieces (* use the best, freshest ricotta you can find)
Preparation
Start boiling lightly salted water in a generously sized pot. When the water comes to a boil, add the spaghetti and cook just until al dente—often that’s about 1 minute less than indicated on the package.
Meanwhile, place the pieces of butter in an unheated skillet or large bowl next to the pasta pot. Add the Pecorino Romano cheese, grind black pepper over top (to your liking), and sprinkle 2 tbsp. cooking water around the sides of the skillet or bowl.
When the spaghetti is done, quickly scoop it out of its cooking water with a pasta ladle and drop it into the skillet or bowl. Don’t shake off all the cooking water; it is an essential ingredient. Stir and swirl the spaghetti vigorously to melt the butter, the Pecorino Romano cheese, and the cooking water into a light sauce. Add more cooking water if the pasta appears too dry.
Check the seasonings (adding salt and more ground pepper if needed), gently fold in the ricotta, and serve immediately, with additional grated Pecorino Romano on the side.
There are probably as many versions of this soup as there are Bolivian families, and all of them likely to be delicious, but this is the version that has evolved at our house over the years. I love the bright-red color that comes from the tomato and chili pastes; it brightens even the coldest, most dreary day. I also love the soup’s many layers of flavor, each one contributing to the overall symphony. It’s even better the next day, so it’s a great make-ahead dish. And it’s very adaptable: make a vegetarian version by eliminating the beef/lamb, adding more veggies, and using vegetable broth/bouillon. Or substitute quinoa for the wheat if gluten is an issue.
Bolivian Soup with Wheat Berries (Sopa de Trigo)
Wheat/Hominy: 1/3-1/2 c. (60-95 gr.) dry wheat berries/trigo pelado
1 can (14 oz./400 gr.) cooked hominy/mote blanco, undrained, OR 1/2 c. (60 gr.) dried cracked hominy/maiz blanco trillado–see photo below
½ c. freeze-dried potato/black chuño (optional)
Soup broth:
12 c. (3 liters) beef broth
1 lb. (500 gr.) meaty, bone-in beef or lamb
1 large onion, halved
1 large tomato, quartered
2 carrots, peeled and halved
2 bay leaves
beef bouillon cubes (optional)
Soup Vegetables:
3/4 c. (100 gr.) frozen petite peas
2 large carrots, julienned
3 large potatoes, julienned (it’s traditional to julienne both the carrots and the potatoes, but I have been known to dice both instead…)
Note: If using the optional freeze-dried potato/chuño, soak it in warm water overnight prior to making the soup. Before adding it to the soup in step #5, drain it and squeeze as much water out as possible. If necessary, chop into small pieces.
Place the wheat berries (and, if using, the dried hominy) in a medium saucepan, cover with several inches of water, and bring to a boil. Reduce heat, cover, and simmer for about 60-90 minutes or until both wheat and hominy are soft. Drain and set aside. If using canned hominy, pre-cook only the wheat, and add the undrained canned hominy to the soup in step #5.
Meanwhile, add the broth and meat/bones to a large pot and bring to a low simmer, skimming periodically until no more foam is produced. Add the halved onion, quartered tomato, halved carrots, and the bay leaves and continue simmering slowly until the vegetables are soft, about 30 minutes. Check the seasonings and add beef bouillon cubes to taste, if needed.
Remove the beef/lamb to a dish and let cool. Strain the broth through a fine-meshed sieve into a large bowl, mashing the tomato pieces to extract any remaining liquid. Return the broth to the pot and discard the vegetables.
Shred the meat, discarding the bones and any fat, and add the shredded meat to the pot along with 1 c. of the cooked wheat, the hominy, the freeze-dried potato/chuño (if using), and the peas, carrots, and potatoes. Bring to a low simmer and cook for 15 minutes.
Meanwhile, prepare the sofrito: Heat the olive oil in a skillet over medium-high heat, add the onion, and cook until soft and slightly golden. Add the remaining ingredients to the skillet and cook for a few minutes, stirring frequently, to make a fragrant paste. Add the paste to the soup pot, stir to mix, and continue simmering the soup, covered, for 15 minutes or more to develop the flavors and ensure all vegetables are soft. If the soup seems too thick, add more water. If it needs more salt, add another bouillon cube.
Serve with the sliced green onions and herbs sprinkled on top, and with plenty of crusty bread.


 on the sides; front-facing wall of opus mixtum (bands of brick and tufa), with lateral 'toothing' and a structural arch; plus rough-hewn travertine column--Portico of Claudius, Portus (c. 50 AD)")
")
 with lateral 'toothing' and putlog holes at the top--Trajan's warehouse, Portus (c. 100 AD)")
")
, Trajan's warehouse, Portus (c. 100 AD)")

