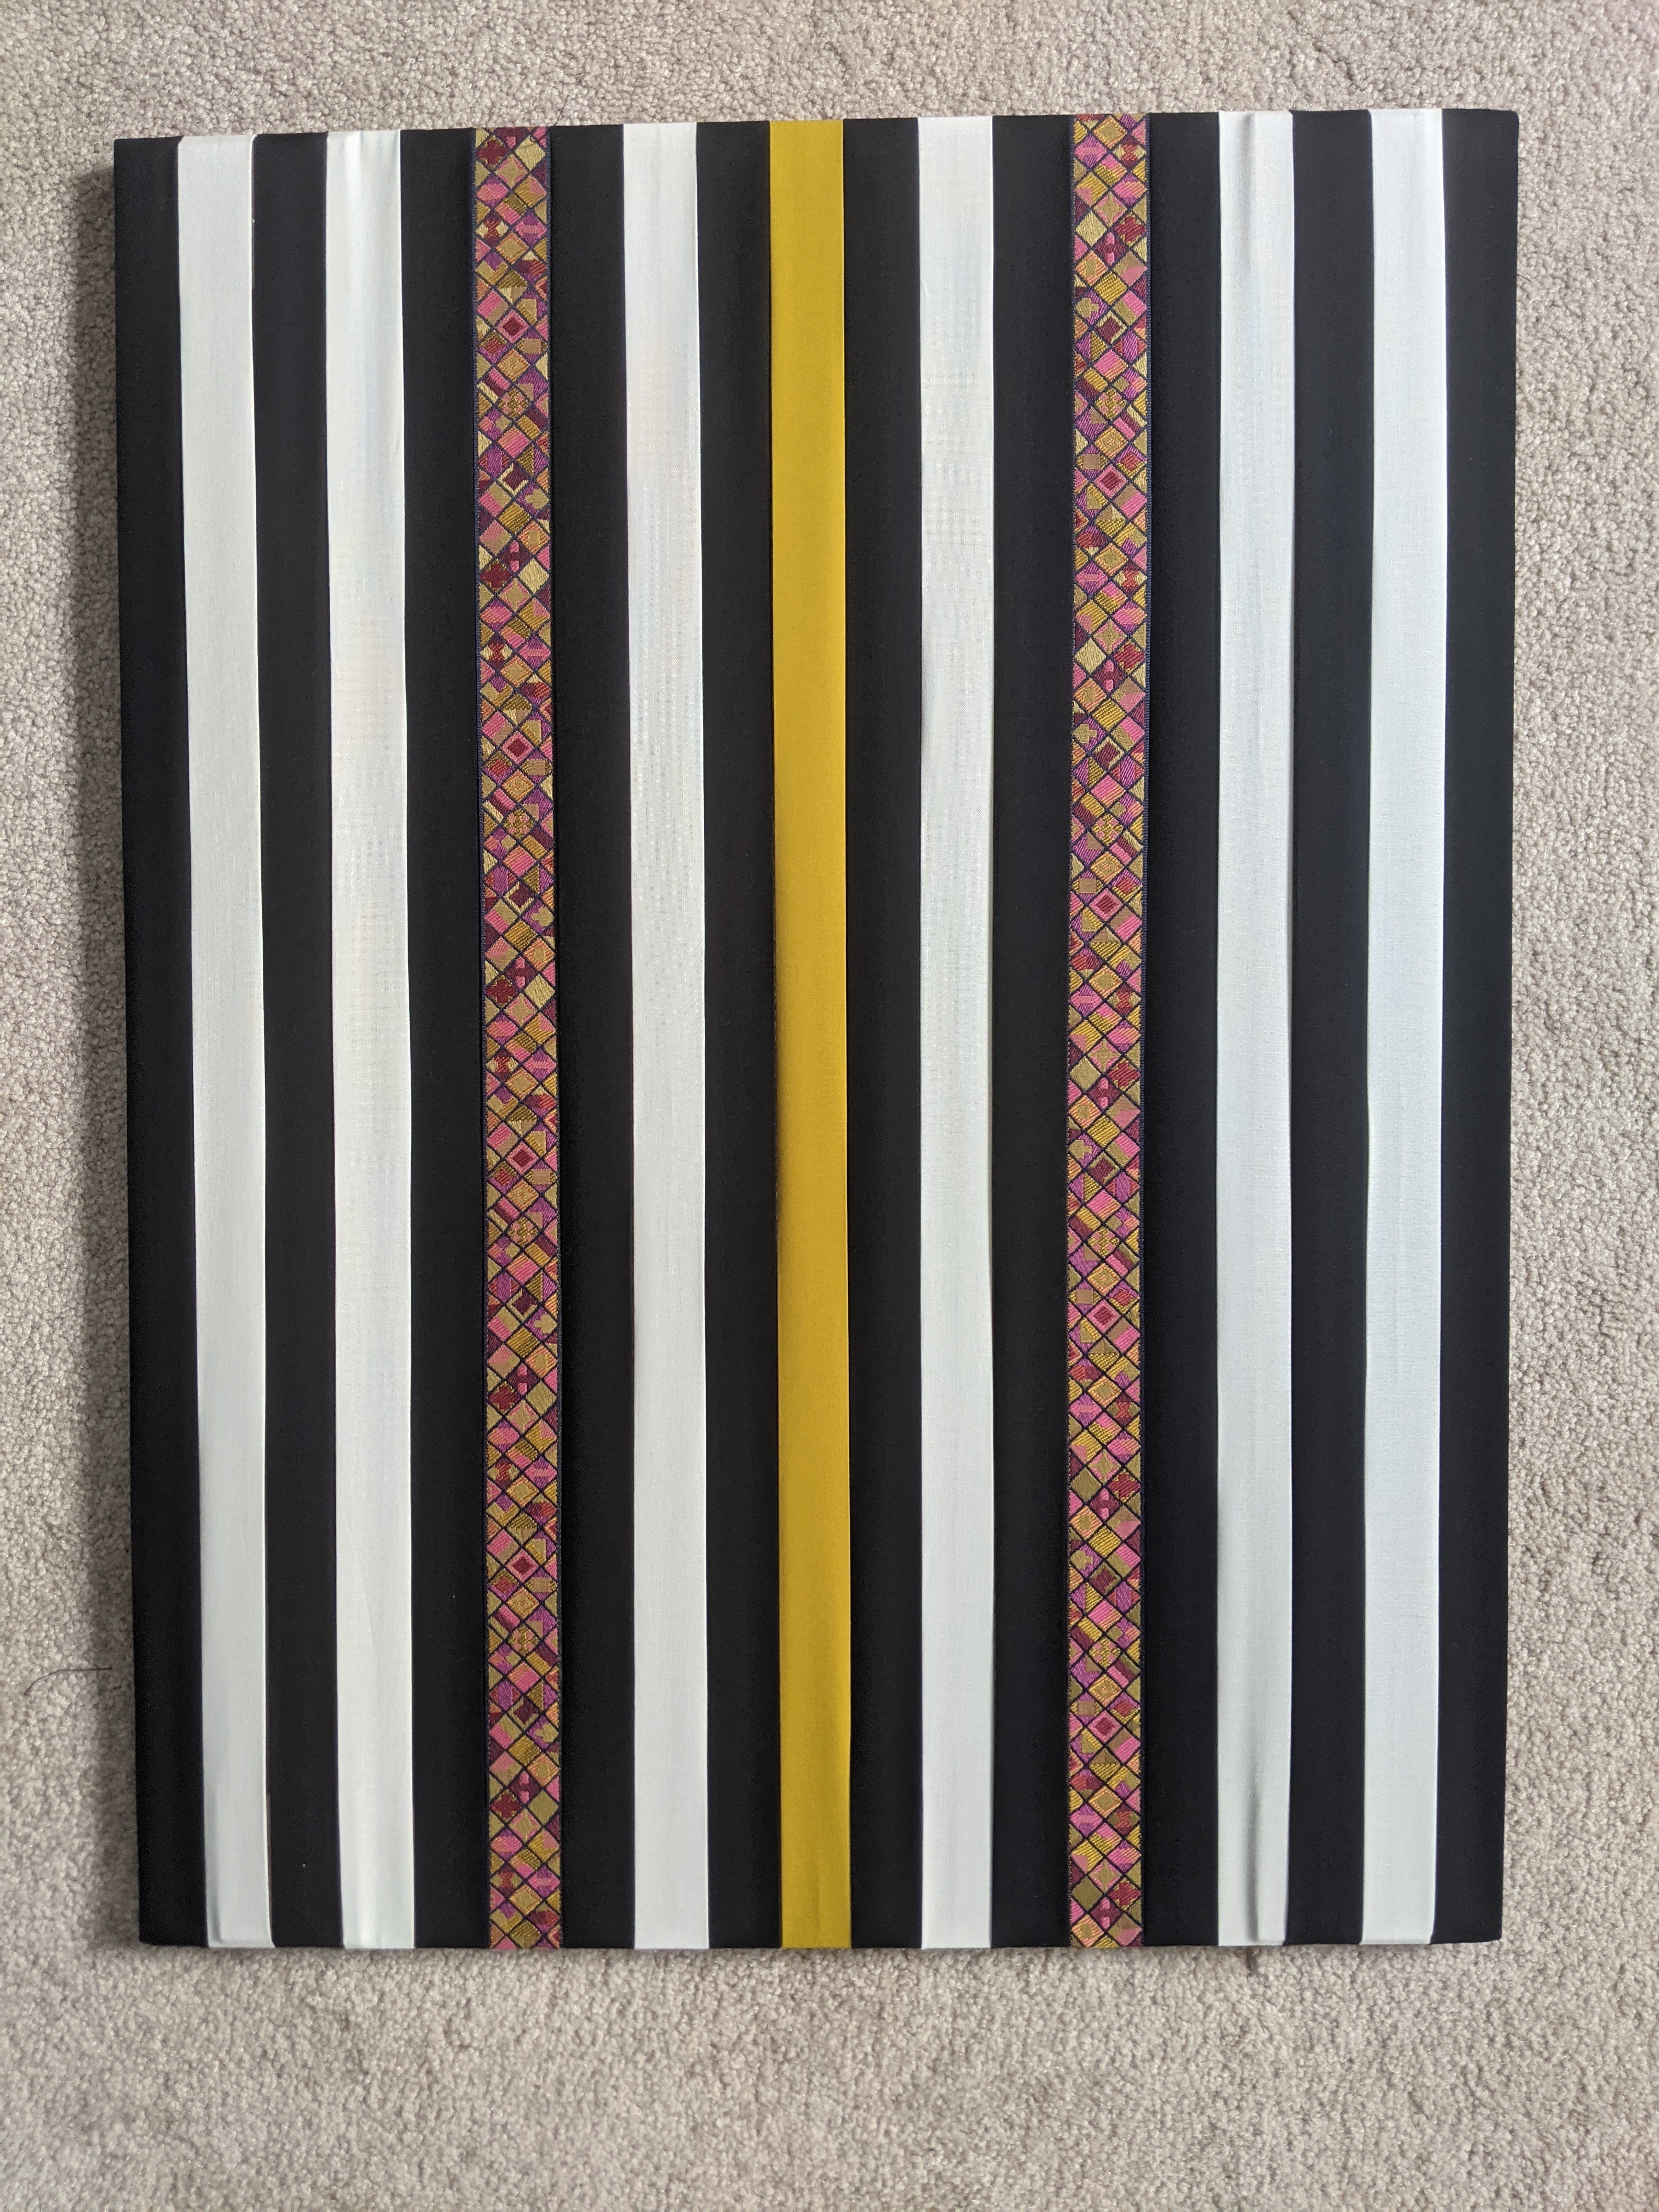
This post is LONG overdue. In 2021, I wrote about experimenting with fabric weaving and the many lessons I learned doing a triaxial/tumbling block weave. In that post, I mentioned a triptych-style weave I had done for our bedroom, a weaving project that was completely different from the others in that 1) I wove each piece by stapling the strips onto a frame vs pinning them to a foam board, and 2) I went into it without any clear patterns in mind. In the end I adopted a square weave for the center panel, based on some of the experimenting I had done before. For the side panels, I played around with the placement of the strips until I was happy with the end result.
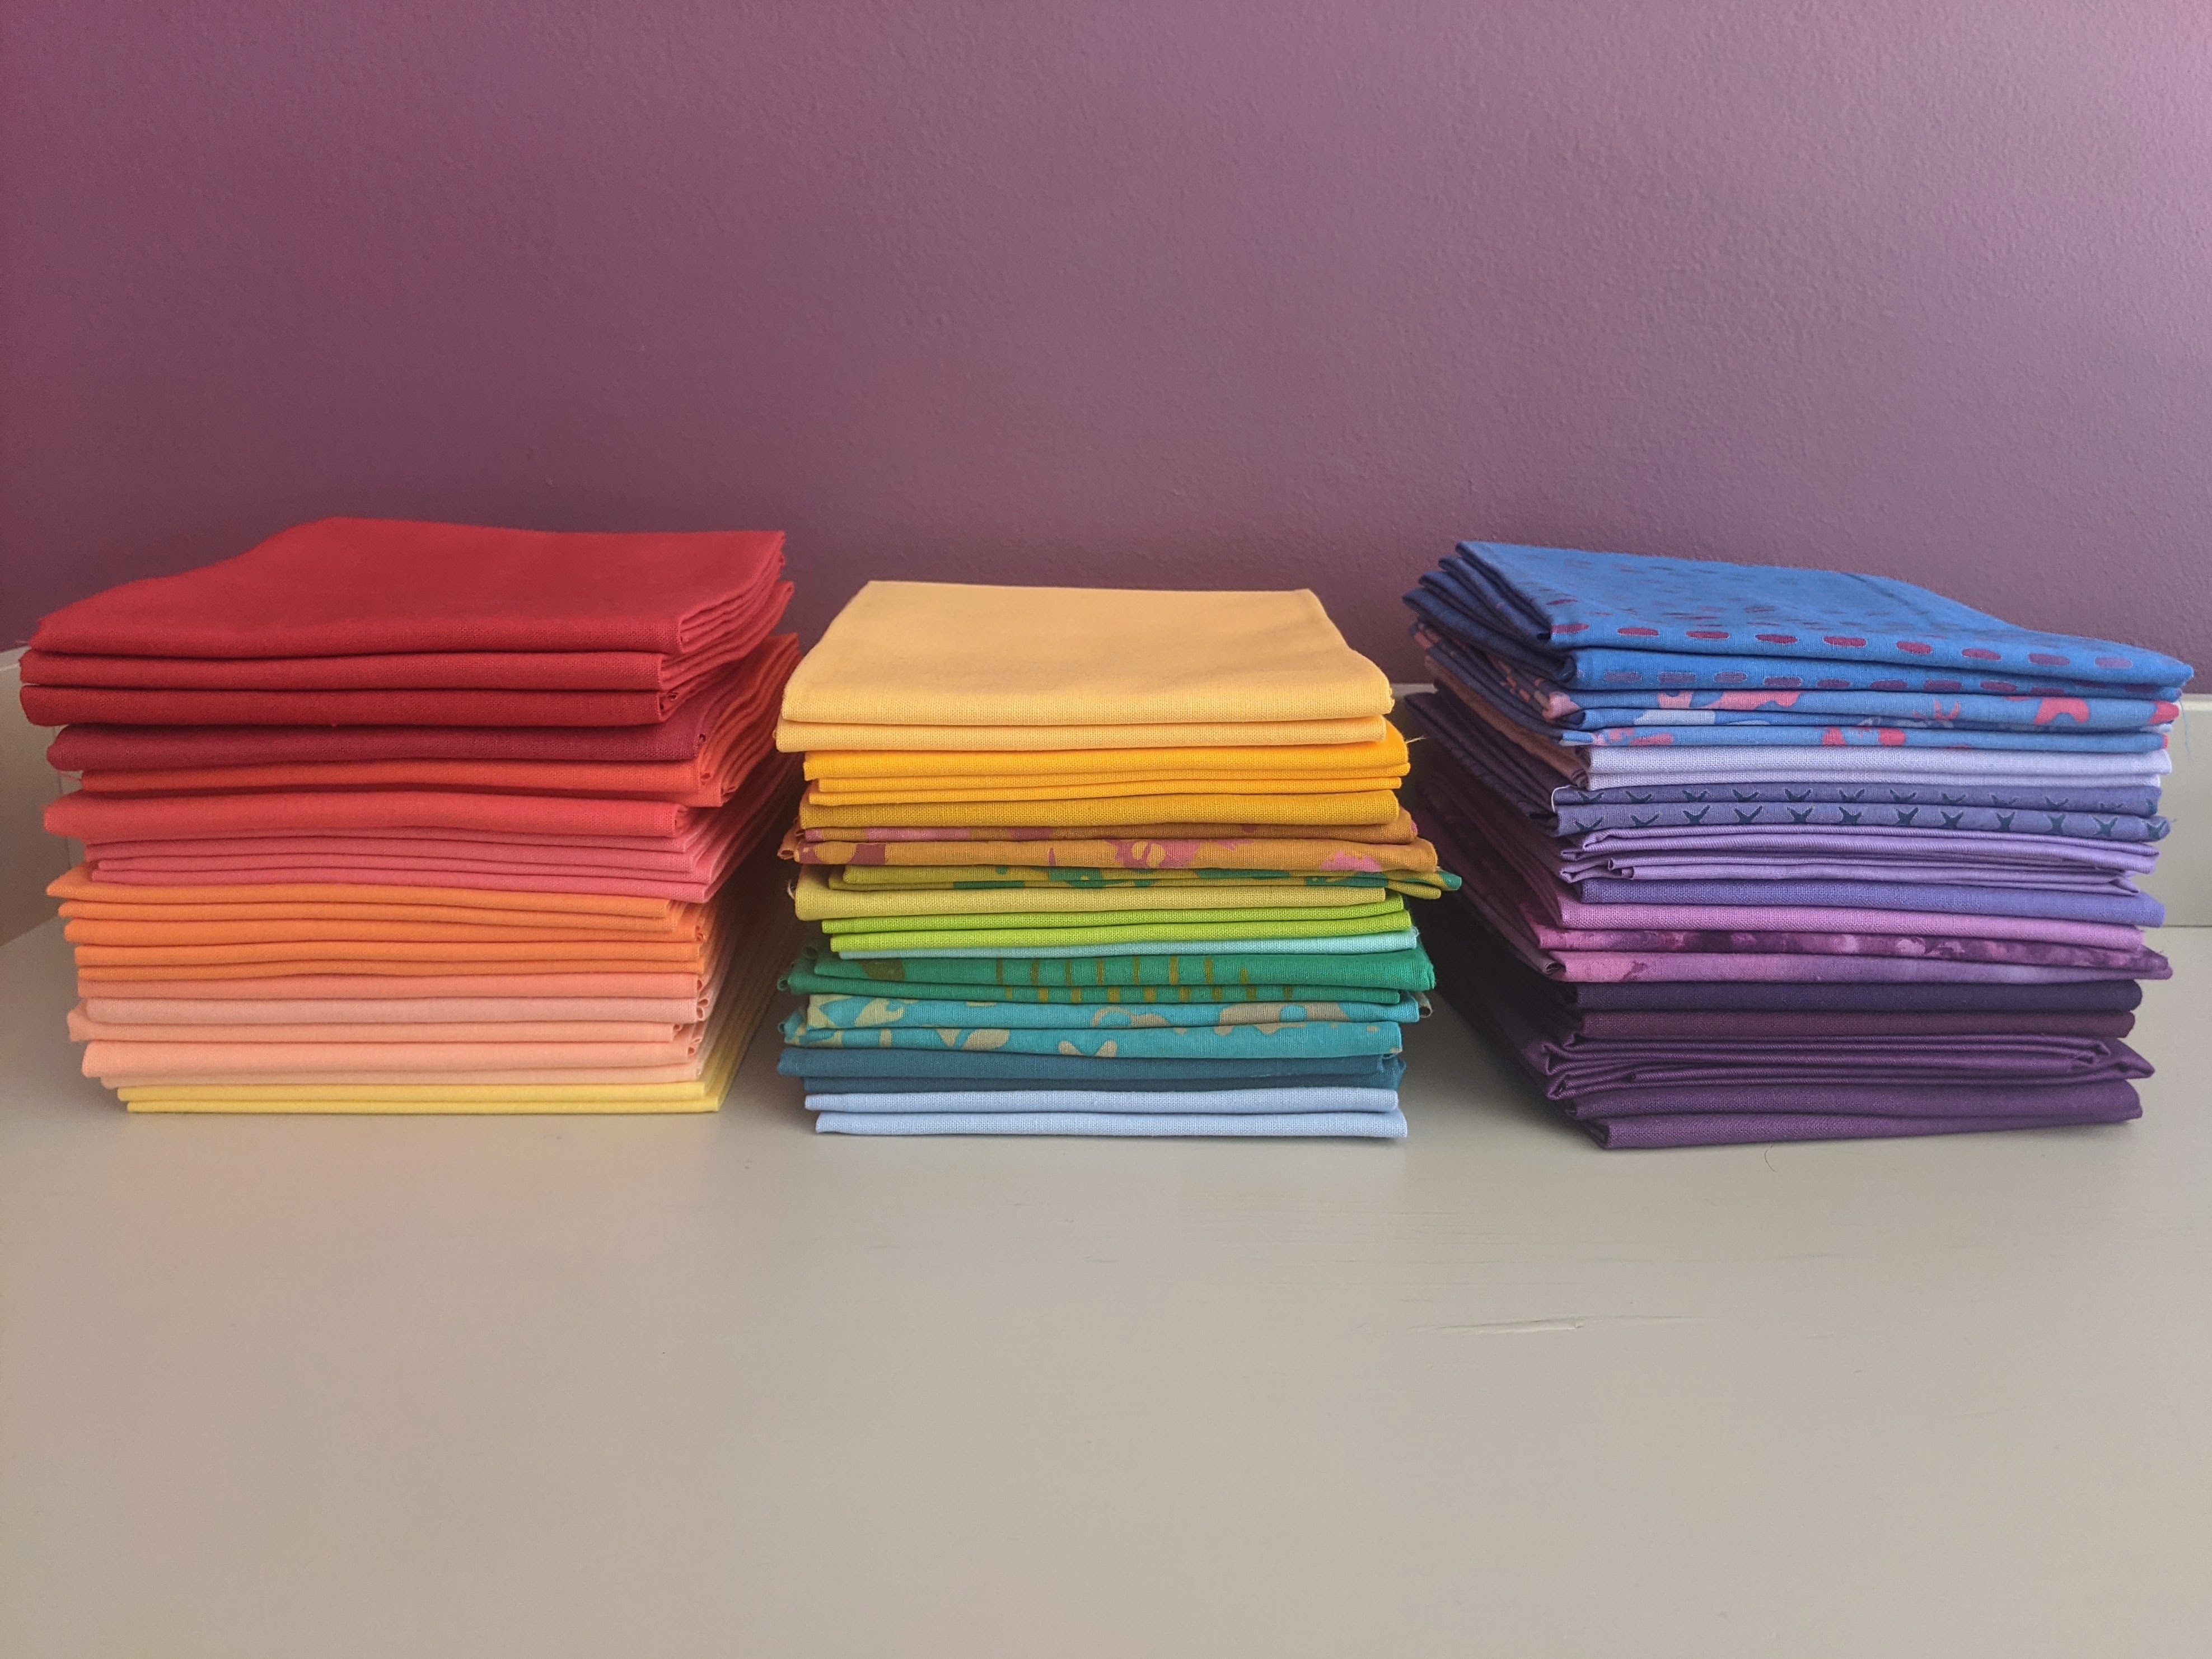
But first, I spent way too much time figuring out what fabrics to use. Our room has plum walls and our comforter is burnished gold. We have black night tables and cream colored lamps. Somehow, this project had to bring all those colors together. The first thing I found was not a type of fabric per se, but rather a thick woven ribbon:
I thought it perfectly tied most of the colors together. So then I set out to find fabrics that could complement it. Here’s what I ended up with, all laid out on the floor as I started to work out the pattern for the side panels:
You may be wondering why I decided to do this on a frame, versus on a foam board. The main reason is that I (still) don’t know how to use a sewing machine and I wanted a finished product right away. I also mistakenly thought weaving/stapling on a frame would be easy. In hindsight, I could have woven each of the panels on foam boards, taped them off, then wrapped the entire finished weaves around the frames, but I didn’t think of that, and even if I had, I would most certainly have run into problems getting smooth corners. As it was, I blundered onward in completed ignorance and completed these panels out of sheer stubbornness after “revising” them multiple times.
Oh, another reason I decided to use frames? They were free! They came with the packaging for the night tables, to protect the sides, and even though they were odd-looking, compressed cardboard frames, I thought “Hmmm, I think I can use these for something.”
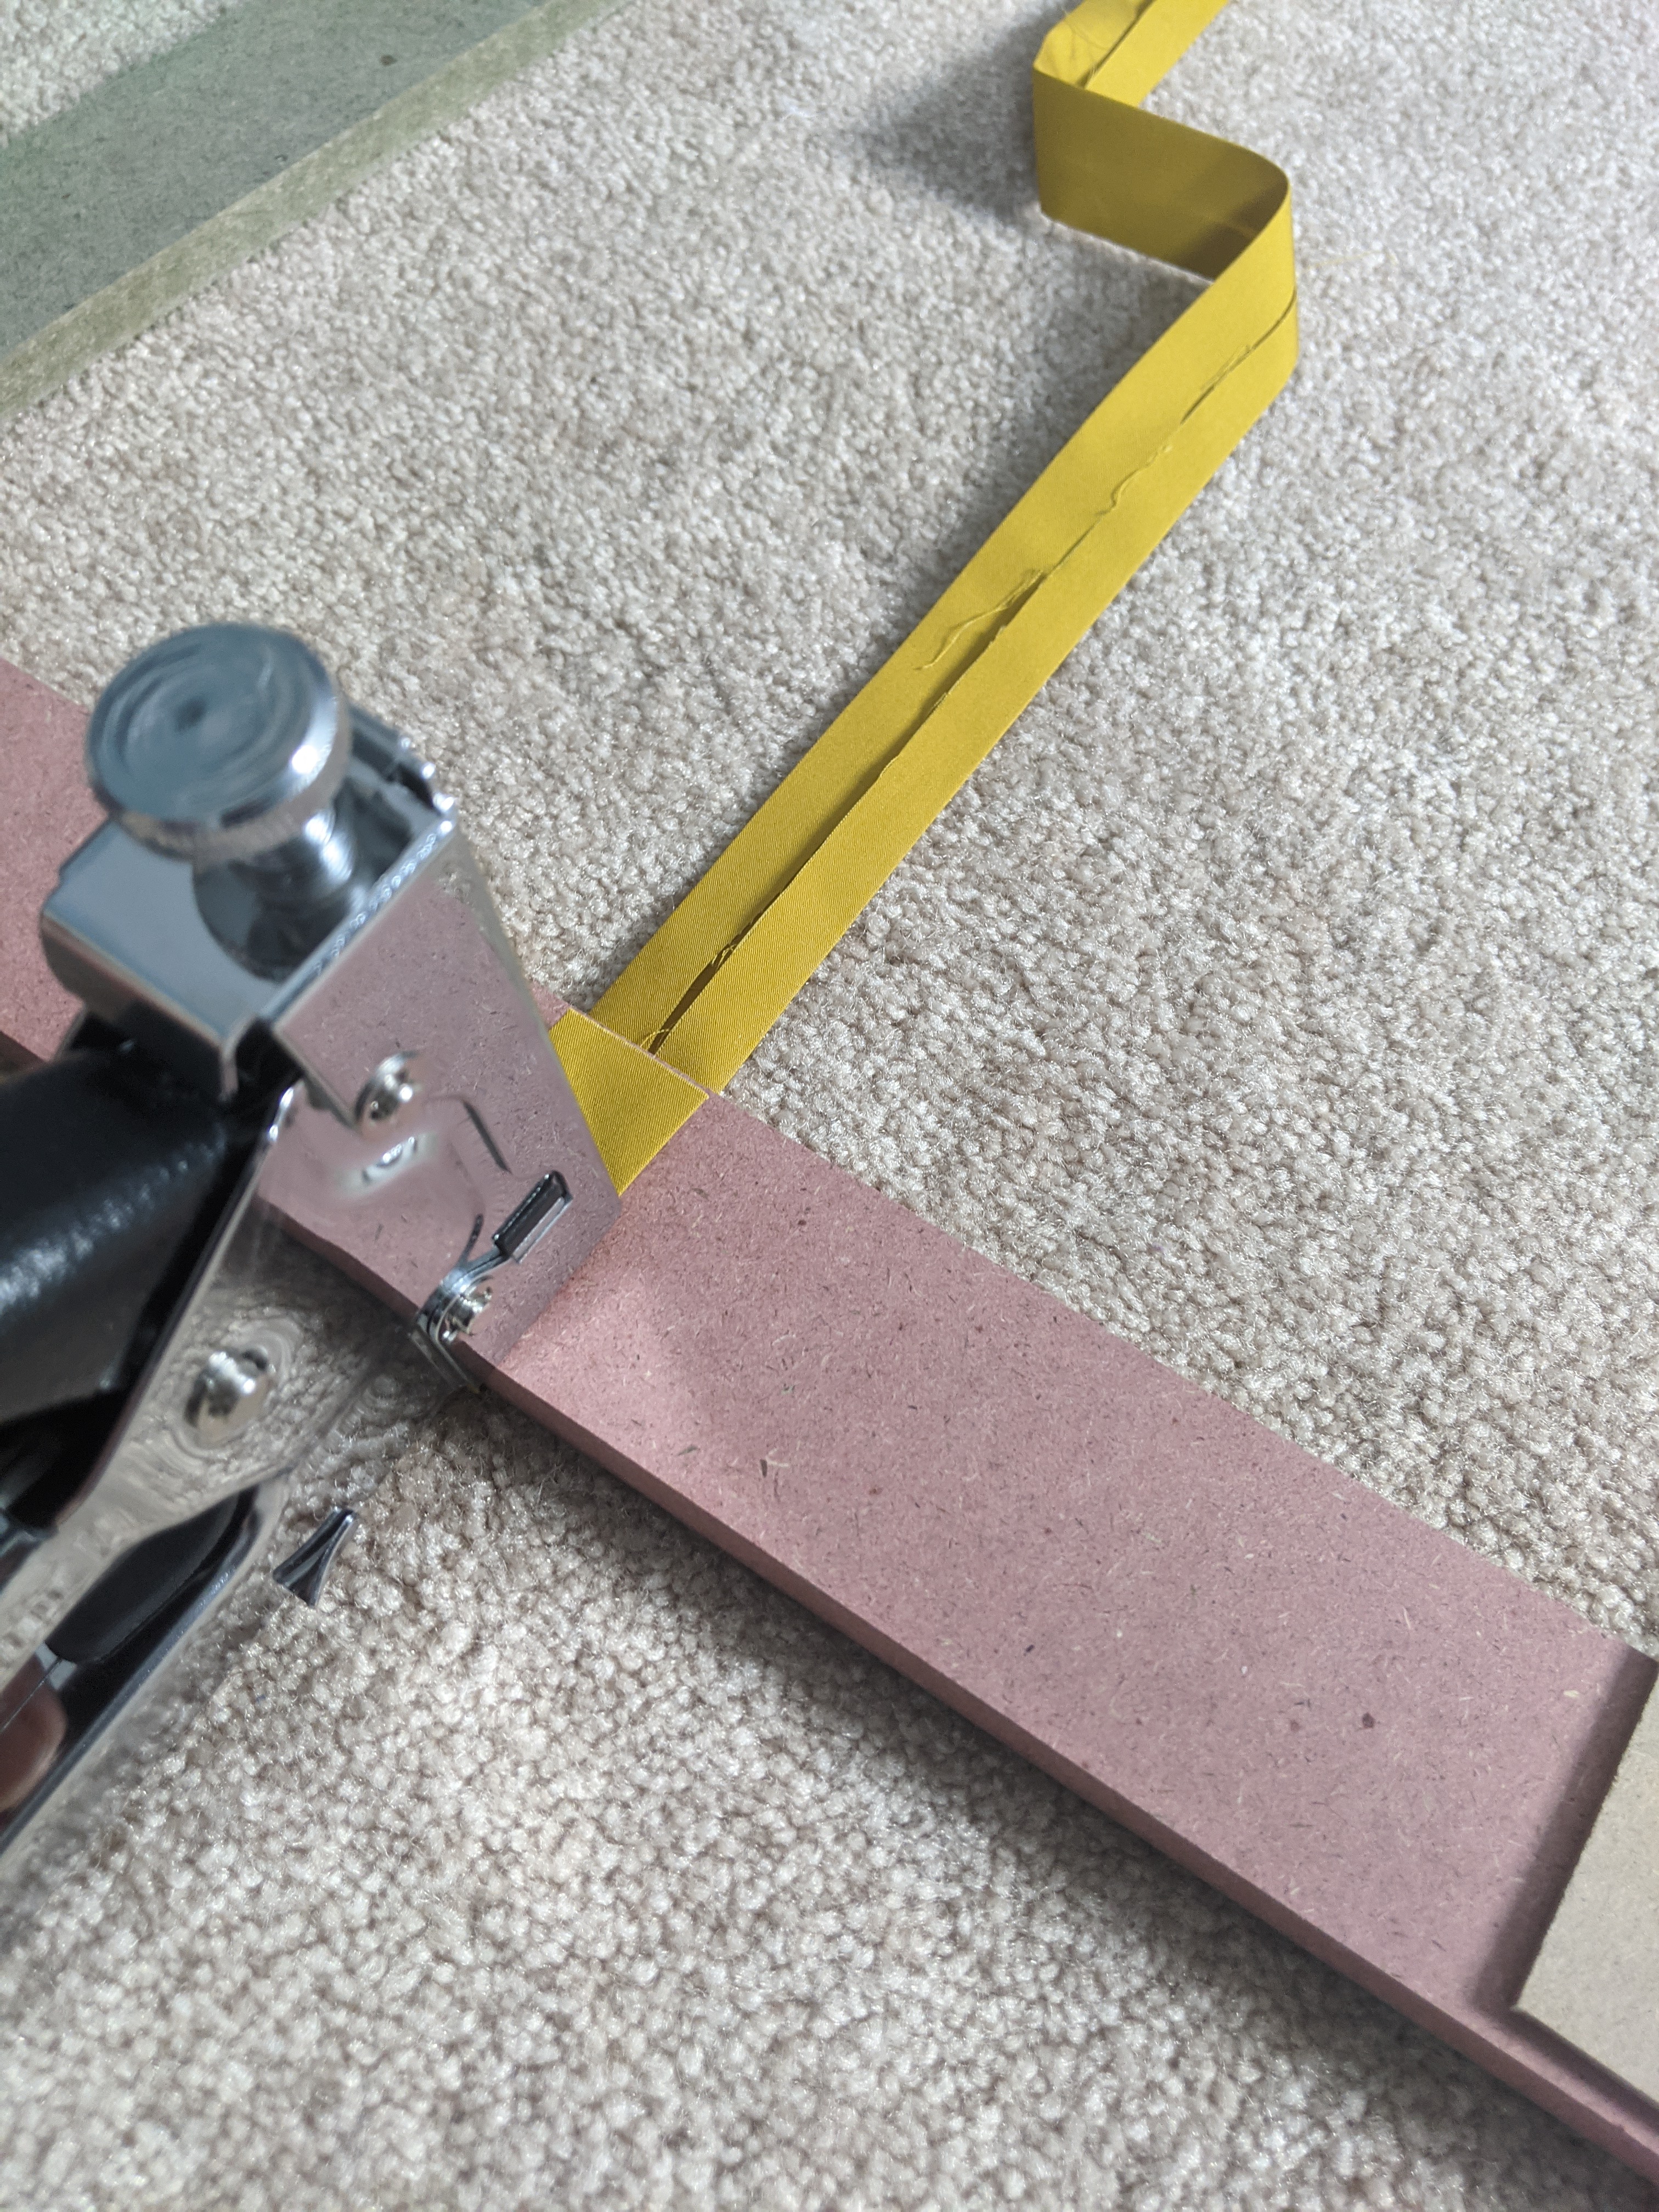
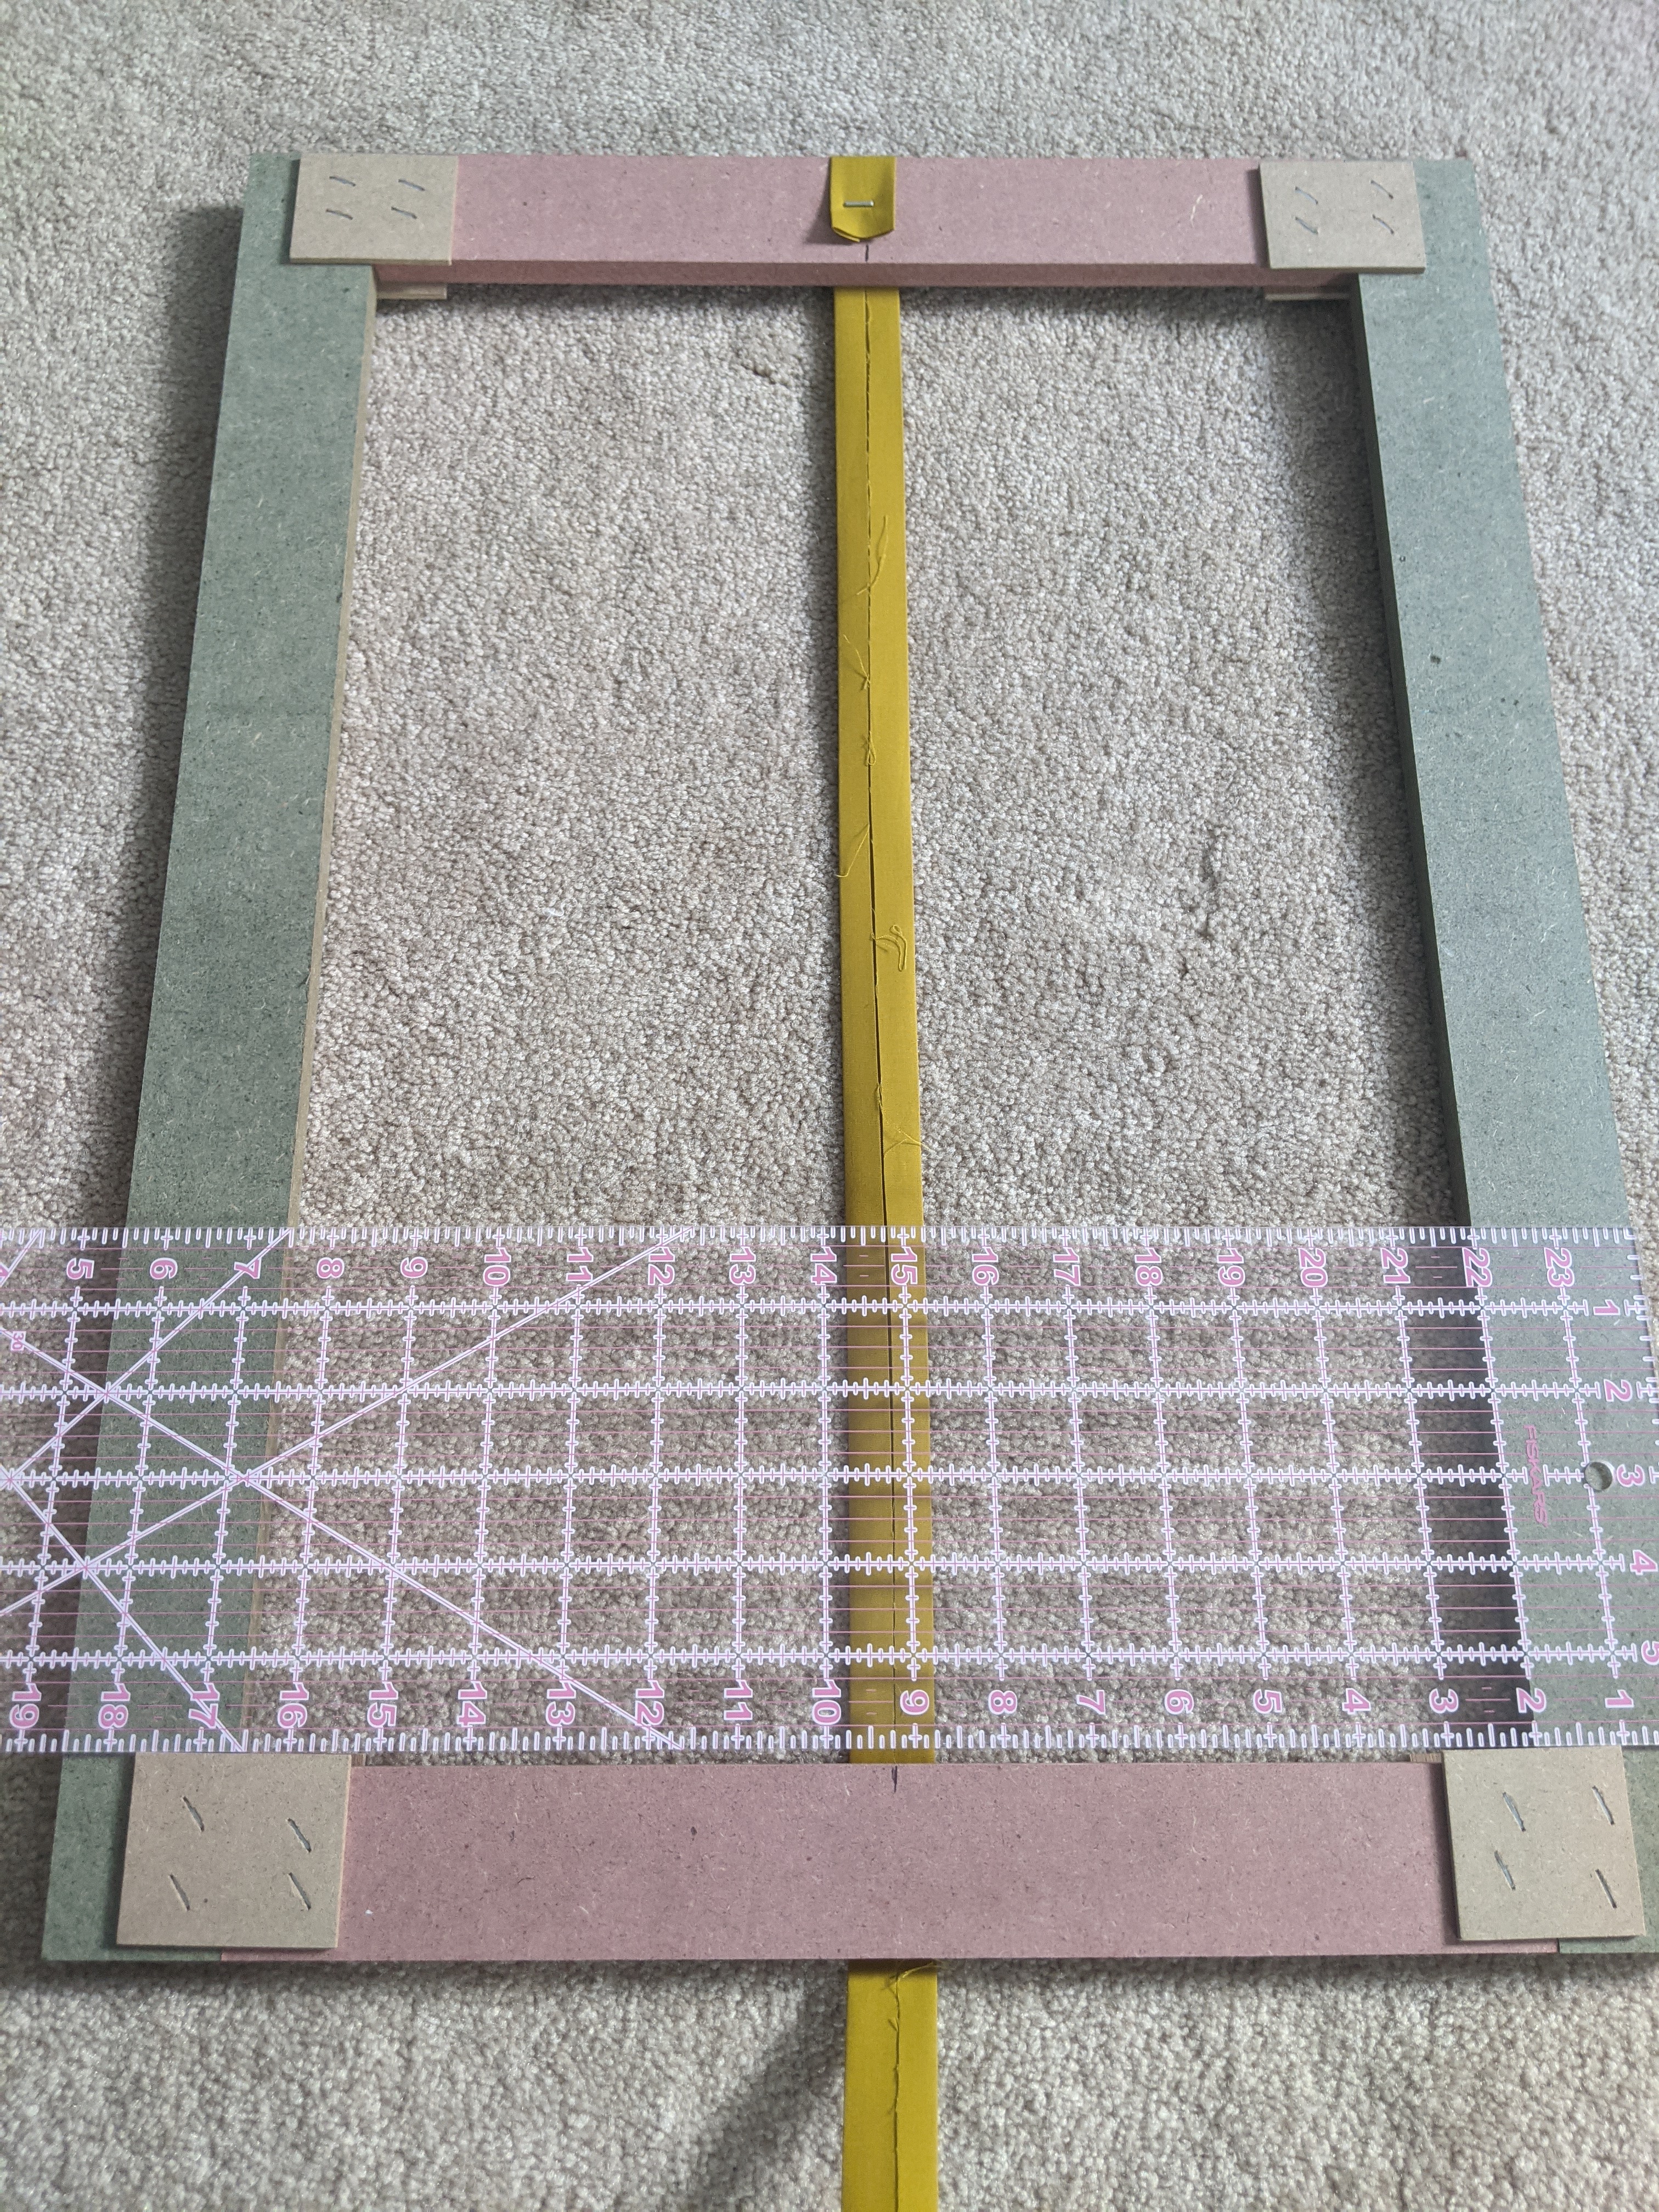
So, with free frames at hand, fabric choices complete, fabric strips made, and a couple vague patterns in mind, I started weaving–on the floor of our guest bedroom. I started by finding the vertical midpoint of each frame, to place the first strip there. I wanted to be sure everything was symmetrical, and figured I could fudge the edges if needed (which ended up being needed).
Then I proceeded to staple on all the other vertical strips. (These photos are of the center, square-patterned panel in my triptych, which I actually wove after having completed one of the side panels):
Except, eagle-eyed observers will note that the strips in the first two photos don’t look quite right, as the finished center panel (right) has purple in it and the ribbon strips are near the edges. Correct. I wasn’t happy with the way the original strips looked, so I un-stapled most of them and started over, but failed to take photos of the new version!
I don’t have any good photos of the horizontal weaving I did, except one where I stood the uncompleted center panel next to a completed side panel on our bed to see what they looked like together (right photo) :
Here’s what I learned from this experiment:
Do not staple the horizontal strips until they are all in place. You need the wiggle room to slide them around a bit to get them smooth and in the right place. Then, stretch them tight and staple them in place.
Weaving across the middle of the frame is easy because there is only air beneath the area you are weaving, so there is a lot of give and you can reach under and adjust as needed.
Weaving across the top and bottom of the frame is hard, as the vertical strips are very tight where they are folded over the frame and stapled. Also, for me, it entailed weaving over hard compressed cardboard there, so it was not possible to adjust from underneath. In the middle of the frame, I could use my fingers to guide the fabric strips across, but at the ends I had to use a WEFTY tool (see my previous post) to guide the fabric strips through.
The frames were not perfectly sized to fit the 1″ strips I created, so I folded the last strips at the very edges over the frame a bit. It turned out ok.
Would I do this again? Yes! I’ve just been waiting for more free frames to magically appear. And also, I’ve been a bit busy in the garden….
Two of the reasons I like fabric weaving are: 1) even after planning your project, you can never know exactly how it will turn out; it depends on the color, type, and number of fabric strips you use; the pattern; and how you combine everything. All of that is hard to “see” until it starts to come together. Often, you are rewarded with a beautiful surprise. But sometimes, things just don’t turn out as you imagined. If that happens, then 2) you can easily undo what you have woven and start over, combining the original strips in different ways, incorporating different fabric strips, or even choosing a different pattern.
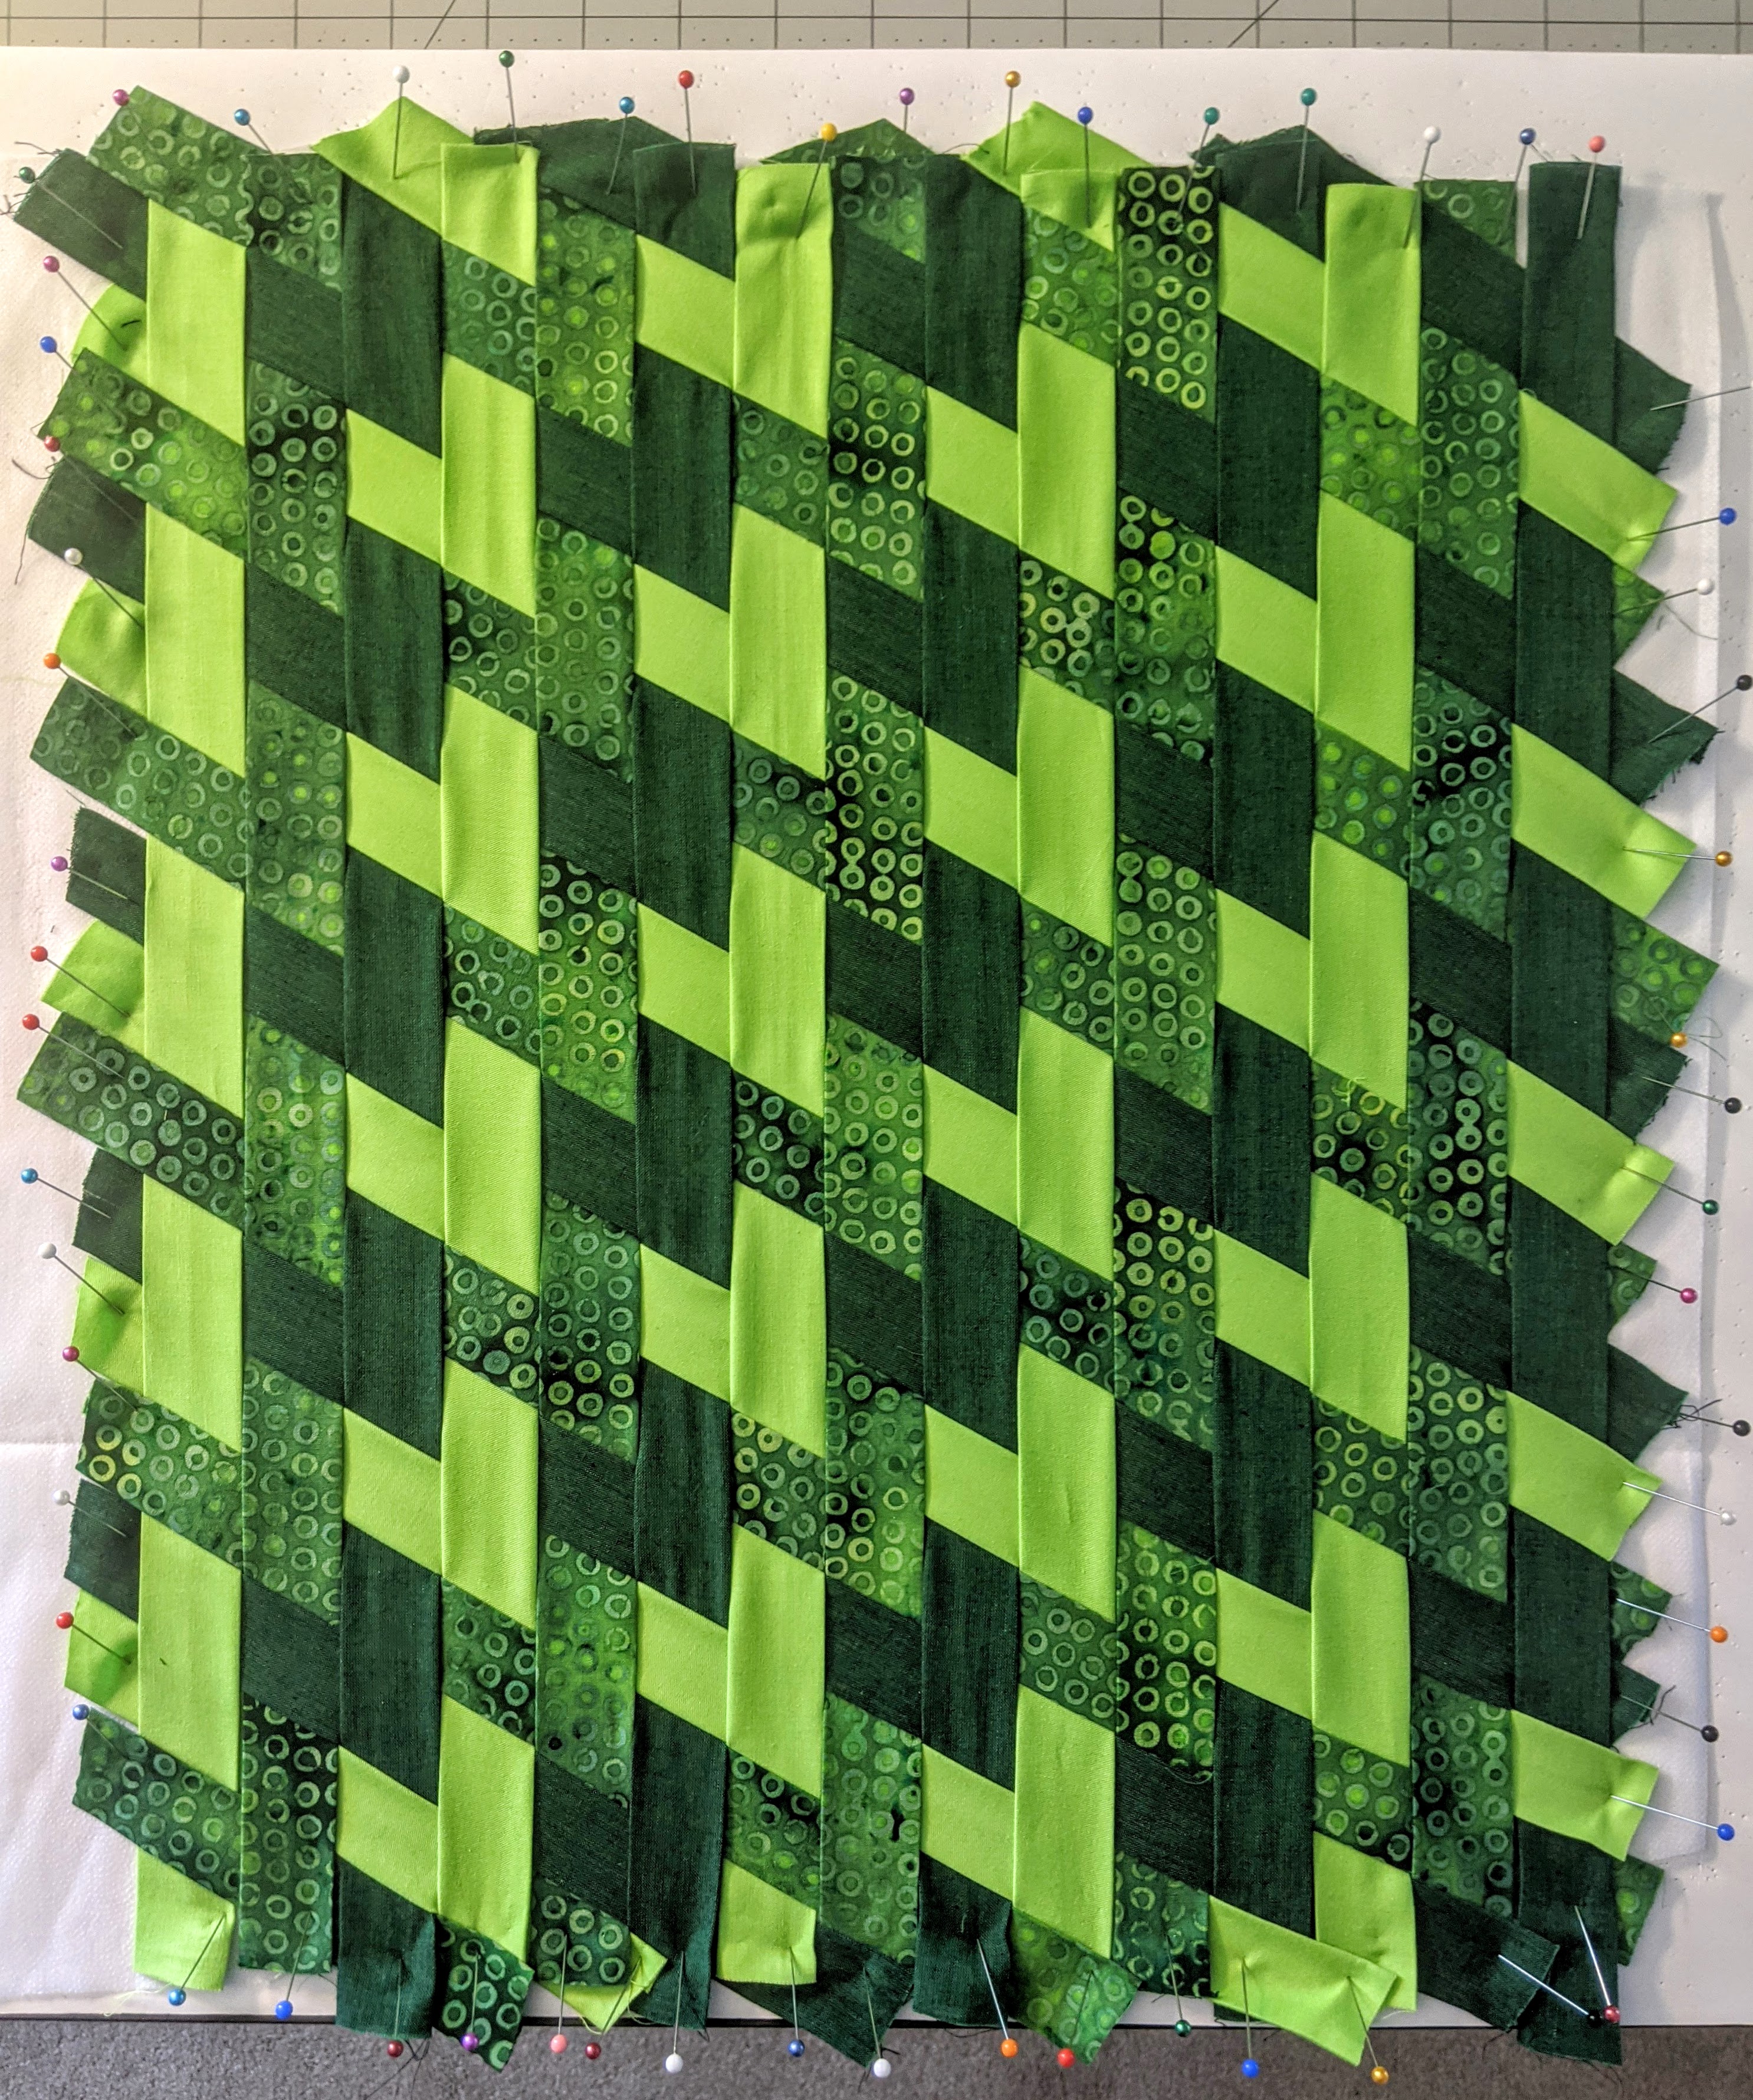
This weave is the same as the first one I wrote about–it’s a triaxial/tumbling block/madweave pattern–but the fabric strips are woven so that the colors/fabric strips come together to look like hexagons. It is a small example of the diverse results you can get, even with the same basic process.
This is a fairly simple hexagonal pattern that requires only three colors/types of fabric strips. I chose a green motif this time and cut my fabric 18 inches long x 2 inches wide, then made 1-inch strips; see my first post for more info on getting started.
Layer 1: Pin the strips vertically onto your foam board (with fusible interfacing underneath), alternating the colors (1,2,3; repeat).
Layer 2: First, find the 30-degree angle. Lay your ruler horizontally across the Layer 1 strips on your board (in the middle of the board, lined up against the right edge) so you can see how the 30-degree angle is situated. Then weave your first Layer 2 strip so that it approximates the 30-degree line, going up toward the left from the middle of the right side. Check the strip against the ruler, to make sure it is at the correct angle, adjusting it as needed until it is perfectly aligned. You may need to tug it gently into place until it is perfect (see the dark green strip below outlined in red).
The basic weave for Layer 2 is “over one, under two,” though you will need to stagger that pattern for each row/color. In my case, with 15 strips in Layer 1 and using the dark green fabric as my Strip 1, my pattern was (starting from right side and going up to the left):
Strip 1 (Dark Green): [Under one], over one, under two, over one, under two…
Strip 2 (Patterned Fabric): Under two, over one, under two, over one, under two….
Strip 3 (Light Green): Over one, under two, over one, under two….
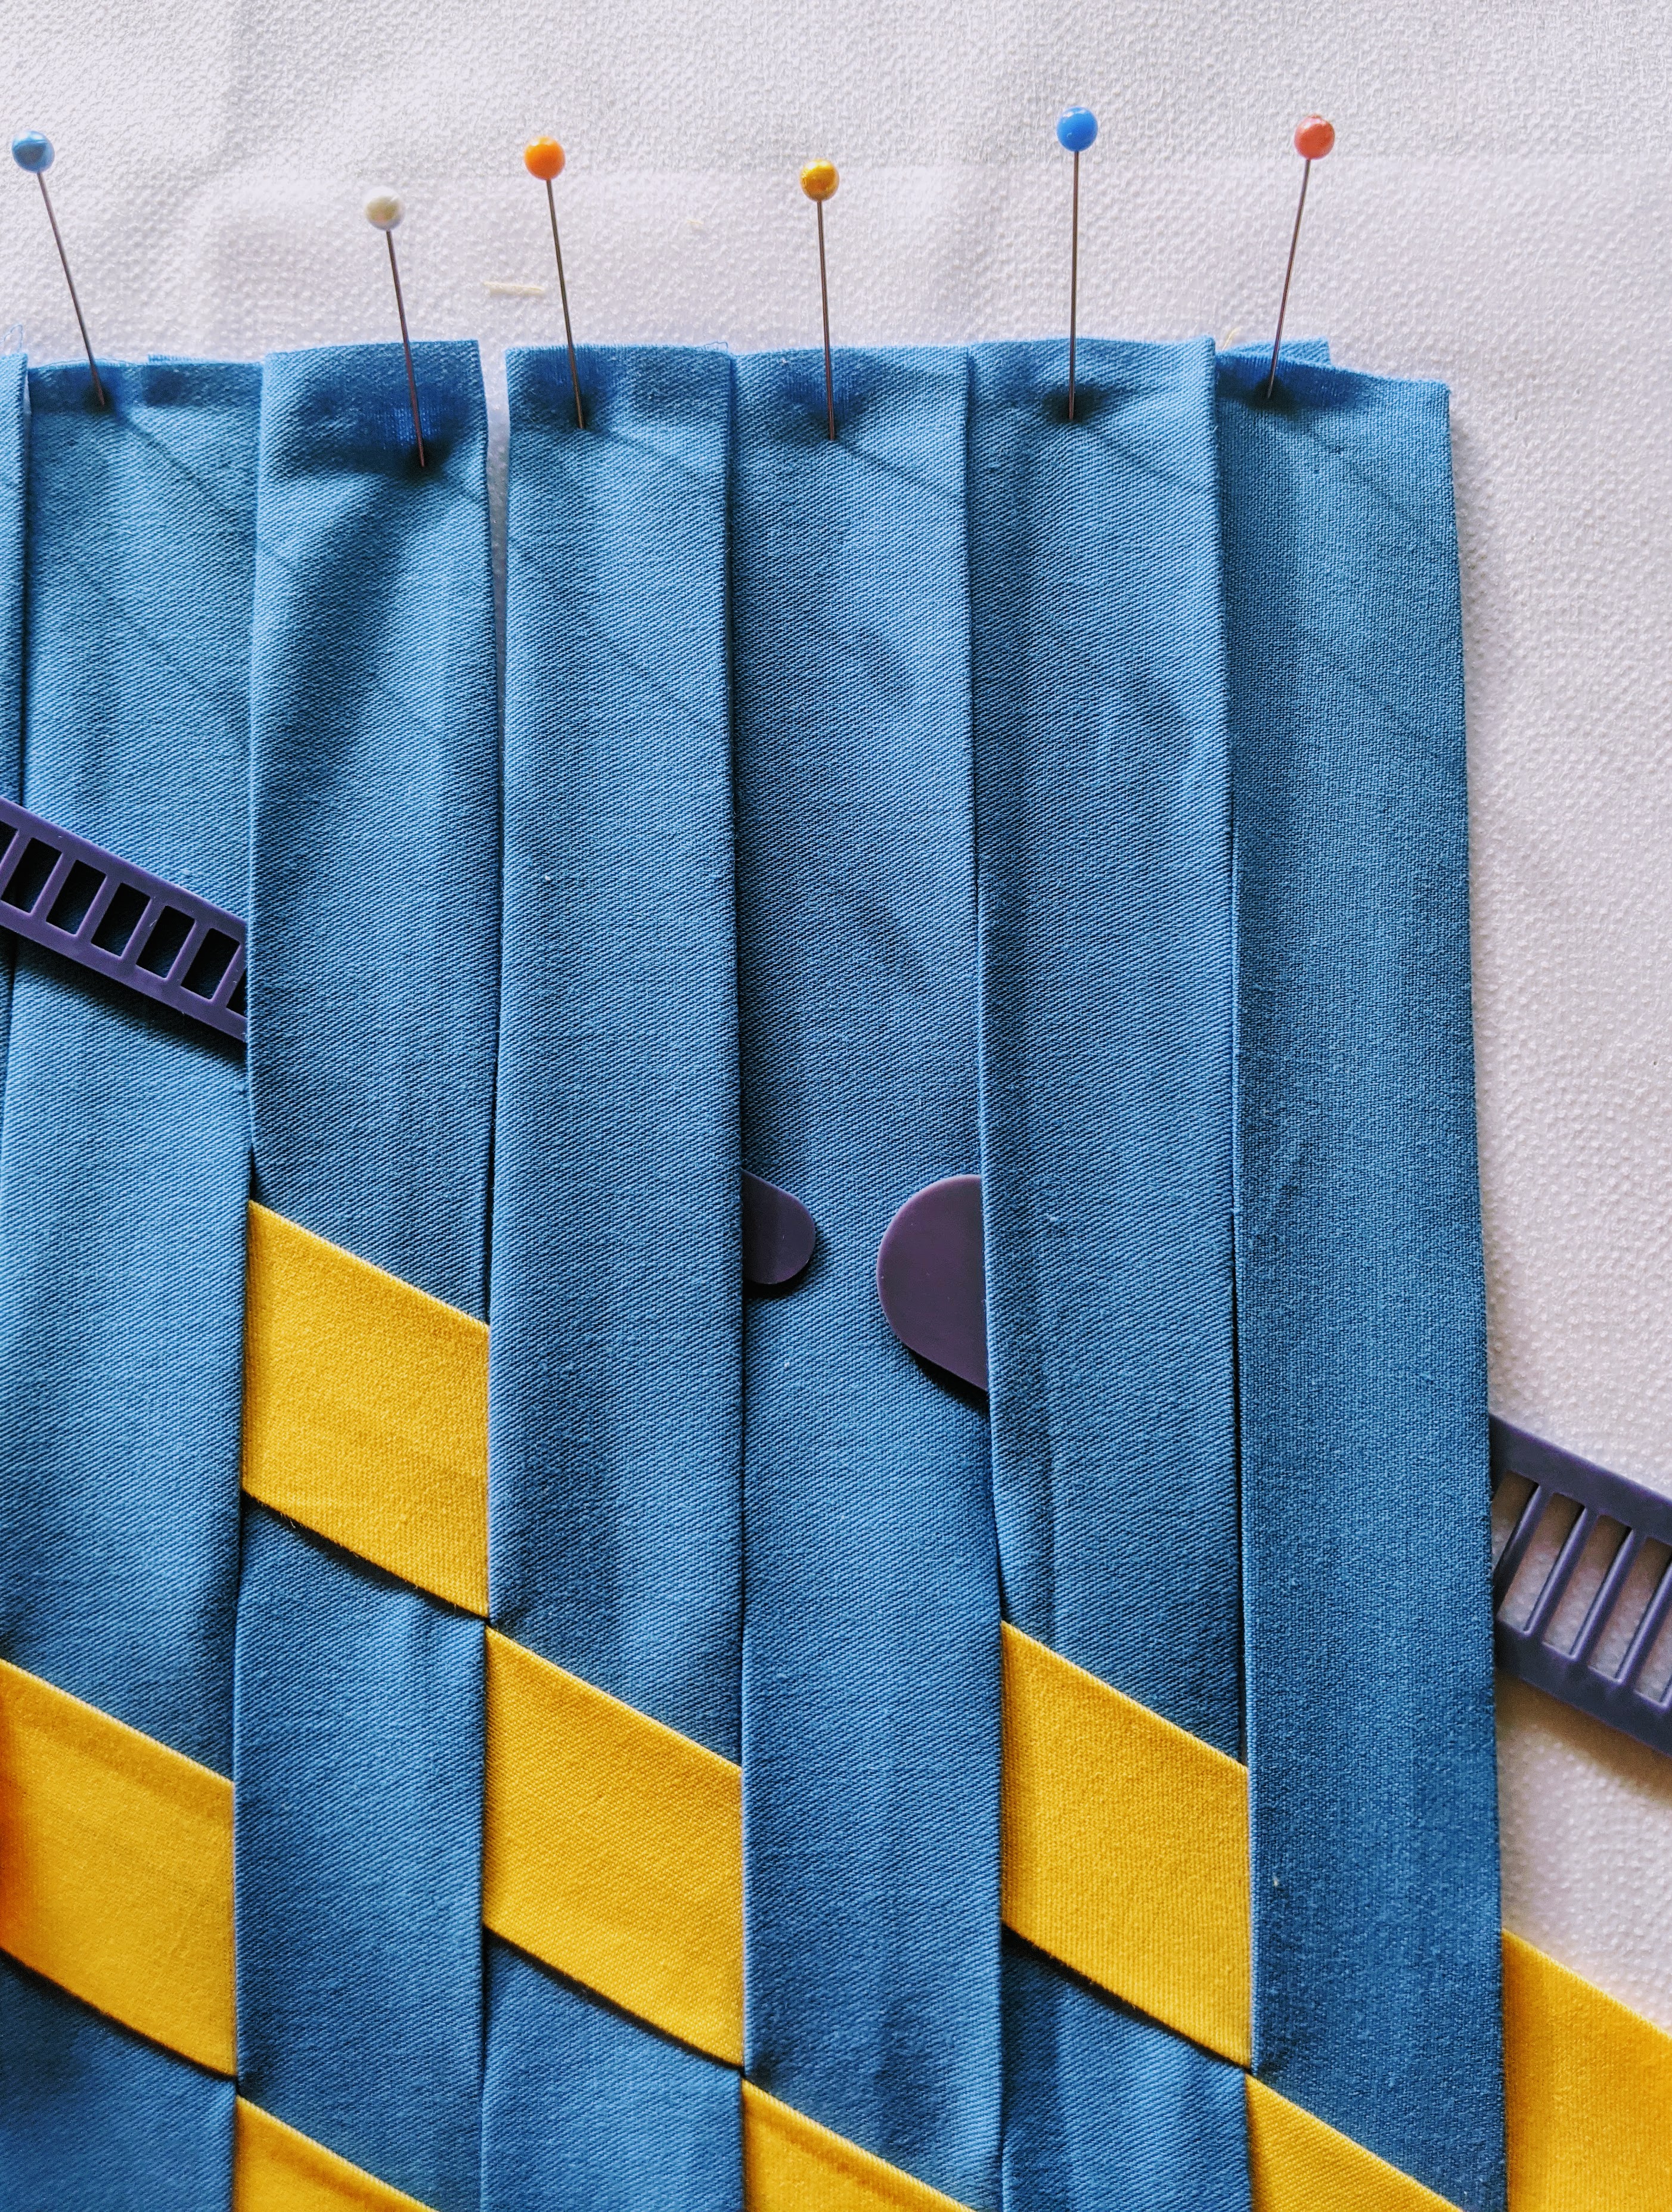
The photos below show the first three strips of Layer 2 (with WEFTY and Purple Thang tools resting above the top pins), and the finished Layer 2. You can start to see two sides of the blocks/cubes/hexagons forming.
Layer 3: This layer does not have a pattern; every row is the same. Each time, you must find the “bird” or backward “Z” to weave under, making sure to choose the right fabric strip to complete the hexagons properly. With each Layer 3 strip you weave (in the photos below, the strips go from the left side up toward the right), you want to complete a row of hexagons/blocks all in the same fabric. As you weave, you want your Layer 3 strips to form the top of each hexagon/block, meaning you must weave under everything else. See this post for how to identify the “bird” or backward “Z”, and also for how to maneuver your WEFTY tool under and over. The photos below show Layer 3 in progress, and a close-up of the final hexagons.
We moved into a new house this past summer, and repainted every single wall in the house (because we are crazy that way). We spent a lot of time making sure the living areas felt just right. As usual, we left our bedroom for last. One thing it needed was some kind of art work on the wall above the bed, and after coming across a fabric weaving photo online, I knew that was what I wanted to do. Two problems: 1) My previous weaving experience was limited to making potholders as a child and 2) I don’t know how to use a sewing machine, which is useful for actually turning the weaves into a final product of some kind. (I can sew by hand, but that was definitely not something I wanted to attempt here.)
I tackled the first problem by finding out everything I could about weaving with fabric strips, and by practicing a lot. I avoided the second problem by deciding on a non-sewing solution for the bedroom project, though I know it’s only a matter of time before I’m going to have to learn how to use a sewing machine. This post is not about the weaving I finally did for the bedroom wall, but about the practice runs leading up to it and what a novice like me learned along the way–in case anyone can benefit from my mistakes.
Fabric basics: I knew fabric came in yards, but that was it. (As I mentioned, I had a lot to learn….) Now I know that a bolt of fabric is usually 44″ wide, though width can sometimes vary a tiny bit. So a yard of fabric is usually 36″ x 44″. A half yard is 18″ x 44″ and a fat quarter is 18″ x 22″. I started out by buying inexpensive fat-quarter bundles online, to use for practice:
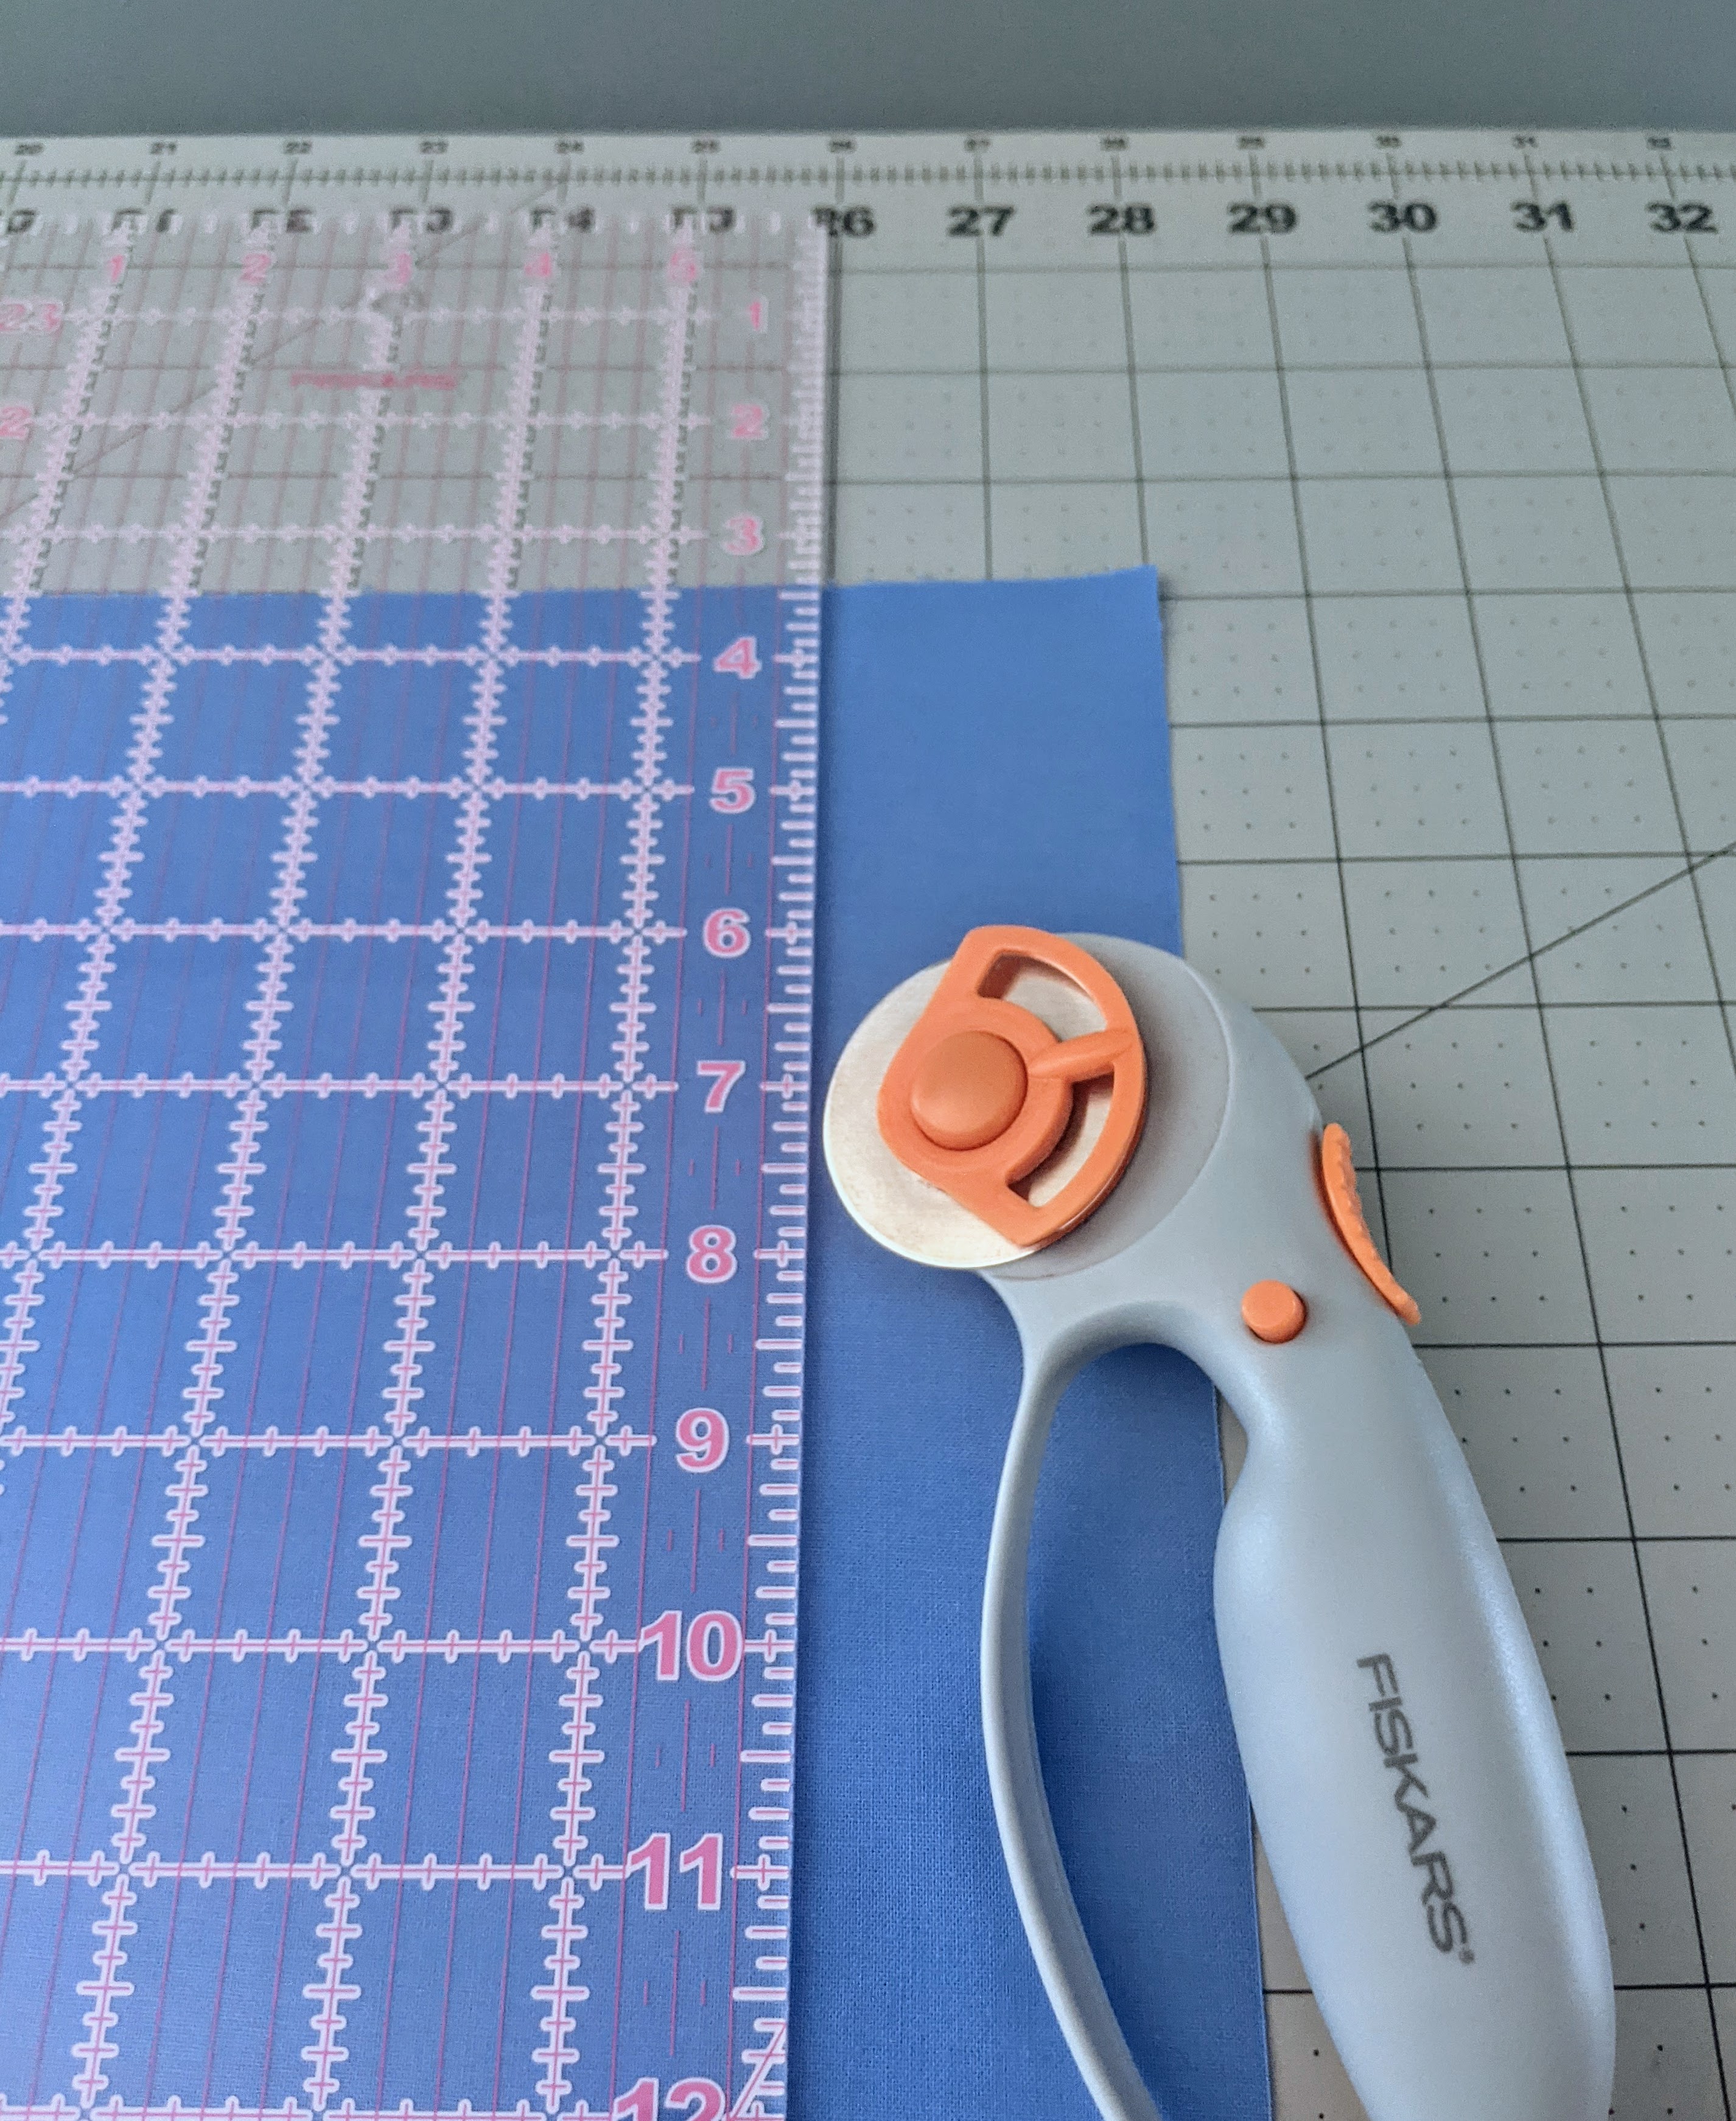
Cutting the fabric: This may sound self evident, but to weave with fabric strips you need to make the fabric strips–and cutting the fabric is only the first step. I decided to weave with 1″ strips, meaning I needed to cut fabric pieces double that width. A fat quarter will yield 11 (2″wide x 18″ long) pieces. I cut the fabric on a drafting table (though any good-sized work space will do) topped with a self-healing rotary cutting mat, using a rotary cutter. I lined up the fabric on the mat and used a 6″ x 24″ inch clear ruler as a guide/edger for the rotary cutter, moving leftward across the fabric since I’m right-handed:
Fabric strips: The second step is to actually make the strips (aka tape). For 1″ strips, you need to fold a 2″ piece of fabric in half by bringing the two long halves together, and run it through a sasher tool/tape maker while ironing the strips to keep them neat and flat. The first photo below shows (l-r) a final 1″ ironed strip, the fabric in the sasher tool, and some original 2″ pieces of fabric. The second photo shows the ironing process, though note–as this was one of the first times I made a strip, I ran the cloth through the sasher tool with the tool upside down. It’s much easier to maneuver when the curved part of the tool faces upward, so don’t repeat my mistake!
Preparing your work surface: Normally, you will be working on a foam board (though I didn’t use one when doing the project for my bedroom wall; more on that later). Select a foam board larger than you expect your final project to be, and place a layer of fusible interfacing on the board, tackier/stickier side up. (You will bond your weave to the interfacing with an iron after you are done with your project, to help keep it all in place, then you will tape the edges for extra reinforcement.)
Patterns: There are MANY different ways to weave. I chose three colors (orange, blue, yellow) of inexpensive fat-quarter fabric and decided to try all sorts of patterns with those. But instead of trying the easiest pattern first, I went straight for a triaxial/tumbling block weave, because why not? (There are reasons why not, but I ignored them. I should have remembered that this pattern is also fittingly called a “madweave.”) A triaxial weave has three layers: A first set of strips that are pinned vertically onto the foam board/interfacing (see the blue strips below), a second layer of strips going diagonally upward to the left at a 30-degree angle (see yellow strips below), and a third layer of strips going diagonally upward to the right at a 30-degree angle, moving over and under the previous two layers. For this type of weave especially, a WEFTY tool is essential (I use it for all my weaves; it makes everything much easier). I used a 1″ WEFTY (the larger of the two purple ones below) for the actual weaving, and a smaller one to help lift the strips. [Note: You can see the fusible interfacing below the blue strips; everything rests atop a foam board, too.]
Issues to Consider When Doing a Triaxial Weave:
Dimensions of final project: Because I did not think it through properly (or at all), I started out assuming that if I used strips that were 18″ long, I’d end up with a final project that was 18″ x 18″. Incorrect when it comes to a triaxial design. I forgot basic geometry: the hypotenuse is always longer than the sides. Meaning if my longest diagonal strip was 18″ (which is the length I had cut all my strips), then the width of my finished project could not also be 18″ or my diagonal strips would not be long enough to reach the sides. In fact, the ideal width was closer to 14″, as I learned when I started over with 14 vertical strips in the first layer, instead of 18. To avoid this problem again, I turned to math: Multiply the length of your strips by .78 to see how wide you can go for your first layer (for example, 18″ long x .78 = 14.04″ wide = 14 strips that are 1″ each). If you are using 22″ strips, your project can be about 17″ wide (22″ x .78 = 17.16).
Measuring a 30-degree angle: When starting the second layer of a triaxial weave, make sure you know how to measure a 30-degree angle. I thought I did, but I didn’t. The first time I tried, I placed the clear acrylic ruler vertically on my foam board (ie, perpendicular to the bottom edge), found the 30-degree angle and began weaving. The resulting pattern looked pretty cool, but not like any other triaxial weaves I’d seen. Turns out, by placing my ruler vertically, I’d ended up with a 60-degree angle. So I learned the hard way to measure the angle with my ruler placed HORIZONTALLY along the bottom edge of my board (ie, parallel to the bottom edge).
Where to start the second layer: For the second layer, start in the middle of one side (I like to start this layer on the right side, going upward toward the left at a 30-degree angle; see yellow strips below). Follow this pattern:
Strip 1: Over one, under two, over one, under two….
Strip 2: Under one, over one, then under two, over one, under two, over one….
Strip 3: Under two, over one, under two, over one….
Repeat.
Note: As a reminder to myself, when I finish weaving each “Strip 1”, I pin it to the right side of the board with a BLACK pin, to make for easy identification/counting. You could also use white or any color that stands out. I go up the board from the first strip I pinned in the middle in a 1, 2, 3, 1, 2, 3 pattern, and down the board from that middle strip in a 1, 3, 2, 1, 3, 2, 1 pattern. The red arrow below shows my first Strip 1; I wove above and below it afterward.
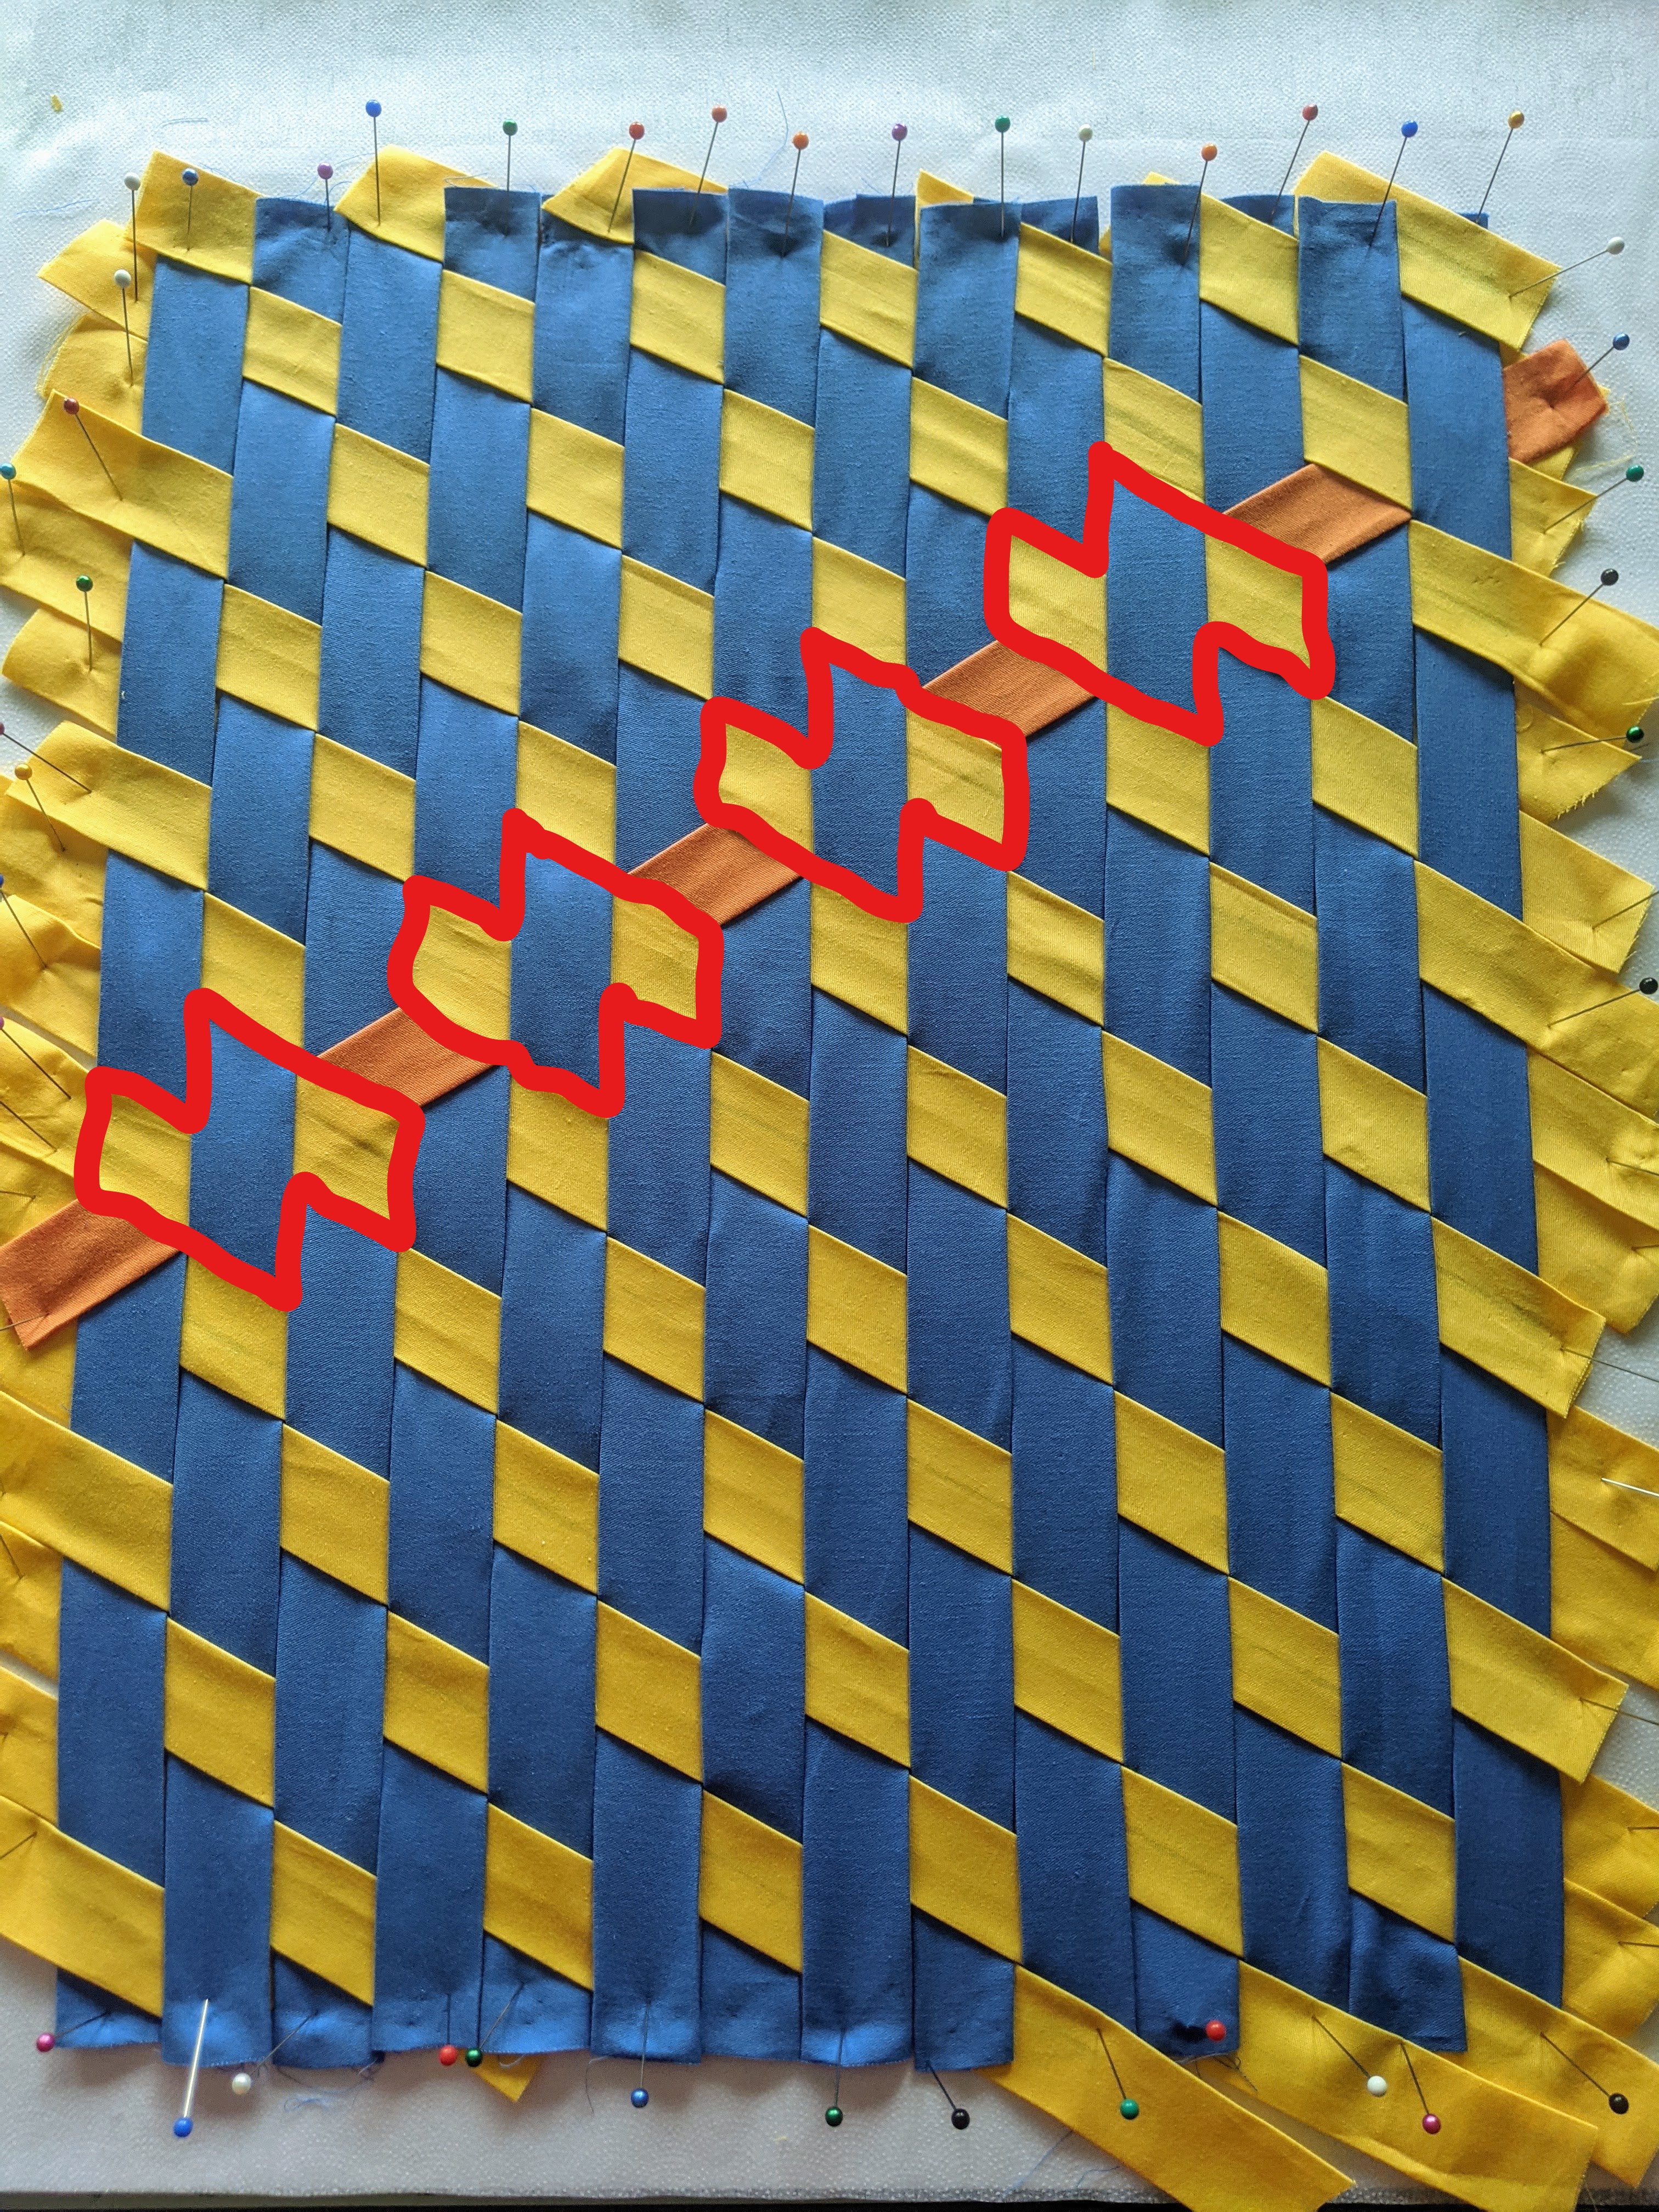
Where to start the third layer: For the third layer, start in middle of the other side (I start this layer on the left side, going up toward the right at a 30-degree angle; see orange strip below). You need to find a guide to know what parts of the first two layers to weave under. Some people look for a bird, others for a backwards “Z,” weaving under the wings and body of each “bird” or the horizontal parts of the “Z” (see red outlines in the photo below; those “birds” or backwards “Zs” are what you will need to weave under in the third layer). Going under the first wing and the body of the “bird” is easy; maneuvering the Wefty tool under the second wing but over another underlying strip of fabric below that wing is more tricky and requires some lifting and checking to make sure you’re getting it through the right way. This is when the second, smaller WEFTY tool helps; you can use it to lift the fabric and guide the main WEFT tool through (you can also use a tool called That Purple Thang for the same purpose). Once you get a sense of how to do it, this layer is actually very straightforward; you weave each strip exactly the same way, no Strip 1, Strip 2, etc. It’s also a fun layer to weave because you’ll start seeing the tumbling block pattern emerge after you’ve woven a few strips.
For my practice projects, I would finish one pattern, then undo it or switch it up a bit, and start another. Here are a few of the practice patterns I tried before moving on to more colors and more complex fabrics:
Here is my first actual triaxial weave, one that was not a practice one. It is fused to the interfacing below, with edges taped off, ready to be turned into something ( as soon as I learn to use the sewing machine and sew the edges properly). Note: There are 14 vertical rows in the first layer (the black strips), which allowed me to weave diagonally with 18″ strips at the longest points across the middle. By the time you get close to the corners of the weave, you can cut off the overhanging parts of strips from previous rows and reuse those cut-offs for the shortest sections. (This will make sense after you’ve tried the triaxial weave for the first time.)
I hope some of this info helps. I learned a lot from the resources listed below, but some things I only picked up by trial and error. I’m sure I have many more errors to discover, but perhaps these preliminary observations will make it easier for you as you get started.
Overview of supplies you will need:
Fabric (I used 100% cotton quilting fabric)
Clear ruler (a 6″ x 24″ is a good one to start with)
Rotary cutter and extra blades
Self-healing cutting mat
Iron
Sasher tool
WEFTY tool(s), That Purple Thang tool
Foam boards
Fusible interfacing
Pins
Fabric tape (you can even use something like painter’s tape, which is what I used above; anything that you can peel off of the fabric easily)
Great resources I used when learning how to weave:


 on the sides; front-facing wall of opus mixtum (bands of brick and tufa), with lateral 'toothing' and a structural arch; plus rough-hewn travertine column--Portico of Claudius, Portus (c. 50 AD)")
")
 with lateral 'toothing' and putlog holes at the top--Trajan's warehouse, Portus (c. 100 AD)")
")
, Trajan's warehouse, Portus (c. 100 AD)")

