Tag Archives: orange

ROYGBIV: Orange

7 Apr

Depending on who you ask, the color orange brings to mind many things: amusement, danger, encouragement, energy, enjoyment, enthusiasm, extroversion, fascination, fire, happiness, heat, sunshine, and warmth.

It is one of my favorite colors, because it is so cheery (and because it goes so well with blue, its complementary color). I particularly like that it is associated with joy and creativity, and I love this description: “Orange oozes with delight.”

Interestingly, people did not have a good way to describe the color at first, sometimes calling it (in English) “yellow-red” or “saffron.” It wasn’t until oranges made their way around the world from their native Southeast Himalayan foothills that the color began to be associated with the ripe fruit. The first recorded use of orange as a color name in English was in 1512.

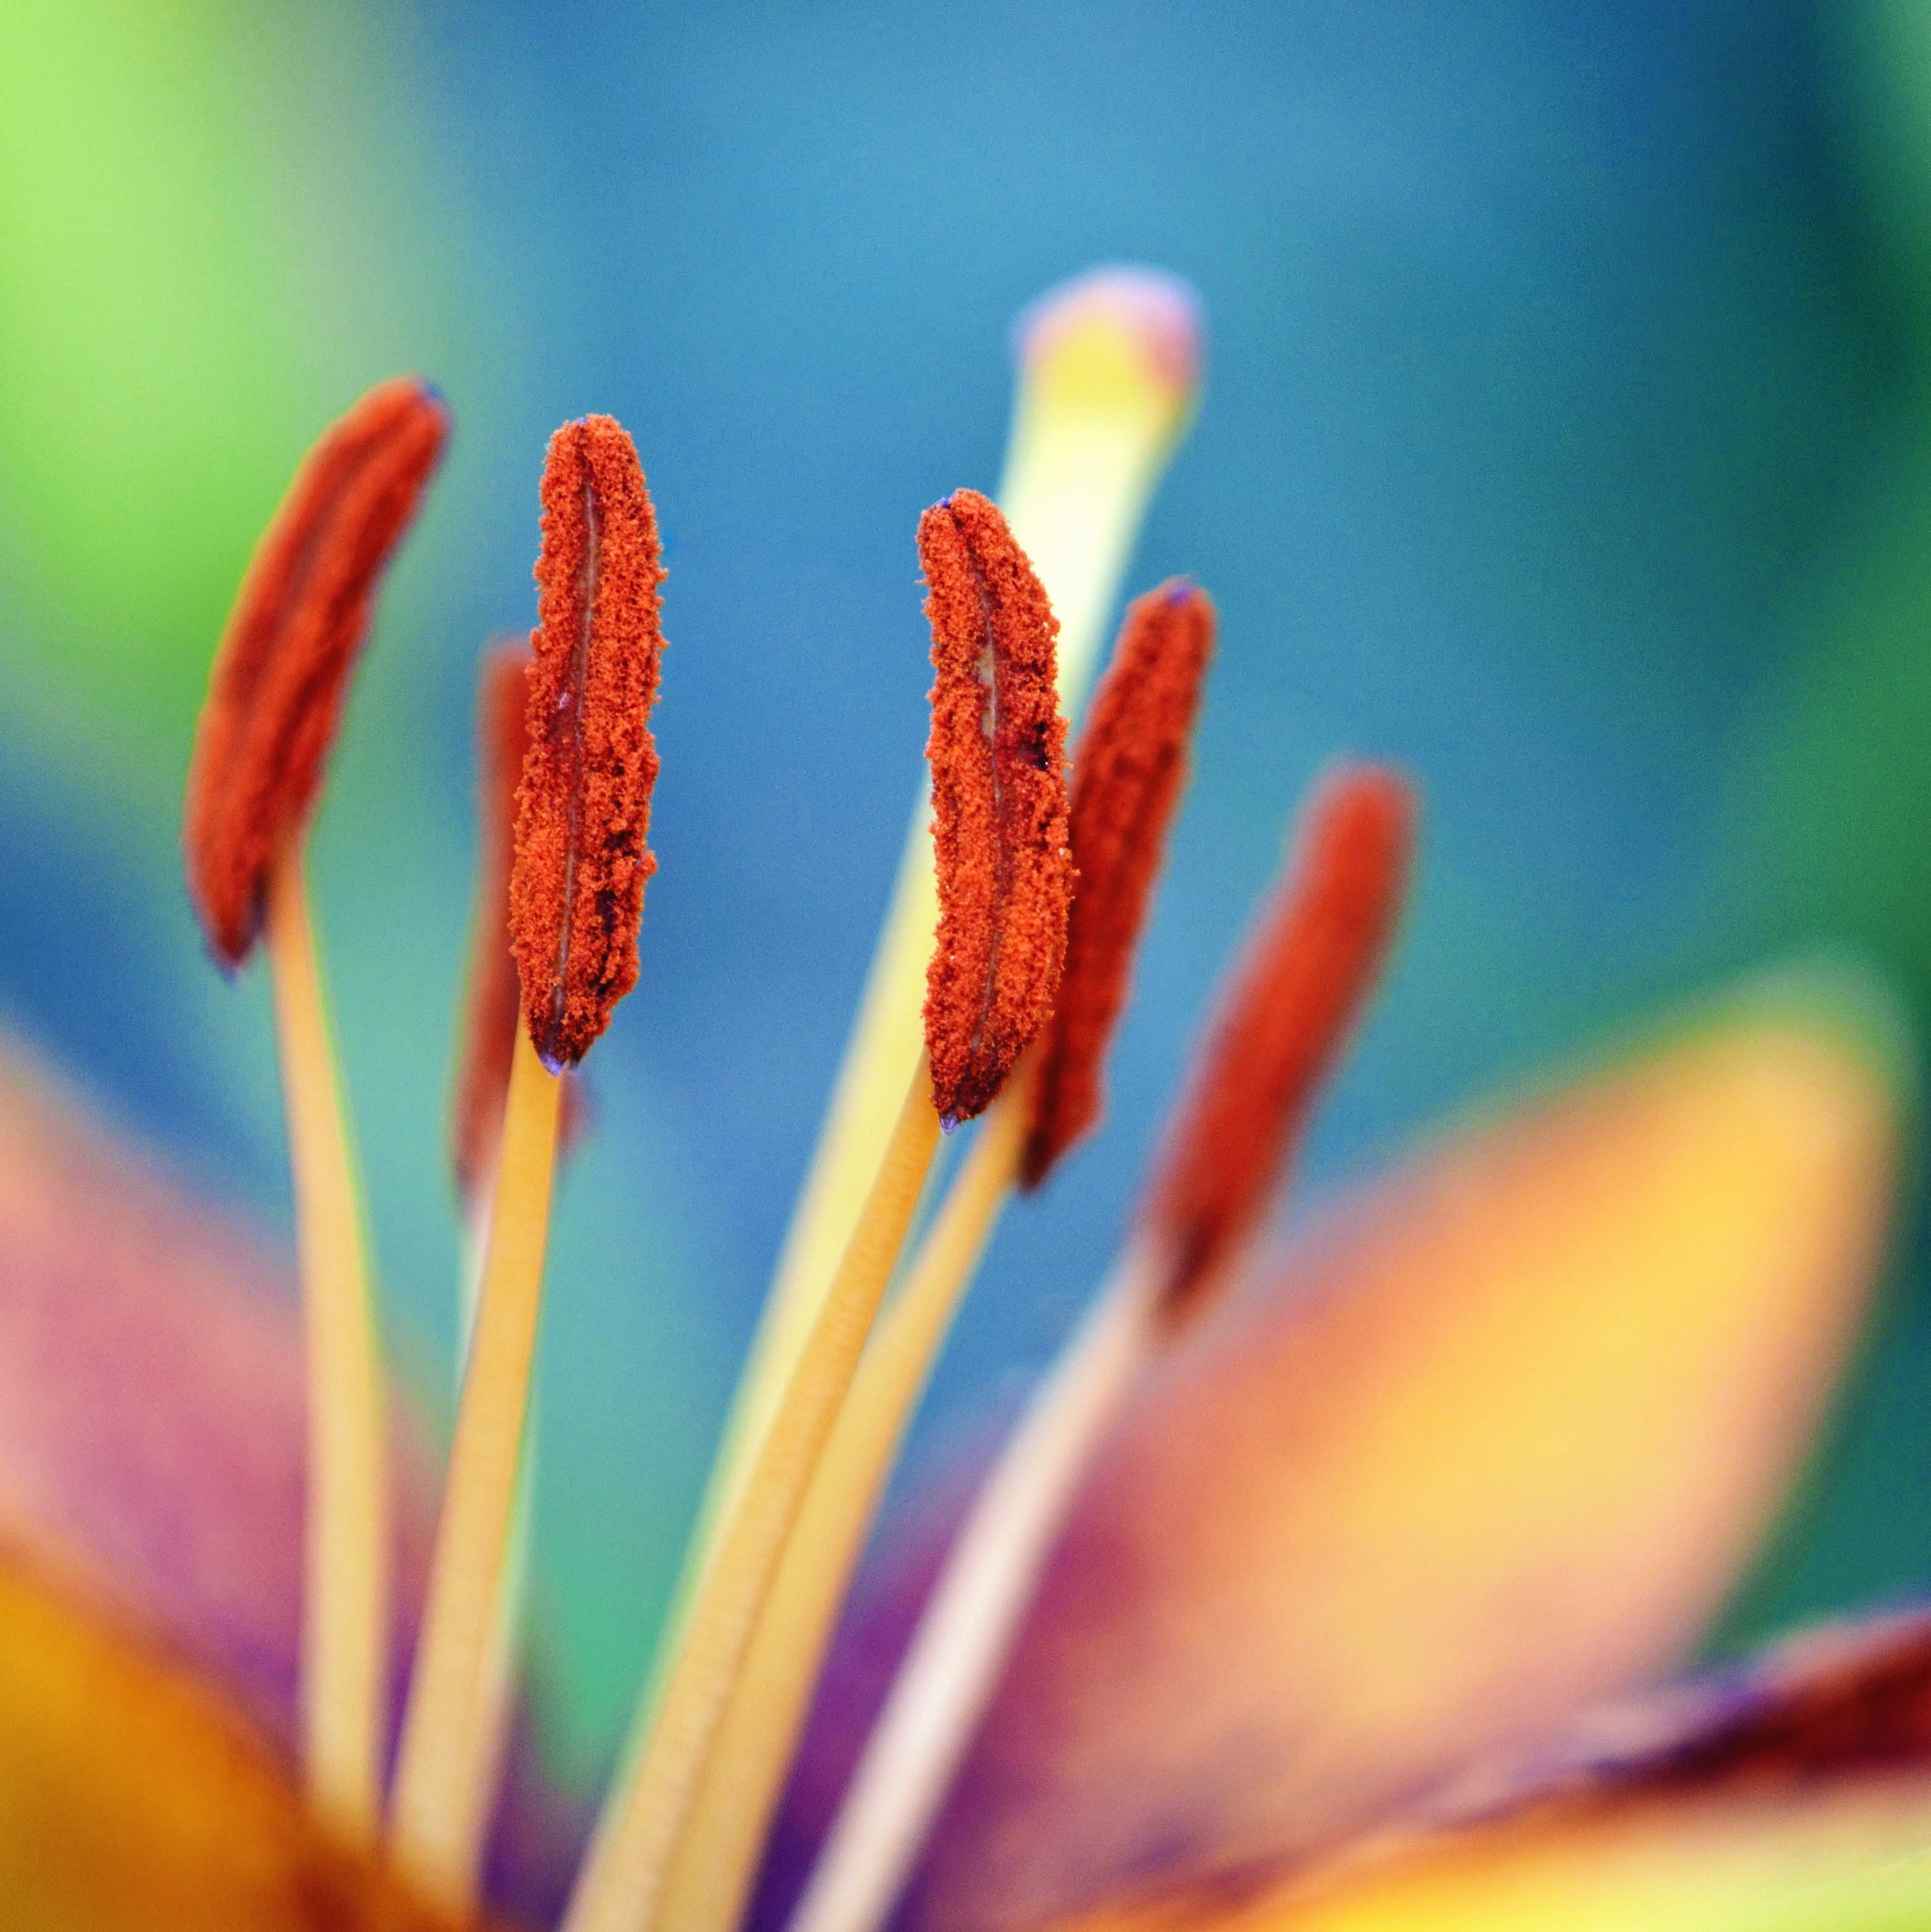
This week’s color, orange, appears on the six stamens of an Asiatic Lily ‘Tiny Sensation.’ The stamens are the male reproductive organs of flowers, consisting of anthers coated in pollen resting atop slim filaments. The female part of the flower, the pistil, can be seen rising blurrily in the back. Though not visible in the photo, the top part (the stigma) has three lobes and is sticky, to better catch the pollen.

Here is a better view of the pistil and its three-lobed stigma, surrounded by the six stamens. This photo is from a different lily, but luckily the pollen here is also orange, fitting in with this week’s theme.

Pollination occurs when bees, butterflies, and other pollinators carry the pollen from the lily’s anthers to the female parts of other lilies. Successful sexual reproduction leads to seeds that ripen in pods and are dispersed when the pods start to open in the fall. Unfortunately, I do not have any good photos of lily seed pods (though will now be on the lookout this fall), but did stumble upon iris seeds one autumn, as described here.

And of course, as lilies come from bulbs, another great way to get more lilies is via bulb division.

ROYGBIV: Red

30 Mar

In recent months, I’ve thought a lot about the color wheel and the classic rainbow of colors, most recently from having to organize my fabric weaving quarters and yards in some kind of logical way, but also from repainting our new house (after pondering split-complementary and tetradic color schemes until my eyes crossed).

At the same time, I also have a LOT of photos of colorful things that have caught my eye over the years, so I thought to start posting a weekly “ROYGBIV” photo, following the red-orange-yellow-green-blue-indigo-violet sequence. But I had to ask myself, what exactly is the difference between indigo and violet? Indigo and violet are both “purple,” but indigo is a very blue-purple and violet is a red-purple. It helps if you think of the colors on a wheel: violet eventually morphs into red, and most people can distinguish red-purple.

Indigo is far more controversial, thanks to Isaac Newton. He realized white light is actually made up of a spectrum of many colors, where each color blends into the neighboring color. He designated seven colors as being in the visible color spectrum; it was he who included indigo. There are many theories as to why he chose seven colors: Was he following the pattern of sevens (seven musical notes, seven days of the week, seven planets, etc.) or did he simply observe that seven colors had large-enough wavelengths to make the list? We may never know, but what is certain is that the human eye is notoriously insensitive to indigo; it is a hard color for most people to identify. Bearing that in mind, I’ll try to keep indigo in rotation for as long as I can determine it’s not actually blue….

This week, however, I will start off with the first color normally found in the sequence: Red.

Oxheart tomatoes (Cuore Di Bue), taken at the Testaccio Market in Rome, Italy

An Unexpected and (Re)Productive Study of the California Poppy

21 Mar

Sometimes, blown car tires lead to unexpected opportunities. While in California on our way to Monterey, our tire blew out on the freeway and very spectacularly separated itself from the rim. Our oldest son was driving and successfully steered the car to the side of the road, with the help of a kind truck driver, who stopped traffic in the right lane to let us over. While the spare tire was being put on, I noticed a cheery patch of poppies down a small hill, and headed there with my camera, whereupon I had an impromptu lesson in reproduction–of the floral kind.

The Golden State loves golden symbols, so it’s no surprise the California Poppy is the state flower. It’s a favorite of many gardeners, but also grows wild across California and elsewhere; masses of poppies make some Western mountains look as if they have been dusted with orange-yellow confetti. They also grow by the roadside, where I was lucky enough to get to study them for a little while. In that scraggly patch, there were poppies at all stages of development, from buds to full flowers, to seed pods.


The flower buds are encased in a calyx made up of two fused sepals; the papery cap slowly gets pushed off as the four overlapping poppy petals begin to unfurl.

  
Inside the cup-shaped flower itself are the stamens (pollen-tipped male reproductive organs) and the pistil (female organ), waiting for pollinators–usually bees, but also beetles and flies–to help ensure a new generation of Eschscholzia californica. This is the plant’s  very civilized (and somewhat passive) Plan A in terms of reproduction.


But, there’s a Plan B, too–and it’s a bit more lively. Once the poppy’s main flowering cycle comes to an end, the petals start dropping off, revealing an elongated seed pod (fruit) sitting on the disk-like torus. The pod gets longer and bigger, starts drying up in the sun, and finally bursts open, ejecting seeds as far as 6 feet away. This type of seed dispersal has a great name: explosive dehiscence.  Oh, how I wish I could have seen it in action.

  
So, what pollinators cannot achieve, the plant takes care of on its own, spreading its wealth just a bit further one seed pod at a time. Something to admire this April 6, which is California Poppy day.


Weekly Photo Challenge: Spring

3 May

When I think of Spring, I think of flowers and new life.  This Tulipa “Ballerina” is one the the earliest and cheeriest flowers in my garden, and a look inside the tulip reveals some essentials about plant reproduction.


This close-up focuses on the three-lobed stigma (the top-most section of the tulip’s female reproductive parts, known collectively as the pistil), which catches pollen via its sticky and fuzzy surface. The pollen then travels down the tube-like style to the ovary where  fertilization takes place (if the pollen came from a tulip plant), ultimately leading to the production of seeds. The six pollen-covered anthers (the top-most parts of the male reproductive organs, known collectively as the stamens) are blurred in the background; the stamens emanate from the base of the pistil.

Tulips are considered “perfect” flowers because they contain both male and female reproductive organs. They can self pollinate, but can also cross pollinate in the wild with the help of bees and other pollinators. Alas, most commercial tulips, including this one, are sterile hybrids. But the good thing is that tulips also reproduce via their bulbs, which allows gardeners to enjoy them anew each spring.

Flowers Above

27 Mar

Recently, when walking to and from work or through my garden or around my neighborhood, I have tended to keep my eyes at ground level, on the alert for early blooms and signs of spring. But this evening, in the magical hour before sunset, I looked up… and was immediately rewarded by the sight of emerging flowers on local trees, a glorious sight indeed–and a reminder that good things also come from above.


Red Maple flowers


Emerging Cornelian Cherry Dogwood flower cluster


Red Maple flower cluster, photographed on black table

What’s in a Name? Robin Redbreast

6 Feb

It’s February, which in the Northern hemisphere qualifies as being just about half way between Christmas and spring. So it’s appropriate to talk about robins right now. In some places, they are symbols of Christmas, and in others they are a sign of spring. Either way, the copper-chested birds are a cheery site to behold. Despite their burnt orange coloring, the birds were originally known as Robin Redbreasts–because 500 or so years ago in Europe, there was no name for the color orange. “Yellow-red” was as close as people got to describing that happy blend of the two primary colors. But when a certain citrus fruit became more widely eaten, the color found a new name: orange. The first recorded use of that word as a color was in 1512.

But back to robins. The color is named after the fruit, and the American Robin is named after the European one. Except that it is now clear they are not closely related. European robins are chats, while American Robins are members of the thrush family. One is smaller and rounder, while the other is longer and leaner looking. The only thing they share is  a spot of orange on the breast, and even then, one bird has a small copper patch high up while the other has a longer one most of the way down. And the rest of their markings are not very similar. But early Europeans encountering these birds in North America in the 17th and 18th centuries thought they looked like robins, and named them accordingly. 

blame these early settlers for the noteworthy bout of avian befuddlement I recently experienced. I repeatedly came across a very friendly little bird during the few days we were in Ireland at Christmas and took several photos of it, all the while wondering what it was and chiding myself for not knowing. It looked almost like a little sparrow, except for that orange coloring (and the beak… and probably a number of other things). What could that bird be? Imagine my chagrin when I discovered it was a robin–how is it possible to not recognize a robin when staring straight at one? I can only say that the robin I have always known is the American one, and I was unprepared to identify the European version. I offer up these photos as evidence: first a European Robin (Erithacus rubecula), then its American counterpart (Turdus migratorius).  And then I rest my case. (Not sure how much of a case it is, but I rest it anyway).

Recipe: Citrus-Spiced Braised Red Cabbage

24 Jan

I love cabbage, that most humble of vegetables. Humble it may be, but versatile, too–and good for you, especially the red kind. With its lovely jewel tones (from a type of pigment also found in flower petals and fruits), red cabbage adds a beautiful touch of color to any meal.

This braised red cabbage is tangy and slightly sweet, featuring fresh orange juice, red wine, and  balsamic vinegar, as well as cinnamon, cloves, and caraway seed. It is a very nice accompaniment to pork or sausages, or a Thanksgiving meal–and also adds bit of zing to sandwiches. And if you are like me, you may also find yourself eating it cold, just because.


Citrus-Spiced Braised Red Cabbage

2 tbsp. olive oil
1 lg. onion, cut in half through the ends, then sliced into thin strips
3 cloves garlic, minced
1/2 tsp. caraway seeds
1/2 tsp. ground cinnamon
1/8 tsp. ground cloves
2 lb. red cabbage, any bruised outer leaves removed, cored, and sliced into strips (about 10 c.)
ground black pepper
1 c. vegetable broth
juice of one orange
3 tbsp. red wine
2 tbsp. balsamic vinegar

Preparation
1. Heat a large, heavy-bottom pot over medium-high heat and add the oil. When hot, add the onions and cook until soft and translucent. Add the garlic and spices and cook for a few more minutes, stirring frequently.
2. Add the cabbage and mix well to coat with garlic and spices. Continue cooking until the cabbage has wilted, then sprinkle with black pepper to taste, and add the broth and orange juice. With the heat on medium high, cook the cabbage for about 15 minutes, or until the liquid has reduced by at least half.
3. Add the wine and vinegar, and cook another 15 minutes. There should be some liquid at the bottom of the pot–but the cabbage should not be soupy. Turn up the heat if needed to allow any excess liquid to evaporate.
4. Serve immediately with a slotted spoon.

Iris Seeds

28 Sep

Last weekend, I was ambling down a woody path at Brookside Gardens when I glanced to my left, and then glanced again. What I saw was a small patch of irises, blooms long gone, but with seed pods at the end of the stalks. And one of the pods had split open, revealing bright orange seeds.


Those of you who grow lots of irises may be very familiar with iris seeds, but I had never seen them before. After going home and doing a little research, I now know why: I only have two Japanese irises in my garden; one rarely flowers and the other produces just a couple blooms each year. So it isn’t surprising I haven’t seen any seed pods–my irises aren’t making it easy for bees to pollinate them, and there can’t be any seed pods without successful pollination.

There also can’t be any if each spent iris bloom is carefully removed, which is fairly common practice. Why would a gardener do this? To allow the plant to conserve all its energy for next year rather than spending some of it creating seed pods, which could lead to fewer future blooms on the parent plant. But those seeds could eventually lead to other blooms, and for me, part of the fun in gardening is encountering the occasional nice surprise.

So, assuming a miracle occurs and I do spot an iris seed pod in my garden one year, I would have two options (after letting the pod turn brown and split, harvesting the mature seeds, and drying them out):

  1. plant the seeds in the ground later in the fall (so they can chill throughout winter and so the rain and melting snow can help remove the seeds’ germination inhibitor), or
  2. soak the seeds in daily changes of water for up to two weeks (to get rid of the inhibitor), store them in a plastic bag in the refrigerator (with damp peat moss or potting mix to keep them moist), start them in pots in early spring, and then plant the seedlings. This moist/cold process is known as stratification.

All things considered, I’ll go straight for Option 1. Either way, it may be a year or two before the irises bloom since it takes a while for them to form mature rhizomes. The resulting irises may not look like the parent plant at all, and they may not be quite as fine specimens as other irises–or they might. I like a good mystery.

Bay Area 1: Berkeley–Town and Gown

22 Jul

I just spent a beautiful vacation week in Northern California, our former home of 6 years. During those years, diapers and baby bottles featured more prominently than flower beds and vegetable gardens, though I did manage to always have some lantana growing in a barrel in our courtyard–it looked just like this (I took many photos of lantana while on my trip for old time’s sake–I can’t grow it in Maryland):


I didn’t have much time for gardening in those days (I recall I foolishly signed up for a community garden plot while pregnant, spent days/weeks getting all the weeds out with two toddlers playing alongside me in the dirt, planted some vegetables, then had to hand the plot over to a neighbor when the baby came). The lantanas, which require no attention, were all I could manage.

But once the kids got bigger, my thumb got a bit greener–helped along by the lovely friends and neighbors who were so generous with advice during our time in Australia, which is a land of avid gardeners.  Armed with a perspective I did not have when we lived in Berkeley, I spent this visit looking at things with a new eye, admiring all the plants in bloom and taking full advantage of the wealth of botanic offerings on hand. In Berkeley alone there is the University of California Botanical Garden, the Botanic Garden at Tilden Park, and the Rose Garden. I made a pilgrimage to all those places, but found that there were beautiful things everywhere (yes, I did include a few non-botanical items….). Here are some highlights from Berkeley proper (to be followed later by highlights from the various gardens in Berkeley,  plus Sonoma Valley and Stanford/Palo Alto) :

A view of San Francisco Bay from Cesar Chavez Park,

a close up of the scroll work on Sather Gate on campus, as well as some Blue Salvia and
 

a Blue Potato Bush near Walden School in town, and

a copper Kangaroo Paw and a Redwood tree on campus.
 

Ode to a Flower That Could Have Been

11 Jul

It is a truth universally acknowledged, that a gardener in possession of flower beds and dogs must be in want of good sense. Or at least, must be prepared for disaster.

Earlier this year, we cleared a new flower bed in front of a section of our wooden fence. I carefully planted multiple gladiolus bulbs (my first foray into the fine art of growing gladioli), set up a small powder-coated steel garden fence in front of the bed to keep the dogs out, and sat back with eager anticipation. I watched the tiny shoots emerge and kept track as they grew, and was finally delighted to see the first spike beginning to bloom…

… and then I did two things that sealed the fate of that gladiolus and all its sisters. First, we built a patio, raising the level of earth (and patio) in front of the gladiolus bed. Meaning the distance from the ground to the top of the small steel garden fence protecting the gladioli was now shorter (just above knee height), with no way to compensate since the steel fence was set in lower ground. Second, I tidied up the garden after the patio was finished and attended to some long-neglected duties, including refilling the bird feeders for the first time in months. Within a day, the sounds of birds chirping filled the garden and I looked upon the scene with great satisfaction. And then the squirrels arrived.

Here is a photo from last year, which sums up the situation quite nicely:

If there is one thing that drives our dogs (Schnauzer 1 and Schnauzer 2) to utter distraction, it’s  s-q-u-i-r-r-e-l-s. Yes, our dogs recognize the word. In fact, they almost may be able to spell it by now, too. The gladiolus bed was (note use of past tense) in front of the wooden fence to the right of the bird feeder; squirrels hoping to get close to the feeder have to scramble across the top of that section of wooden fence. For our dogs, this is akin to waving a red cape in front of a mad bull. They go nuts. A day or so after I took the photo of the gladiolus, Schnauzer 1 (the smaller of the two dogs but the most zealous squirrel chaser) saw a squirrel dancing along the top of the wooden fence and immediately realized the new patio allowed her to clear the small steel garden fence quite easily, putting her within jaw-snapping distance of the squirrel. After an elegant leap landed her squarely on top of the gladiolus plants, she crashed through them, launching herself against the wooden fence in the hopes of shaking the squirrel off.

The gladioli survived this first game of rodent roulette, but just barely; they were all knocked over. So I propped them back up with stakes, set up a barricade of patio chairs in front of the flower bed, and yelled at the dogs. But instinct trumps all. Within another day, all the gladiolus plants were shredded; Schnauzer 1 went around, under, and over the chairs, or simply leapt the garden fence a bit further down the garden and trampled her way to the gladioli. Schnauzer 2 offered abundant vocal support. Here is a photo of the sorry scene–a couple of lilies were also leveled:


And here are the culprits, scanning the trees and fence lines for more enemy combatants. Wretched dogs…. I’m not quite ready to go the electric fence route, though each decimated plant moves me closer in that direction. So for now, it’s a choice between moving the bird feeder or filling it up only in the winter (which many people advocate anyway). I hope that with these additional precautions, I might actually see a gladiolus in bloom next year.