

We moved into a new house this past summer, and repainted every single wall in the house (because we are crazy that way). We spent a lot of time making sure the living areas felt just right. As usual, we left our bedroom for last. One thing it needed was some kind of art work on the wall above the bed, and after coming across a fabric weaving photo online, I knew that was what I wanted to do. Two problems: 1) My previous weaving experience was limited to making potholders as a child and 2) I don’t know how to use a sewing machine, which is useful for actually turning the weaves into a final product of some kind. (I can sew by hand, but that was definitely not something I wanted to attempt here.)
I tackled the first problem by finding out everything I could about weaving with fabric strips, and by practicing a lot. I avoided the second problem by deciding on a non-sewing solution for the bedroom project, though I know it’s only a matter of time before I’m going to have to learn how to use a sewing machine. This post is not about the weaving I finally did for the bedroom wall, but about the practice runs leading up to it and what a novice like me learned along the way–in case anyone can benefit from my mistakes.
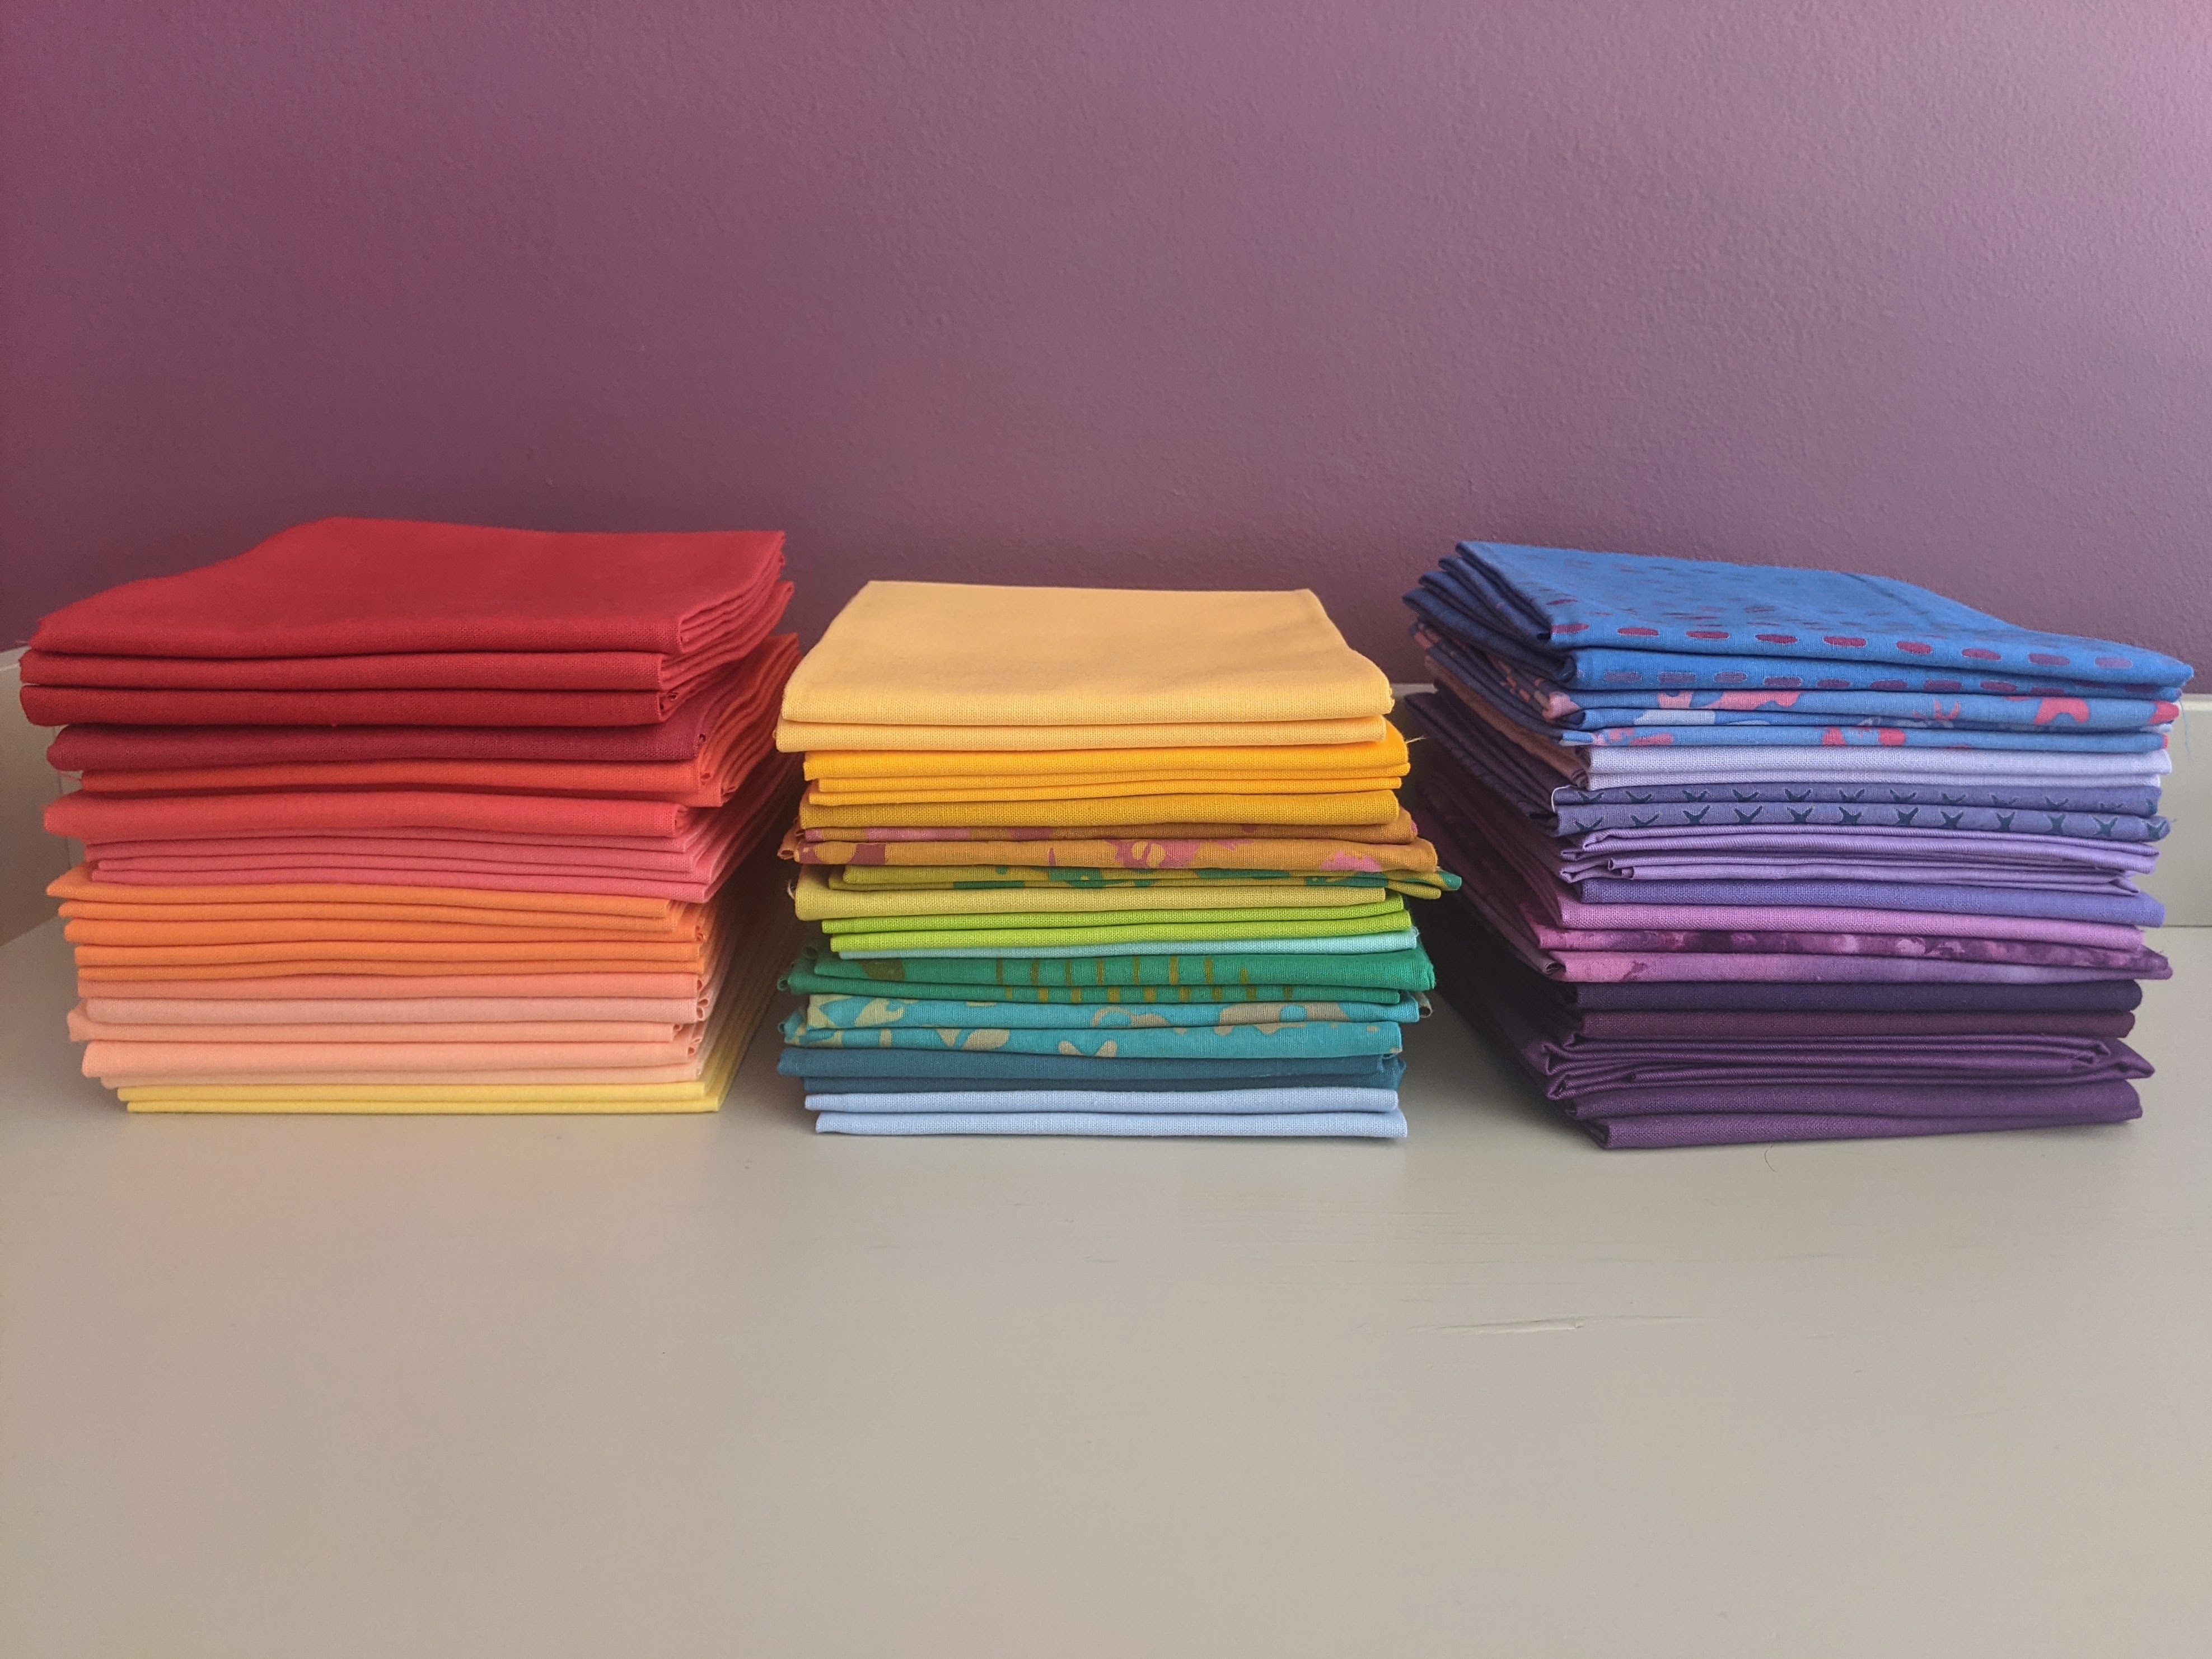
Fabric basics: I knew fabric came in yards, but that was it. (As I mentioned, I had a lot to learn….) Now I know that a bolt of fabric is usually 44″ wide, though width can sometimes vary a tiny bit. So a yard of fabric is usually 36″ x 44″. A half yard is 18″ x 44″ and a fat quarter is 18″ x 22″. I started out by buying inexpensive fat-quarter bundles online, to use for practice:
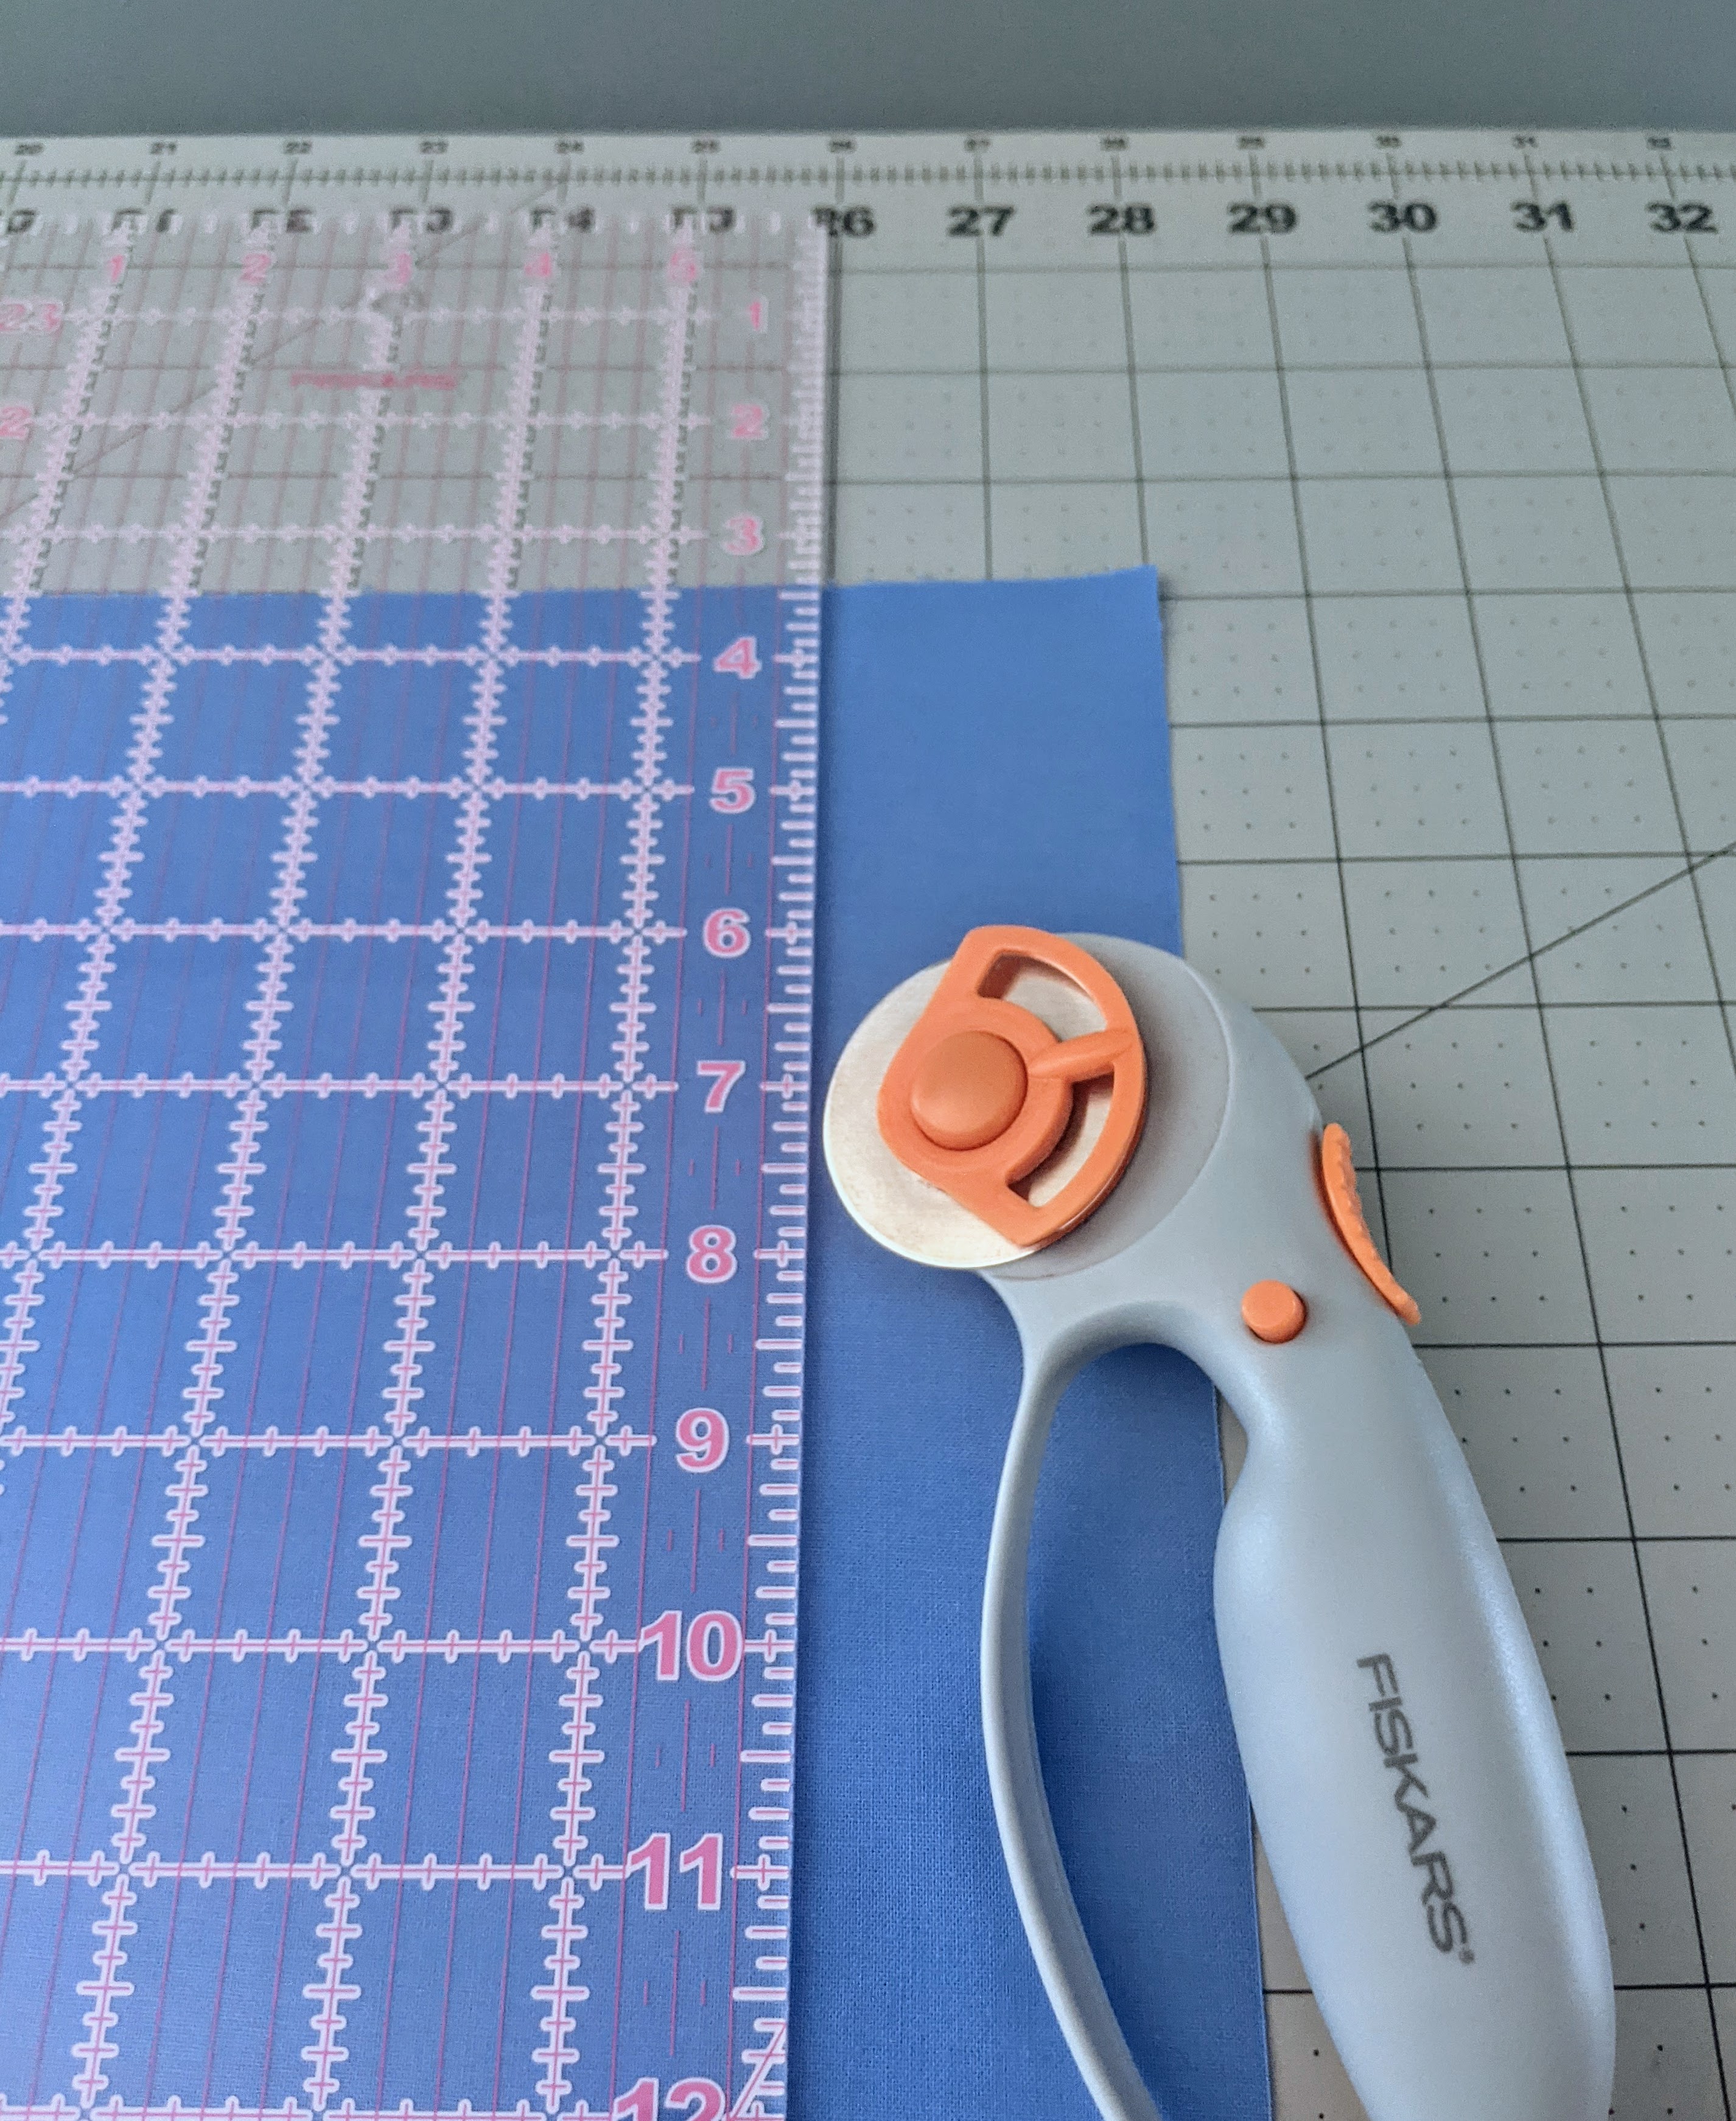
Cutting the fabric: This may sound self evident, but to weave with fabric strips you need to make the fabric strips–and cutting the fabric is only the first step. I decided to weave with 1″ strips, meaning I needed to cut fabric pieces double that width. A fat quarter will yield 11 (2″wide x 18″ long) pieces. I cut the fabric on a drafting table (though any good-sized work space will do) topped with a self-healing rotary cutting mat, using a rotary cutter. I lined up the fabric on the mat and used a 6″ x 24″ inch clear ruler as a guide/edger for the rotary cutter, moving leftward across the fabric since I’m right-handed:
Fabric strips: The second step is to actually make the strips (aka tape). For 1″ strips, you need to fold a 2″ piece of fabric in half by bringing the two long halves together, and run it through a sasher tool/tape maker while ironing the strips to keep them neat and flat. The first photo below shows (l-r) a final 1″ ironed strip, the fabric in the sasher tool, and some original 2″ pieces of fabric. The second photo shows the ironing process, though note–as this was one of the first times I made a strip, I ran the cloth through the sasher tool with the tool upside down. It’s much easier to maneuver when the curved part of the tool faces upward, so don’t repeat my mistake!


Preparing your work surface: Normally, you will be working on a foam board (though I didn’t use one when doing the project for my bedroom wall; more on that later). Select a foam board larger than you expect your final project to be, and place a layer of fusible interfacing on the board, tackier/stickier side up. (You will bond your weave to the interfacing with an iron after you are done with your project, to help keep it all in place, then you will tape the edges for extra reinforcement.)
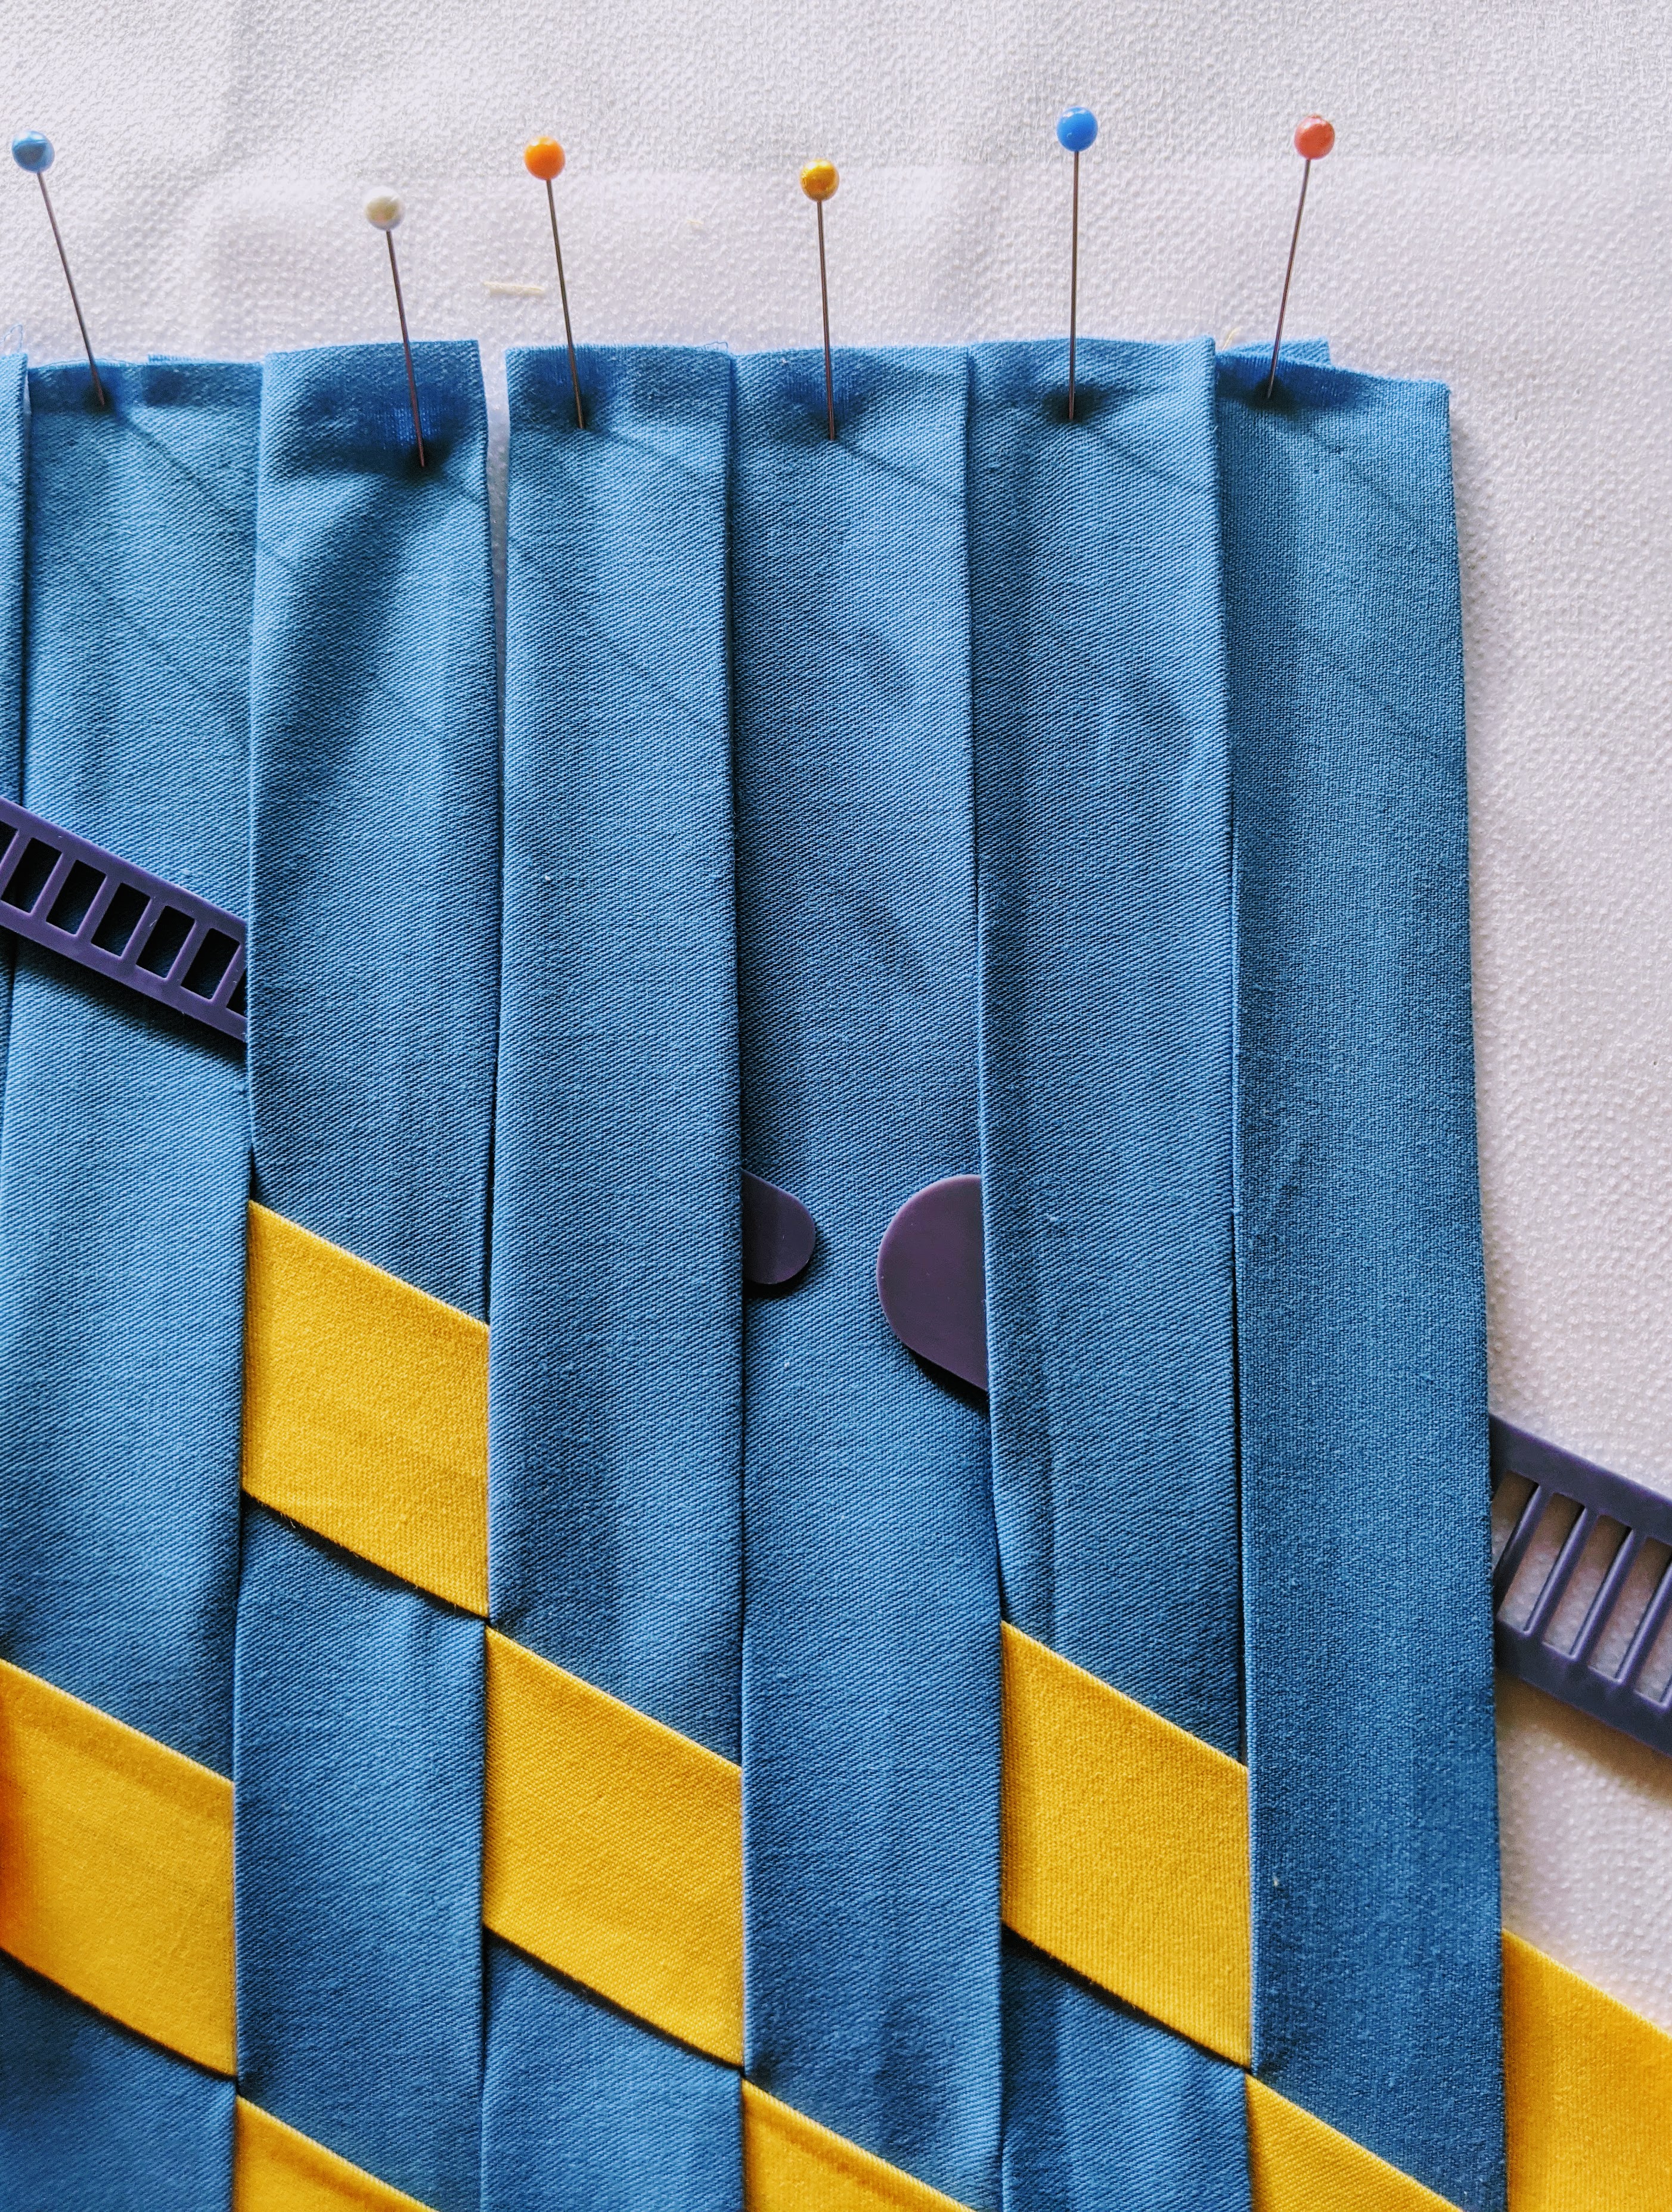
Patterns: There are MANY different ways to weave. I chose three colors (orange, blue, yellow) of inexpensive fat-quarter fabric and decided to try all sorts of patterns with those. But instead of trying the easiest pattern first, I went straight for a triaxial/tumbling block weave, because why not? (There are reasons why not, but I ignored them. I should have remembered that this pattern is also fittingly called a “madweave.”) A triaxial weave has three layers: A first set of strips that are pinned vertically onto the foam board/interfacing (see the blue strips below), a second layer of strips going diagonally upward to the left at a 30-degree angle (see yellow strips below), and a third layer of strips going diagonally upward to the right at a 30-degree angle, moving over and under the previous two layers. For this type of weave especially, a WEFTY tool is essential (I use it for all my weaves; it makes everything much easier). I used a 1″ WEFTY (the larger of the two purple ones below) for the actual weaving, and a smaller one to help lift the strips. [Note: You can see the fusible interfacing below the blue strips; everything rests atop a foam board, too.]
Issues to Consider When Doing a Triaxial Weave:
Dimensions of final project: Because I did not think it through properly (or at all), I started out assuming that if I used strips that were 18″ long, I’d end up with a final project that was 18″ x 18″. Incorrect when it comes to a triaxial design. I forgot basic geometry: the hypotenuse is always longer than the sides. Meaning if my longest diagonal strip was 18″ (which is the length I had cut all my strips), then the width of my finished project could not also be 18″ or my diagonal strips would not be long enough to reach the sides. In fact, the ideal width was closer to 14″, as I learned when I started over with 14 vertical strips in the first layer, instead of 18. To avoid this problem again, I turned to math: Multiply the length of your strips by .78 to see how wide you can go for your first layer (for example, 18″ long x .78 = 14.04″ wide = 14 strips that are 1″ each). If you are using 22″ strips, your project can be about 17″ wide (22″ x .78 = 17.16).
Measuring a 30-degree angle: When starting the second layer of a triaxial weave, make sure you know how to measure a 30-degree angle. I thought I did, but I didn’t. The first time I tried, I placed the clear acrylic ruler vertically on my foam board (ie, perpendicular to the bottom edge), found the 30-degree angle and began weaving. The resulting pattern looked pretty cool, but not like any other triaxial weaves I’d seen. Turns out, by placing my ruler vertically, I’d ended up with a 60-degree angle. So I learned the hard way to measure the angle with my ruler placed HORIZONTALLY along the bottom edge of my board (ie, parallel to the bottom edge).
Where to start the second layer: For the second layer, start in the middle of one side (I like to start this layer on the right side, going upward toward the left at a 30-degree angle; see yellow strips below). Follow this pattern:
- Strip 1: Over one, under two, over one, under two….
- Strip 2: Under one, over one, then under two, over one, under two, over one….
- Strip 3: Under two, over one, under two, over one….
- Repeat.
Note: As a reminder to myself, when I finish weaving each “Strip 1”, I pin it to the right side of the board with a BLACK pin, to make for easy identification/counting. You could also use white or any color that stands out. I go up the board from the first strip I pinned in the middle in a 1, 2, 3, 1, 2, 3 pattern, and down the board from that middle strip in a 1, 3, 2, 1, 3, 2, 1 pattern. The red arrow below shows my first Strip 1; I wove above and below it afterward.

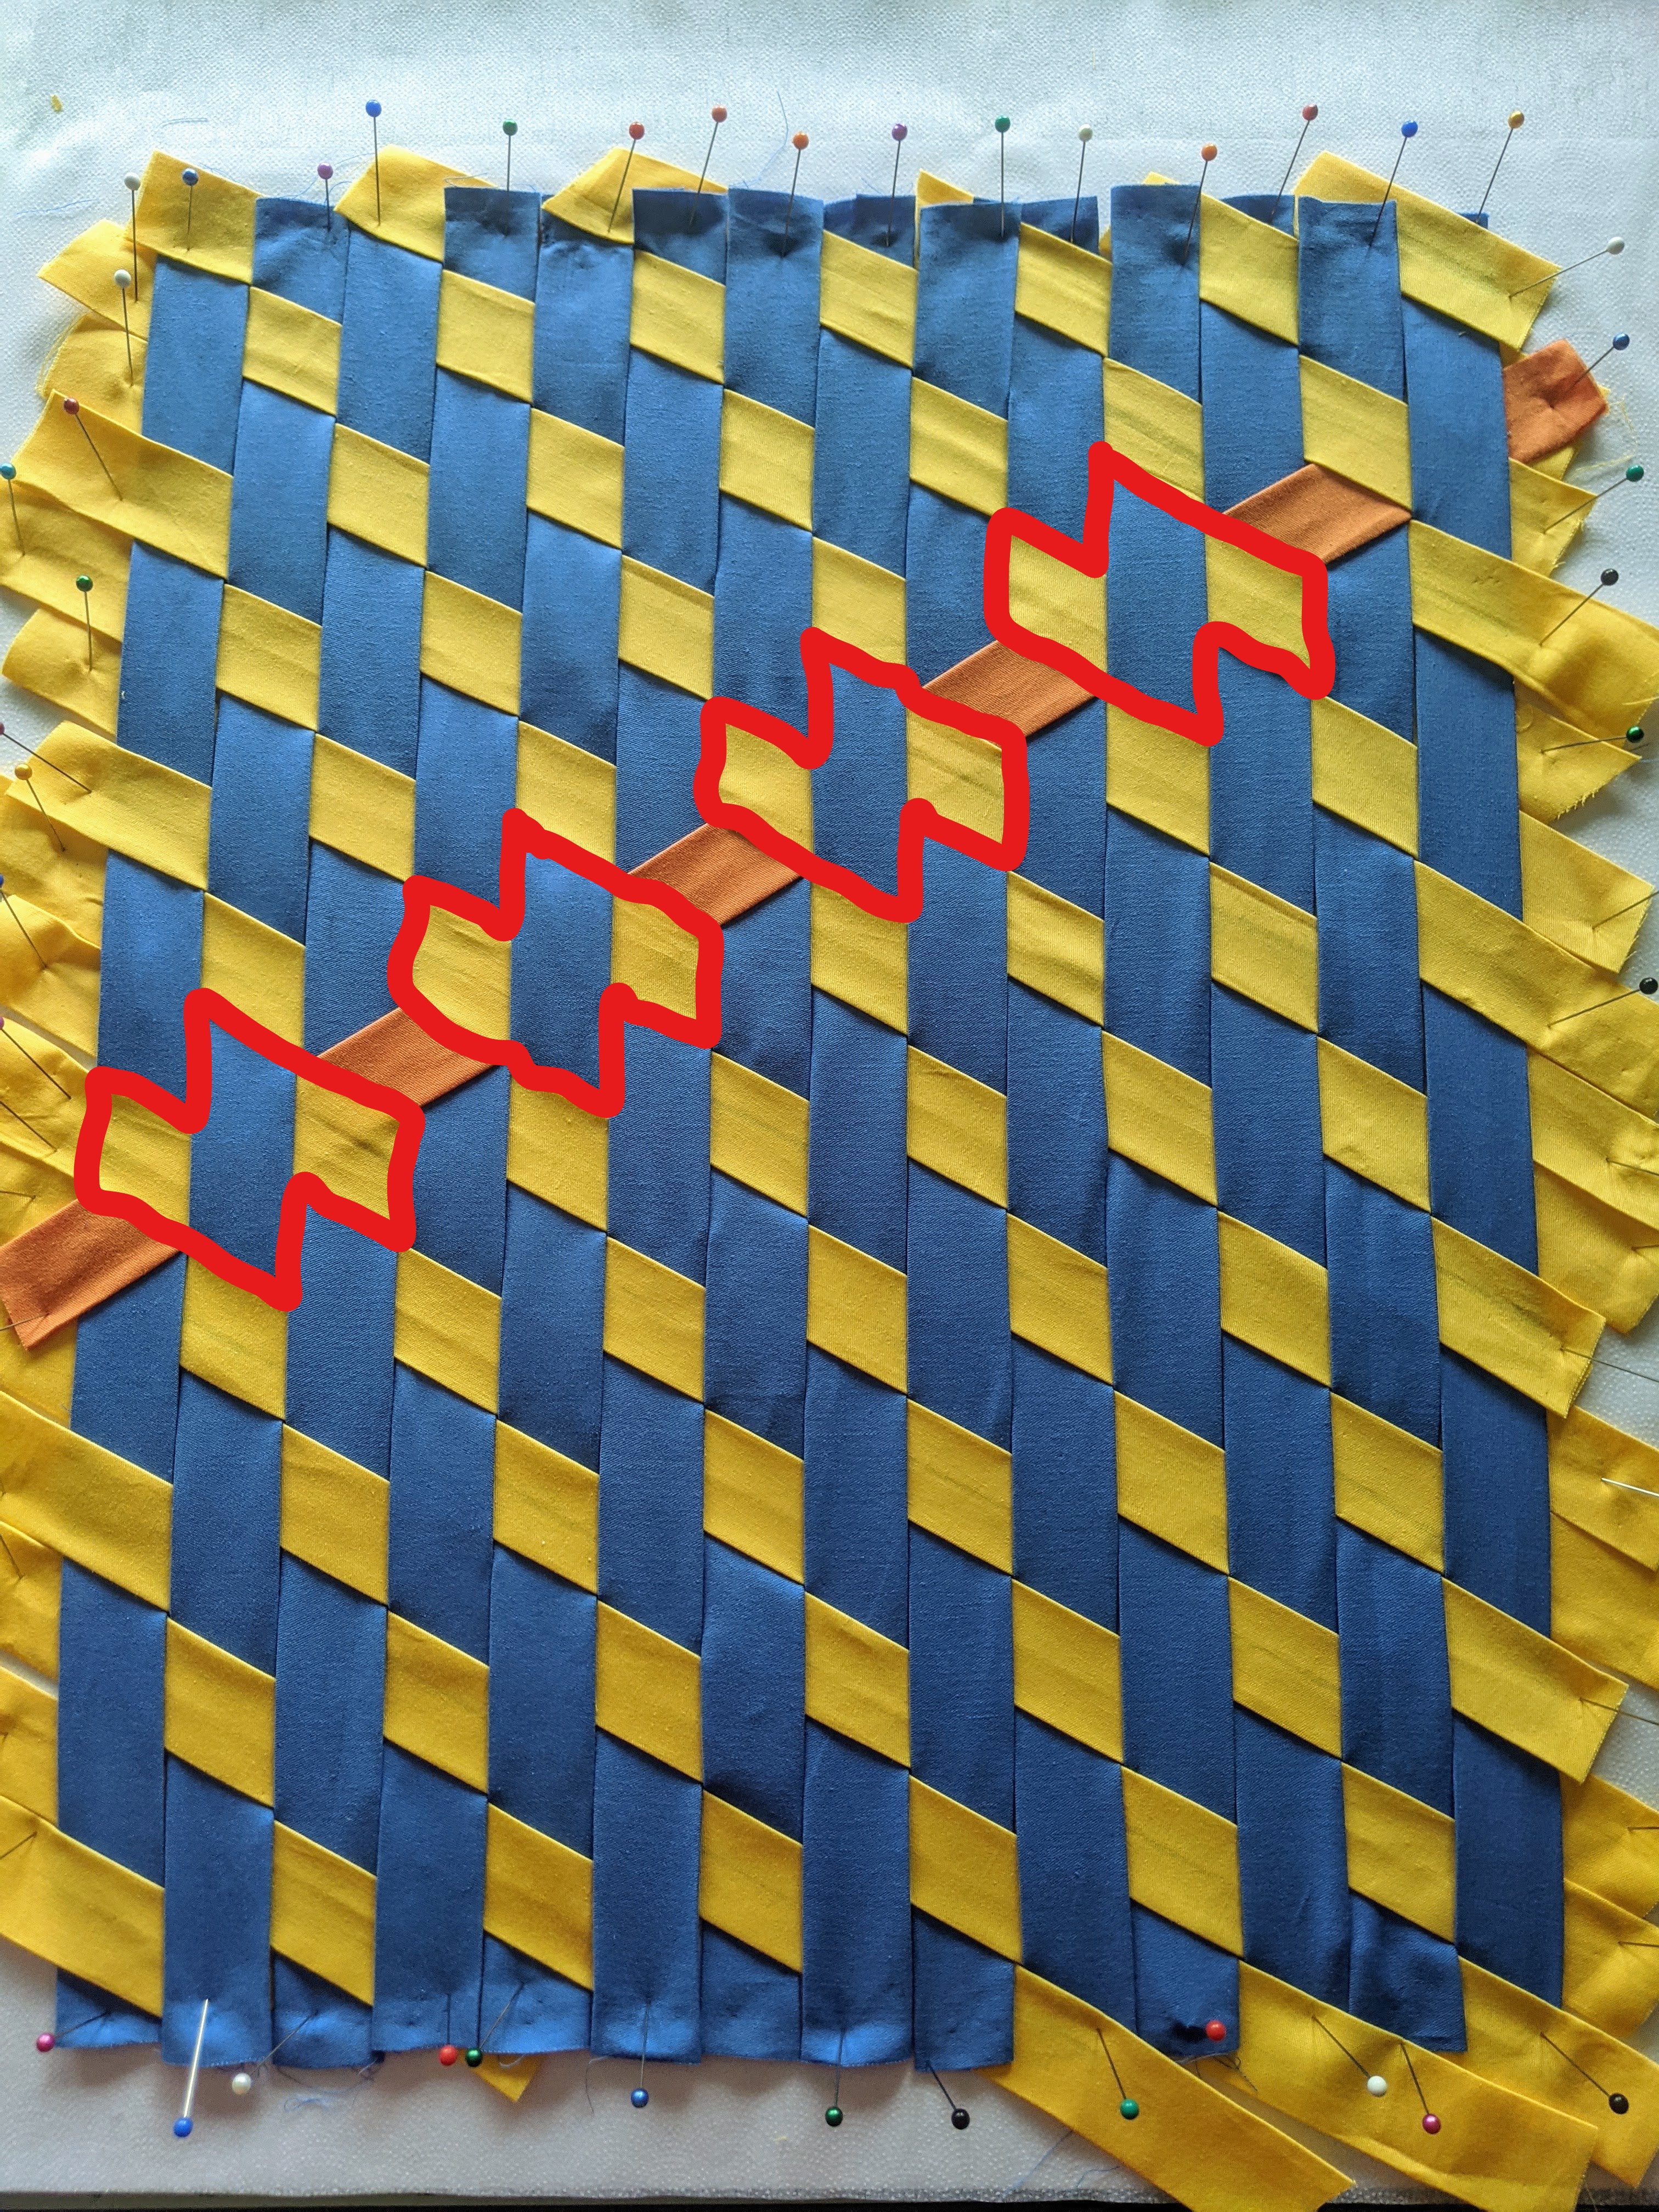
Where to start the third layer: For the third layer, start in middle of the other side (I start this layer on the left side, going up toward the right at a 30-degree angle; see orange strip below). You need to find a guide to know what parts of the first two layers to weave under. Some people look for a bird, others for a backwards “Z,” weaving under the wings and body of each “bird” or the horizontal parts of the “Z” (see red outlines in the photo below; those “birds” or backwards “Zs” are what you will need to weave under in the third layer). Going under the first wing and the body of the “bird” is easy; maneuvering the Wefty tool under the second wing but over another underlying strip of fabric below that wing is more tricky and requires some lifting and checking to make sure you’re getting it through the right way. This is when the second, smaller WEFTY tool helps; you can use it to lift the fabric and guide the main WEFT tool through (you can also use a tool called That Purple Thang for the same purpose). Once you get a sense of how to do it, this layer is actually very straightforward; you weave each strip exactly the same way, no Strip 1, Strip 2, etc. It’s also a fun layer to weave because you’ll start seeing the tumbling block pattern emerge after you’ve woven a few strips.
For my practice projects, I would finish one pattern, then undo it or switch it up a bit, and start another. Here are a few of the practice patterns I tried before moving on to more colors and more complex fabrics:


Here is my first actual triaxial weave, one that was not a practice one. It is fused to the interfacing below, with edges taped off, ready to be turned into something ( as soon as I learn to use the sewing machine and sew the edges properly). Note: There are 14 vertical rows in the first layer (the black strips), which allowed me to weave diagonally with 18″ strips at the longest points across the middle. By the time you get close to the corners of the weave, you can cut off the overhanging parts of strips from previous rows and reuse those cut-offs for the shortest sections. (This will make sense after you’ve tried the triaxial weave for the first time.)

I hope some of this info helps. I learned a lot from the resources listed below, but some things I only picked up by trial and error. I’m sure I have many more errors to discover, but perhaps these preliminary observations will make it easier for you as you get started.
Overview of supplies you will need:
- Fabric (I used 100% cotton quilting fabric)
- Clear ruler (a 6″ x 24″ is a good one to start with)
- Rotary cutter and extra blades
- Self-healing cutting mat
- Iron
- Sasher tool
- WEFTY tool(s), That Purple Thang tool
- Foam boards
- Fusible interfacing
- Pins
- Fabric tape (you can even use something like painter’s tape, which is what I used above; anything that you can peel off of the fabric easily)
Great resources I used when learning how to weave:
- Tumbling Blocks Madweave Tutorial (video by WEFTY/Tara Curtis, inventor of the WEFTY tool. She has other videos, as well)
- The Fundamentals of Fabric Weaving (6-part video series by Mister Domestic)
- Fabric Weaving Tutorial (video by Crafty Gemini)
- Tumbling Block Bias Tape Weaving (blog by The House that Lars Built)
- Fabric Weaving Mini Quilt (blog by Crafty Staci)
- Houndstooth Fabric Weaving (video by Mr. Domestic)
More of my posts on fabric weaving:

 on the sides; front-facing wall of opus mixtum (bands of brick and tufa), with lateral 'toothing' and a structural arch; plus rough-hewn travertine column--Portico of Claudius, Portus (c. 50 AD)")
")
 with lateral 'toothing' and putlog holes at the top--Trajan's warehouse, Portus (c. 100 AD)")
")
, Trajan's warehouse, Portus (c. 100 AD)")


Stunning.
LikeLike
Thank you!
LikeLike
Yay, you’re back!
LikeLike
Thanks Leah. It was about time, and it seemed the right time, too.
LikeLike
Gwendy these are awesome!!!! Incredible work. I love it!!! I am interested in what these might eventually be sewn into. I think they are terrific as wall art, just as they are. Especially the triaxial one. Just sensational.
I had never thought about it, but am now tempted to get into weaving. Might not be for me though. I already think quilting is too finicky and this looks many degrees more exacting than quilting is. But on the other hand… they are stunning! And from quilting I have most of the supplies.
I have three vintage sewing machines — which is really two more than I need! I wish we lived closer (and there wasn’t a pandemic) so I could give you one and a quick lesson on how to use it. I am sure you’ll have a lot of fun once you start sewing with these beautiful pieces. I think sewing machines are easy once you get the hang of threading them.
Love this work and hope to see more of these projects in future!!
LikeLike
Thanks Julia. I would love to see your sewing machines and get a lesson from you. That would be so much fun! One day, hopefully not too long from now, it will be possible.
LikeLike
Gee, that triaxial one is magic. It reminds me of Escher!
LikeLike
I like that aspect as well!
LikeLike
Iâll be honest, when I saw this pattern, this was all I could think ofâ¦.
[cid:image001.png@01D71436.59C7E120]
LikeLike
It’s the birthplace of a quilt. 😁🌹
LikeLike
Thank you so much for sharing this wonderful technique! I’m at my second piece now and i’ve used elastics on all four sides to hold the strips when you have to remove a pin to weave through. You might like that trick. Thanks again for explaining it all so well.
LikeLike
Thank you for your comment; that’s a great idea to use elastics! Wishing you all the best with your weaving projects.
LikeLike